If someone you love read these books, pass this on.
My 4th grade white teacher in a rez border town read the entire series to us every day post lunch. They live in a total fantasy in South Dakota. Much like most of settler...
{
    "type": "entry",
    "published": "2020-12-28T20:27:07+00:00",
    "url": "https://twitter.com/karabaic/status/1343654735211991040",
    "quotation-of": "https://twitter.com/KimTallBear/status/1343547601082347521",
    "content": {
        "text": "If someone you love read these books, pass this on."
    },
    "author": {
        "type": "card",
        "name": "jk",
        "url": "https://twitter.com/karabaic",
        "photo": "https://pbs.twimg.com/profile_images/1256785873384861696/QfRzUvne.jpg"
    },
    "post-type": "note",
    "refs": {
        "https://twitter.com/KimTallBear/status/1343547601082347521": {
            "type": "entry",
            "published": "2020-12-28T13:21:24+00:00",
            "url": "https://twitter.com/KimTallBear/status/1343547601082347521",
            "content": {
                "text": "My 4th grade white teacher in a rez border town read the entire series to us every day post lunch. They live in a total fantasy in South Dakota. Much like most of settler North America.\npbs.org/wnet/americanm\u2026 via @PBSAmerMasters",
                "html": "My 4th grade white teacher in a rez border town read the entire series to us every day post lunch. They live in a total fantasy in South Dakota. Much like most of settler North America.\n<a href=\"https://www.pbs.org/wnet/americanmasters/in-promoting-the-myth-of-white-self-sufficiency-the-little-house-books-rewrite-history/16545/\">pbs.org/wnet/americanm\u2026</a> via <a href=\"https://twitter.com/PBSAmerMasters\">@PBSAmerMasters</a>"
            },
            "author": {
                "type": "card",
                "name": "Kim TallBear",
                "url": "https://twitter.com/KimTallBear",
                "photo": "https://pbs.twimg.com/profile_images/1311148010517135360/me3retGb.jpg"
            },
            "post-type": "note"
        }
    },
    "_id": "17350865",
    "_source": "2773"
}
One of the absolute highlights of 2020 was the return of @letsmakeamusic. It's like Punch Up The Jam crossed with the chaos of Weird Twitter. If you're looking for some good pure podcast goofs, check it out.
Let's Make a Music is BACK!
We turn YOUR song title suggestions into actual, legitimate, full-fledged songs. And they're always certified bangers.
You can listen HERE:
...
{
    "type": "entry",
    "published": "2020-12-28T20:10:03+00:00",
    "url": "https://twitter.com/andymcmillan/status/1343650439766556674",
    "quotation-of": "https://twitter.com/LetsMakeAMusic/status/1308934433953767428",
    "content": {
        "text": "One of the absolute highlights of 2020 was the return of @letsmakeamusic. It's like Punch Up The Jam crossed with the chaos of Weird Twitter. If you're looking for some good pure podcast goofs, check it out.",
        "html": "One of the absolute highlights of 2020 was the return of <a href=\"https://twitter.com/LetsMakeAMusic\">@letsmakeamusic</a>. It's like Punch Up The Jam crossed with the chaos of Weird Twitter. If you're looking for some good pure podcast goofs, check it out."
    },
    "author": {
        "type": "card",
        "name": "Andy McMillan",
        "url": "https://twitter.com/andymcmillan",
        "photo": "https://pbs.twimg.com/profile_images/1151993418232369153/9ShXZFLh.jpg"
    },
    "post-type": "note",
    "refs": {
        "https://twitter.com/LetsMakeAMusic/status/1308934433953767428": {
            "type": "entry",
            "published": "2020-09-24T01:01:02+00:00",
            "url": "https://twitter.com/LetsMakeAMusic/status/1308934433953767428",
            "video": [
                "https://video.twimg.com/ext_tw_video/1308934164427800577/pu/vid/720x720/XIW2kM7fvN-UJkYD.mp4?tag=10"
            ],
            "content": {
                "text": "Let's Make a Music is BACK!\n\nWe turn YOUR song title suggestions into actual, legitimate, full-fledged songs. And they're always certified bangers.\n\nYou can listen HERE:\nApple: tinyurl.com/lmam-apple\nGoogle: tinyurl.com/lmam-google\nStitcher: tinyurl.com/lmam-stitcher",
                "html": "Let's Make a Music is BACK!\n\nWe turn YOUR song title suggestions into actual, legitimate, full-fledged songs. And they're always certified bangers.\n\nYou can listen HERE:\nApple: <a href=\"https://tinyurl.com/lmam-apple\">tinyurl.com/lmam-apple</a>\nGoogle: <a href=\"https://tinyurl.com/lmam-google\">tinyurl.com/lmam-google</a>\nStitcher: <a href=\"https://tinyurl.com/lmam-stitcher\">tinyurl.com/lmam-stitcher</a>"
            },
            "author": {
                "type": "card",
                "name": "Let's Make a Music",
                "url": "https://twitter.com/LetsMakeAMusic",
                "photo": "https://pbs.twimg.com/profile_images/1307790843995131905/lXdvOgQL.jpg"
            },
            "post-type": "video"
        }
    },
    "_id": "17350677",
    "_source": "2773"
}
{
"type": "entry",
"author": {
"name": "Cathie",
"url": "https://cathieleblanc.com/",
"photo": null
},
"url": "https://cathieleblanc.com/2020/12/28/thinking-about-educational-cooperatives/",
"published": "2020-12-28T11:28:26-05:00",
"content": {
"html": "<p>One of the many biographies of women artists that I listened to on my daily walks this year was <a href=\"https://wwnorton.com/books/Dorothea-Lange/\"><em>Dorothea Lange: A Life Beyond Limits</em></a> by Linda Gordon. Lange was a complicated, talented photographer committed to social justice. There were a couple of things about the book that annoyed me but mostly I loved it and was sad when it ended with her death from esophageal cancer at the age of 70. It seems like she wasn\u2019t done contributing to the world.</p>\n<p>I have always admired the work of the FSA photographers, Lange among them. Her photo, Migrant Mother (below), is one of the most iconic images of the 1930s Depression. I love the idea of the US government paying artists of various types to document life in the US, especially during a time like the Depression.</p>\n<img src=\"https://i1.wp.com/cathieleblanc.com/wp-content/uploads/MigrantMother.jpg?resize=513%2C640&ssl=1\" alt=\"\" /><p><em>Migrant Mother</em> by Dorothea Lange: <a href=\"https://www.loc.gov/resource/cph.3c07705/\">https://www.loc.gov/resource/cph.3c07705/</a></p>\n<p>One of the things I was struck by was the description of life in the migrant camps that Lange visited. In particular, I was intrigued by the informal educational cooperatives that Gordon briefly mentions in the biography. The inhabitants of the camps would teach each other various topics (like how to do sheet rock and other skilled construction tasks) in these informal co-ops. I love this idea. As a side note, there doesn\u2019t appear to be a whole lot of information about the informal educational co-ops set up during this time although there are some studies of the co-op economies created during the Depression. I think a study focused on educational co-ops set up informally outside of a university setting during this time would make for interesting reading.</p>\n<p>On another (related\u2013I promise) note, I just completed a <a href=\"https://cathieleblanc.com/2020/12/27/raspberry-pi-christmas-project/\">Raspberry Pi project</a>. The Raspberry Pi computer was <a href=\"https://en.wikipedia.org/wiki/Raspberry_Pi\">originally</a> developed as a platform for learning about computing fundamentals. It proved to be such a useful tool that people now use it for all kinds of projects. I chose it both because it would work for my project and because I would have fun learning and trying out new things with it. Because many of the bells and whistles of modern computers are stripped away, the Raspberry Pi is a great platform for understanding how modern computers work. For example, I understand what protocols are and how they are used, but setting up the SMB protocol on the Raspberry Pi and then connecting to it from other devices helped me to understand things that I didn\u2019t even know I didn\u2019t understand. This new level of understanding makes me feel more in control of my digital life which is powerful. This made me think about cooperative education where members of the community teach each other the things they know. I think it would be cool to set up a technology-focused educational cooperative. In many ways, this is what appeals to me about the <a href=\"https://indieweb.org/\">IndieWeb</a> movement. The Homebrew Website Clubs and IndieWebCamps are educational cooperatives where people talk about web-based projects that interest and excite them and teach each other how to do the cool things they know about.</p>\n<p>Although it wasn\u2019t exactly a cooperative, one of the most rewarding service activities I have ever engaged in was that I taught online digital concepts and skills to senior citizens at the Meredith Senior Center for about 5 years. I would teach the same class for 6-8 weeks over and over. We would talk about email and Facebook and cameras. Depending on the group, I might need to talk about how to turn a computer on, how to use a mouse, what a desktop is, what wifi is and how to set up and connect to a wifi network, the difference between wifi and 3G,, etc. I geared each version of the class to the members of the current audience. They would ask questions about buying new computers, signing into different accounts, etc. I had several women who took the class over and over for a couple of years. The Senior Center had laptops for everyone to access but sometimes people would bring their own. It was fun and challenging. I imagine something like this but a more permanent community so that there isn\u2019t just one teacher. The Senior Center classes were for beginners. The tech cooperative would include people of all skill and knowledge levels. And as people learn things, they would teach those things to others.</p>\n<p>We are doing some of this kind of work with the faculty learning communities that we have been running for the last several years. The newest community, the <a href=\"https://cathieleblanc.com/2020/12/06/data-analytics-and-the-science-of-learning/\">Data Analytics Learning Community</a>, will begin with a week-long workshop in January. funded by a grant from the <a href=\"https://nebigdatahub.org/\">Northeast Big Data Hub</a>. I am excited about this new initiative but need to spend some time thinking about the fact that nearly everyone who applied for a stipend already has some experience with data analytics. I was hoping there would be more people interested who were beginners in the area. I\u2019ll need to think about communicating that a technology cooperative is welcoming to people of all skill and knowledge levels. Part of that will involve communicating the democratizing power of taking control of one\u2019s digital life.</p>\n<p>Anyway, all of these things are on my mind as I begin to contemplate the end of my academic career. I\u2019m not ready for retirement yet but some health issues this year definitely have me thinking about what the next stage of my life will look like. I like the tech coop idea because it involves social contact with other people, talking to people about technology, learning new things about technology, and staying up to date with technological innovations. Those are all things that will keep me young!</p>",
"text": "One of the many biographies of women artists that I listened to on my daily walks this year was Dorothea Lange: A Life Beyond Limits by Linda Gordon. Lange was a complicated, talented photographer committed to social justice. There were a couple of things about the book that annoyed me but mostly I loved it and was sad when it ended with her death from esophageal cancer at the age of 70. It seems like she wasn\u2019t done contributing to the world.\nI have always admired the work of the FSA photographers, Lange among them. Her photo, Migrant Mother (below), is one of the most iconic images of the 1930s Depression. I love the idea of the US government paying artists of various types to document life in the US, especially during a time like the Depression.\nMigrant Mother by Dorothea Lange: https://www.loc.gov/resource/cph.3c07705/\nOne of the things I was struck by was the description of life in the migrant camps that Lange visited. In particular, I was intrigued by the informal educational cooperatives that Gordon briefly mentions in the biography. The inhabitants of the camps would teach each other various topics (like how to do sheet rock and other skilled construction tasks) in these informal co-ops. I love this idea. As a side note, there doesn\u2019t appear to be a whole lot of information about the informal educational co-ops set up during this time although there are some studies of the co-op economies created during the Depression. I think a study focused on educational co-ops set up informally outside of a university setting during this time would make for interesting reading.\nOn another (related\u2013I promise) note, I just completed a Raspberry Pi project. The Raspberry Pi computer was originally developed as a platform for learning about computing fundamentals. It proved to be such a useful tool that people now use it for all kinds of projects. I chose it both because it would work for my project and because I would have fun learning and trying out new things with it. Because many of the bells and whistles of modern computers are stripped away, the Raspberry Pi is a great platform for understanding how modern computers work. For example, I understand what protocols are and how they are used, but setting up the SMB protocol on the Raspberry Pi and then connecting to it from other devices helped me to understand things that I didn\u2019t even know I didn\u2019t understand. This new level of understanding makes me feel more in control of my digital life which is powerful. This made me think about cooperative education where members of the community teach each other the things they know. I think it would be cool to set up a technology-focused educational cooperative. In many ways, this is what appeals to me about the IndieWeb movement. The Homebrew Website Clubs and IndieWebCamps are educational cooperatives where people talk about web-based projects that interest and excite them and teach each other how to do the cool things they know about.\nAlthough it wasn\u2019t exactly a cooperative, one of the most rewarding service activities I have ever engaged in was that I taught online digital concepts and skills to senior citizens at the Meredith Senior Center for about 5 years. I would teach the same class for 6-8 weeks over and over. We would talk about email and Facebook and cameras. Depending on the group, I might need to talk about how to turn a computer on, how to use a mouse, what a desktop is, what wifi is and how to set up and connect to a wifi network, the difference between wifi and 3G,, etc. I geared each version of the class to the members of the current audience. They would ask questions about buying new computers, signing into different accounts, etc. I had several women who took the class over and over for a couple of years. The Senior Center had laptops for everyone to access but sometimes people would bring their own. It was fun and challenging. I imagine something like this but a more permanent community so that there isn\u2019t just one teacher. The Senior Center classes were for beginners. The tech cooperative would include people of all skill and knowledge levels. And as people learn things, they would teach those things to others.\nWe are doing some of this kind of work with the faculty learning communities that we have been running for the last several years. The newest community, the Data Analytics Learning Community, will begin with a week-long workshop in January. funded by a grant from the Northeast Big Data Hub. I am excited about this new initiative but need to spend some time thinking about the fact that nearly everyone who applied for a stipend already has some experience with data analytics. I was hoping there would be more people interested who were beginners in the area. I\u2019ll need to think about communicating that a technology cooperative is welcoming to people of all skill and knowledge levels. Part of that will involve communicating the democratizing power of taking control of one\u2019s digital life.\nAnyway, all of these things are on my mind as I begin to contemplate the end of my academic career. I\u2019m not ready for retirement yet but some health issues this year definitely have me thinking about what the next stage of my life will look like. I like the tech coop idea because it involves social contact with other people, talking to people about technology, learning new things about technology, and staying up to date with technological innovations. Those are all things that will keep me young!"
},
"name": "Thinking about Educational Cooperatives",
"post-type": "article",
"_id": "17350608",
"_source": "2782"
}
Still thinking about the ppl who went to 3 SoulCycle classes a day 🥺🥺
"The bigger SoulCycle got, the less desirable it became. The less desirable it became, the less people had tolerance for the culture it fostered."
@alex_abads on how Sou...
{
    "type": "entry",
    "published": "2020-12-28T19:35:19+00:00",
    "url": "https://twitter.com/ZoeSchiffer/status/1343641700946698240",
    "quotation-of": "https://twitter.com/voxdotcom/status/1341833018093264898",
    "content": {
        "text": "Still thinking about the ppl who went to 3 SoulCycle classes a day \ud83e\udd7a\ud83e\udd7a"
    },
    "author": {
        "type": "card",
        "name": "Zo\u00eb Schiffer",
        "url": "https://twitter.com/ZoeSchiffer",
        "photo": "https://pbs.twimg.com/profile_images/1339414834350182401/Cbwg03OA.jpg"
    },
    "post-type": "note",
    "refs": {
        "https://twitter.com/voxdotcom/status/1341833018093264898": {
            "type": "entry",
            "published": "2020-12-23T19:48:16+00:00",
            "url": "https://twitter.com/voxdotcom/status/1341833018093264898",
            "content": {
                "text": "\"The bigger SoulCycle got, the less desirable it became. The less desirable it became, the less people had tolerance for the culture it fostered.\"\n\n@alex_abads on how SoulCycle lost its soul: trib.al/kTwCapS",
                "html": "\"The bigger SoulCycle got, the less desirable it became. The less desirable it became, the less people had tolerance for the culture it fostered.\"\n\n<a href=\"https://twitter.com/alex_abads\">@alex_abads</a> on how SoulCycle lost its soul: <a href=\"http://trib.al/kTwCapS\">trib.al/kTwCapS</a>"
            },
            "author": {
                "type": "card",
                "name": "Vox",
                "url": "https://twitter.com/voxdotcom",
                "photo": "https://pbs.twimg.com/profile_images/807306191395241984/s8xmWAvU.jpg"
            },
            "post-type": "note"
        }
    },
    "_id": "17350035",
    "_source": "2773"
}
StaffPad is an award-winning music notation app, designed for Apple pen and touch, and built for composers.
This is the coolest iPad app ever. My guitar teacher showed me @staffpad yesterday and I was blown away. Magic. staffpad.net
{
    "type": "entry",
    "published": "2020-12-28T19:25:21+00:00",
    "url": "https://twitter.com/scott_gruber/status/1343639192882966528",
    "content": {
        "text": "StaffPad is an award-winning music notation app, designed for Apple pen and touch, and built for composers. \n\nThis is the coolest iPad app ever. My guitar teacher showed me @staffpad yesterday and I was blown away. Magic. staffpad.net",
        "html": "StaffPad is an award-winning music notation app, designed for Apple pen and touch, and built for composers. \n\nThis is the coolest iPad app ever. My guitar teacher showed me <a href=\"https://twitter.com/StaffPad\">@staffpad</a> yesterday and I was blown away. Magic. <a href=\"https://www.staffpad.net/\">staffpad.net</a>"
    },
    "author": {
        "type": "card",
        "name": "Scott Gruber",
        "url": "https://twitter.com/scott_gruber",
        "photo": "https://pbs.twimg.com/profile_images/1340653730526445568/sfMRNA6p.jpg"
    },
    "post-type": "note",
    "_id": "17349807",
    "_source": "2773"
}
The OMD forums has had over 2.5 million pageviews this year. The podcast had over 500,000 downloads this year. Not bad.
Figuring out how to build ad rev without sacrificing user/listener experience is my 2021 hurdle. <3
{
"type": "entry",
"published": "2020-12-28T19:09:38+00:00",
"url": "https://twitter.com/anomalily/status/1343635238065344513",
"content": {
"text": "The OMD forums has had over 2.5 million pageviews this year. The podcast had over 500,000 downloads this year. Not bad.\n\nFiguring out how to build ad rev without sacrificing user/listener experience is my 2021 hurdle. <3",
"html": "The OMD forums has had over 2.5 million pageviews this year. The podcast had over 500,000 downloads this year. Not bad.\n\nFiguring out how to build ad rev without sacrificing user/listener experience is my 2021 hurdle. <3"
},
"author": {
"type": "card",
"name": "Lillian Karabaic \ud83e\udd44\ud83c\udff3\ufe0f\u200d\ud83c\udf08 BLM",
"url": "https://twitter.com/anomalily",
"photo": "https://pbs.twimg.com/profile_images/1123802400731664385/dsHQG1nZ.jpg"
},
"post-type": "note",
"_id": "17349623",
"_source": "2773"
}
Controversial Opinion:
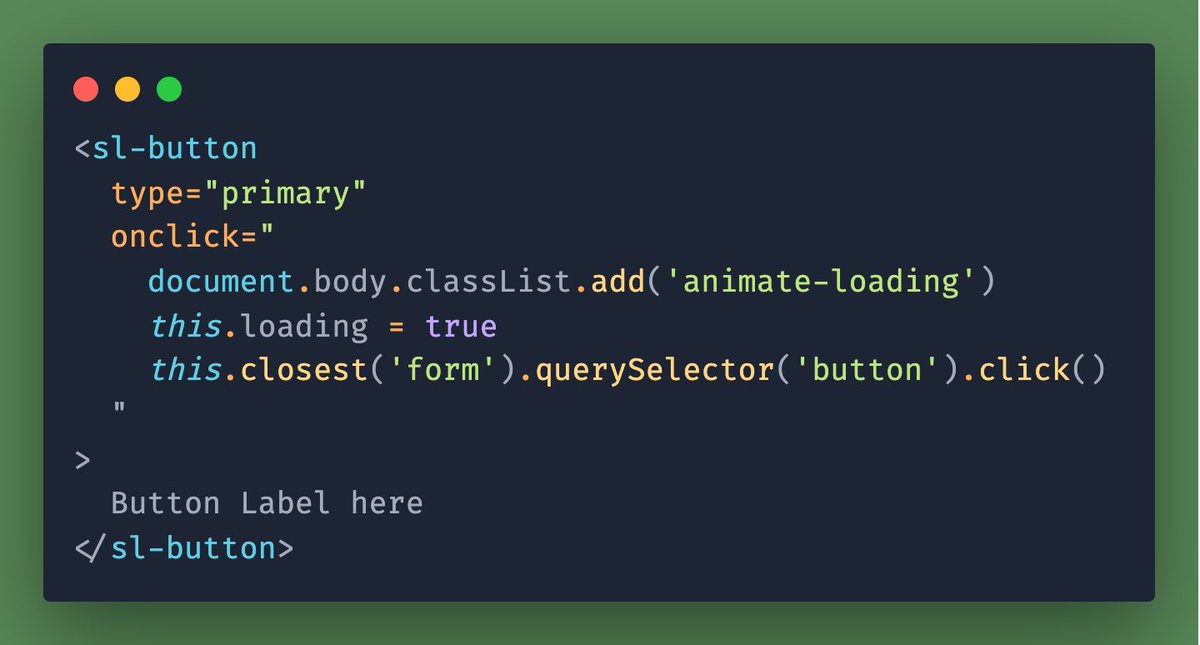
The popularity of JSX and utility CSS/JS (aka Tailwind, Alpine, etc.) as well as baseline functionality in evergreen browsers throws the old “never use inline style= or onclick= in HTML” adage out the window.
Ergo I personally see nothing wrong with this:
{
    "type": "entry",
    "published": "2020-12-28T19:02:07+00:00",
    "url": "https://twitter.com/jaredcwhite/status/1343633343200423936",
    "photo": [
        "https://pbs.twimg.com/media/EqWLZ4YUYAAyfcx.jpg"
    ],
    "content": {
        "text": "Controversial Opinion:\n\nThe popularity of JSX and utility CSS/JS (aka Tailwind, Alpine, etc.) as well as baseline functionality in evergreen browsers throws the old \u201cnever use inline style= or onclick= in HTML\u201d adage out the window.\n\nErgo I personally see nothing wrong with this:"
    },
    "author": {
        "type": "card",
        "name": "Jared White",
        "url": "https://twitter.com/jaredcwhite",
        "photo": "https://pbs.twimg.com/profile_images/1342524575876218881/buD8P1lX.jpg"
    },
    "post-type": "photo",
    "_id": "17349492",
    "_source": "2773"
}
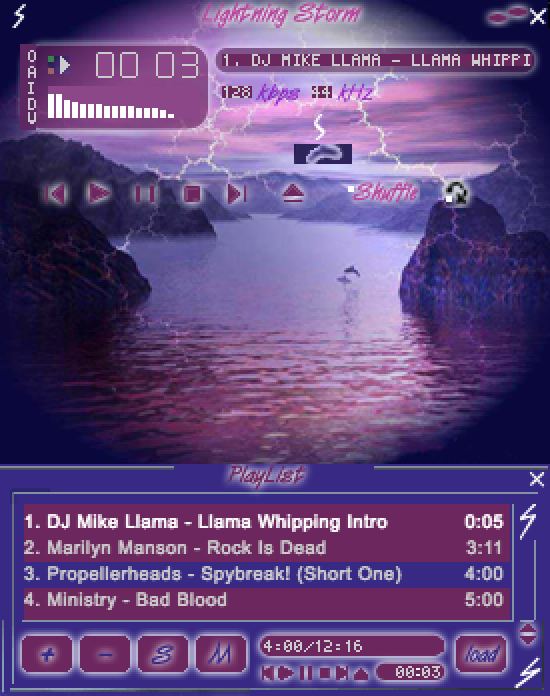
I have seen a LOT of winamp skins via this bot and I love that this one simply makes the EQ "invisible". I tested it in WebAmp and the EQ works, you just can't see it, which makes a lot of sense if you never ever fiddle with the EQ. Why not just have a nice picture there instead.
Lightning_Storm.wsz
skins.webamp.org/skin/5103b9ca9…
{
    "type": "entry",
    "published": "2020-12-28T18:03:39+00:00",
    "url": "https://twitter.com/tinysubversions/status/1343618632660574209",
    "quotation-of": "https://twitter.com/winampskins/status/1343617752980807688",
    "content": {
        "text": "I have seen a LOT of winamp skins via this bot and I love that this one simply makes the EQ \"invisible\". I tested it in WebAmp and the EQ works, you just can't see it, which makes a lot of sense if you never ever fiddle with the EQ. Why not just have a nice picture there instead."
    },
    "author": {
        "type": "card",
        "name": "Darius Kazemi",
        "url": "https://twitter.com/tinysubversions",
        "photo": "https://pbs.twimg.com/profile_images/1204800150939435008/Qk7oX7db.jpg"
    },
    "post-type": "note",
    "refs": {
        "https://twitter.com/winampskins/status/1343617752980807688": {
            "type": "entry",
            "published": "2020-12-28T18:00:10+00:00",
            "url": "https://twitter.com/winampskins/status/1343617752980807688",
            "photo": [
                "https://pbs.twimg.com/media/EqV9OYoVgAAfJ35.png"
            ],
            "content": {
                "text": "Lightning_Storm.wsz\n\nskins.webamp.org/skin/5103b9ca9\u2026",
                "html": "Lightning_Storm.wsz\n\n<a href=\"https://skins.webamp.org/skin/5103b9ca95390078b952500bf84d12f8\">skins.webamp.org/skin/5103b9ca9\u2026</a>"
            },
            "author": {
                "type": "card",
                "name": "Winamp \u26a1\ufe0f Skin Bot",
                "url": "https://twitter.com/winampskins",
                "photo": "https://pbs.twimg.com/profile_images/932051512456445952/KR1pa43v.jpg"
            },
            "post-type": "photo"
        }
    },
    "_id": "17348504",
    "_source": "2773"
}
Usually I do an annual budget post - but my budget for 2021 pretty much can only be calculated through August Due to ~~uncertainty~~ - is posting an 8 month budget even useful?
{
    "type": "entry",
    "published": "2020-12-28T16:42:34+00:00",
    "url": "https://twitter.com/anomalily/status/1343598227354873864",
    "content": {
        "text": "Usually I do an annual budget post - but my budget for 2021 pretty much can only be calculated through August Due to ~~uncertainty~~ - is posting an 8 month budget even useful?"
    },
    "author": {
        "type": "card",
        "name": "Lillian Karabaic \ud83e\udd44\ud83c\udff3\ufe0f\u200d\ud83c\udf08 BLM",
        "url": "https://twitter.com/anomalily",
        "photo": "https://pbs.twimg.com/profile_images/1123802400731664385/dsHQG1nZ.jpg"
    },
    "post-type": "note",
    "_id": "17347055",
    "_source": "2773"
}
Rain, lightning bolts and thunderclaps: scottgruber.me/2020/12/28/rai…
{
    "type": "entry",
    "published": "2020-12-28T16:28:54+00:00",
    "url": "https://twitter.com/scott_gruber/status/1343594785303633920",
    "content": {
        "text": "Rain, lightning bolts and thunderclaps: scottgruber.me/2020/12/28/rai\u2026",
        "html": "Rain, lightning bolts and thunderclaps: <a href=\"https://scottgruber.me/2020/12/28/rain-lightning-bolts-and-thunderclaps\">scottgruber.me/2020/12/28/rai\u2026</a>"
    },
    "author": {
        "type": "card",
        "name": "Scott Gruber",
        "url": "https://twitter.com/scott_gruber",
        "photo": "https://pbs.twimg.com/profile_images/1340653730526445568/sfMRNA6p.jpg"
    },
    "post-type": "note",
    "_id": "17346847",
    "_source": "2773"
}
Some UX patters I've just always hated building. A "load more" button to display additional posts at the bottom of a feed being one of them.
After much fiddling (lack of docs), I got it working in #rails with #hotwire Turbo Streams! The final solution is remarkably elegant! 👏
{
    "type": "entry",
    "published": "2020-12-28T16:26:56+00:00",
    "url": "https://twitter.com/jaredcwhite/status/1343594290388160514",
    "content": {
        "text": "Some UX patters I've just always hated building. A \"load more\" button to display additional posts at the bottom of a feed being one of them.\n\nAfter much fiddling (lack of docs), I got it working in #rails with #hotwire Turbo Streams! The final solution is remarkably elegant! \ud83d\udc4f",
        "html": "Some UX patters I've just always hated building. A \"load more\" button to display additional posts at the bottom of a feed being one of them.\n\nAfter much fiddling (lack of docs), I got it working in <a href=\"https://twitter.com/search?q=%23rails\">#rails</a> with <a href=\"https://twitter.com/search?q=%23hotwire\">#hotwire</a> Turbo Streams! The final solution is remarkably elegant! \ud83d\udc4f"
    },
    "author": {
        "type": "card",
        "name": "Jared White",
        "url": "https://twitter.com/jaredcwhite",
        "photo": "https://pbs.twimg.com/profile_images/1342524575876218881/buD8P1lX.jpg"
    },
    "post-type": "note",
    "_id": "17346746",
    "_source": "2773"
}
{
    "type": "entry",
    "published": "2020-12-28T11:15:24-05:00",
    "url": "https://david.shanske.com/2020/12/28/3712/",
    "syndication": [
        "https://www.swarmapp.com/user/454146796/checkin/5fea049c7c57da1e075027f1"
    ],
    "author": {
        "type": "card",
        "name": "David Shanske",
        "url": "https://david.shanske.com/",
        "photo": "https://david.shanske.com/avatar/dshanske?s=49"
    },
    "checkin": {
        "type": "card",
        "name": "Dania Beach",
        "url": "https://foursquare.com/v/510c76ede4b0b5592ae90775"
    },
    "post-type": "checkin",
    "_id": "17346572",
    "_source": "1905"
}
Pastel mixing patterns today
{
    "type": "entry",
    "published": "2020-12-28T16:03:06+00:00",
    "url": "https://twitter.com/anomalily/status/1343588295003914240",
    "video": [
        "https://video.twimg.com/ext_tw_video/1343588277505327108/pu/vid/720x1280/QMdUfhvS_f1sWI22.mp4?tag=10"
    ],
    "content": {
        "text": "Pastel mixing patterns today"
    },
    "author": {
        "type": "card",
        "name": "Lillian Karabaic \ud83e\udd44\ud83c\udff3\ufe0f\u200d\ud83c\udf08 BLM",
        "url": "https://twitter.com/anomalily",
        "photo": "https://pbs.twimg.com/profile_images/1123802400731664385/dsHQG1nZ.jpg"
    },
    "post-type": "video",
    "_id": "17346389",
    "_source": "2773"
}
How do you sum up 300+ days of March during eternal Caturday?
{
    "type": "entry",
    "published": "2020-12-28T10:39:51-0500",
    "url": "https://martymcgui.re/2020/12/28/103951/",
    "category": [
        "caturday"
    ],
    "video": [
        "https://media.martymcgui.re/a5/7d/02/2d/b58011eae4d55207c9a62ff7d6fbd7d30af7a92a5a1fe547de43f408.mov"
    ],
    "content": {
        "text": "How do you sum up 300+ days of March during eternal Caturday?",
        "html": "<p>How do you sum up 300+ days of March during eternal Caturday?</p>"
    },
    "author": {
        "type": "card",
        "name": "Marty McGuire",
        "url": "https://martymcgui.re/",
        "photo": "https://martymcgui.re/images/logo.jpg"
    },
    "post-type": "video",
    "_id": "17346207",
    "_source": "175"
}
I love it when a person like Windex Missy gets one of those preservation notices, and realizes they have a legal obligation to provide revidence of their own liability to the person suing them. It’s even better when they learn failure to preserve can bias the case against them.
“[Y]ou have positioned yourself as a...leader of the...misinformation campaign by pretending to have...insider’s knowledge’ re: Dominion’s business activities, wh...
{
    "type": "entry",
    "published": "2020-12-28T14:51:48+00:00",
    "url": "https://twitter.com/karabaic/status/1343570350613774337",
    "quotation-of": "https://twitter.com/jennycohn1/status/1343345436657008640",
    "content": {
        "text": "I love it when a person like Windex Missy gets one of those preservation notices, and realizes they have a legal obligation to provide revidence of their own liability to the person suing them. It\u2019s even better when they learn failure to preserve can bias the case against them."
    },
    "author": {
        "type": "card",
        "name": "jk",
        "url": "https://twitter.com/karabaic",
        "photo": "https://pbs.twimg.com/profile_images/1256785873384861696/QfRzUvne.jpg"
    },
    "post-type": "note",
    "refs": {
        "https://twitter.com/jennycohn1/status/1343345436657008640": {
            "type": "entry",
            "published": "2020-12-27T23:58:04+00:00",
            "url": "https://twitter.com/jennycohn1/status/1343345436657008640",
            "content": {
                "text": "\u201c[Y]ou have positioned yourself as a...leader of the...misinformation campaign by pretending to have...insider\u2019s knowledge\u2019 re: Dominion\u2019s business activities, when in reality you were hired thru a staffing agency for one day to clean glass on machines...\u201d lawandcrime.com/high-profile/d\u2026",
                "html": "\u201c[Y]ou have positioned yourself as a...leader of the...misinformation campaign by pretending to have...insider\u2019s knowledge\u2019 re: Dominion\u2019s business activities, when in reality you were hired thru a staffing agency for one day to clean glass on machines...\u201d <a href=\"https://lawandcrime.com/high-profile/dominion-attorneys-send-brutal-letter-to-trump-campaigns-so-called-star-witness-mellissa-carone/\">lawandcrime.com/high-profile/d\u2026</a>"
            },
            "author": {
                "type": "card",
                "name": "Jennifer Cohn \u270d\ud83c\udffb \ud83d\udce2",
                "url": "https://twitter.com/jennycohn1",
                "photo": "https://pbs.twimg.com/profile_images/1308254783359205376/MOI-gCse.jpg"
            },
            "post-type": "note"
        }
    },
    "_id": "17345690",
    "_source": "2773"
}
“[Y]ou have positioned yourself as a...leader of the...misinformation campaign by pretending to have...insider’s knowledge’ re: Dominion’s business activities, wh...
{
    "type": "entry",
    "published": "2020-12-28T14:46:52+00:00",
    "url": "https://twitter.com/karabaic/status/1343569108680331268",
    "quotation-of": "https://twitter.com/jennycohn1/status/1343345436657008640",
    "content": {
        "text": "Missy Windex"
    },
    "author": {
        "type": "card",
        "name": "jk",
        "url": "https://twitter.com/karabaic",
        "photo": "https://pbs.twimg.com/profile_images/1256785873384861696/QfRzUvne.jpg"
    },
    "post-type": "note",
    "refs": {
        "https://twitter.com/jennycohn1/status/1343345436657008640": {
            "type": "entry",
            "published": "2020-12-27T23:58:04+00:00",
            "url": "https://twitter.com/jennycohn1/status/1343345436657008640",
            "content": {
                "text": "\u201c[Y]ou have positioned yourself as a...leader of the...misinformation campaign by pretending to have...insider\u2019s knowledge\u2019 re: Dominion\u2019s business activities, when in reality you were hired thru a staffing agency for one day to clean glass on machines...\u201d lawandcrime.com/high-profile/d\u2026",
                "html": "\u201c[Y]ou have positioned yourself as a...leader of the...misinformation campaign by pretending to have...insider\u2019s knowledge\u2019 re: Dominion\u2019s business activities, when in reality you were hired thru a staffing agency for one day to clean glass on machines...\u201d <a href=\"https://lawandcrime.com/high-profile/dominion-attorneys-send-brutal-letter-to-trump-campaigns-so-called-star-witness-mellissa-carone/\">lawandcrime.com/high-profile/d\u2026</a>"
            },
            "author": {
                "type": "card",
                "name": "Jennifer Cohn \u270d\ud83c\udffb \ud83d\udce2",
                "url": "https://twitter.com/jennycohn1",
                "photo": "https://pbs.twimg.com/profile_images/1308254783359205376/MOI-gCse.jpg"
            },
            "post-type": "note"
        }
    },
    "_id": "17345201",
    "_source": "2773"
}
{
    "type": "entry",
    "published": "2020-12-28T05:53:27+00:00",
    "url": "https://cleverdevil.io/2020/my-emotional-support-pug-eliza",
    "photo": [
        "https://cleverdevil.io/file/4a7d827e9ee9f3070b3992a397b19c5a/thumb.jpg"
    ],
    "syndication": [
        "https://twitter.com/cleverdevil/status/1343435065347477506",
        "https://mastodon.social/@cleverdevil/105456262493613337"
    ],
    "name": "My emotional support pug, Eliza \ud83d\udc36",
    "author": {
        "type": "card",
        "name": "Jonathan LaCour",
        "url": "https://cleverdevil.io/profile/cleverdevil",
        "photo": "https://cleverdevil.io/file/fdbc7696a5f73864ea11a828c861e138/thumb.jpg"
    },
    "post-type": "photo",
    "_id": "17341055",
    "_source": "10"
}
{
"type": "entry",
"author": {
"name": "Cathie",
"url": "https://cathieleblanc.com/",
"photo": null
},
"url": "https://cathieleblanc.com/2020/12/27/raspberry-pi-christmas-project/",
"published": "2020-12-27T23:52:48-05:00",
"content": {
"html": "<p>Like a lot of people, I am spending this Christmas/New Year holiday by myself because of COVID-19. It really hasn\u2019t been a bad thing but I did want to plan something different for me to do on Christmas Day. I decided to try to build a network accessible storage (NAS) server to use primarily for my photos. I wanted to create storage that would be accessible from any of my devices while I\u2019m at home. I have a Dropbox subscription that works really well for this for most of my files but I have chosen not to store my photos there, primarily because there are so many of them. I could have bought an NAS server like <a href=\"https://www.newegg.com/buffalo-ls220d0402/p/N82E16822165596\">this one</a> but I thought it would be fun to build one myself. And it was fun!</p>\n<p>I decided that I would base my NAS on the Raspberry Pi, mainly because I thought it would be fun to try out a couple of different projects. For those who don\u2019t know, a <a href=\"https://www.raspberrypi.org/help/what-%20is-a-raspberry-pi/\">Raspberry Pi</a> is a credit card sized computer that can be customized for a variety of tasks. It provides a way to learn about and practice a lot of computing skills.</p>\n<p><img src=\"https://i2.wp.com/cathieleblanc.com/wp-content/uploads/Raspberry-Pi.png?resize=300%2C241&ssl=1\" alt=\"\" /></p>\n<p>For my playing, I chose <a href=\"https://vilros.com/collections/raspberry-pi-kits/products/raspberry-pi-3-model-b-plus-complete-kit\">a starter kit</a> from Vilros. As you can see in the image above, the kit comes with a Raspberry Pi board which includes a number of ways to connect to other devices (USB, Ethernet, wireless LAN, HDMI), a case to enclose the board, a couple of heat sinks that need to be installed, a power supply, a slot for a microSD card, and the NOOBS (New Out of the Box Software) installer on the card to install the Raspberry Pi operating system which is a version of Unix designed specifically for the Pi. I followed the instructions in the Quick Start Guide to insert the heat sinks. I then followed the instructions to insert the 32GB microSD card.</p>\n<p>In order to work on the Raspberry PI, you need to attach a monitor and keyboard. I used the HDMI cable to connect the Pi to my TV for use as a monitor. I already owned an <a href=\"https://www.eagletec.com/product/50/keyboards/K104-BB\">Eagletec wireless keyboard and mouse</a> so I inserted the wireless dongle into one of the Pi\u2019s USB ports. I then plugged the Pi into the power supply and followed the instructions to install and configure the operating system which is called Raspbian.</p>\n<p>Raspbian provides a graphical desktop environment that looks a lot like Windows or macOS. But most of the work that I did in this project is easier to do using text-based commands. Raspbian provides a tool called Terminal to allow you enter these commands. It looks like this:</p>\n<p><img src=\"https://i0.wp.com/cathieleblanc.com/wp-content/uploads/terminal.png?resize=279%2C180&ssl=1\" alt=\"\" /></p>\n<p>In doing this project, it was definitely helpful that I already know how to use the command line. It was also helpful that I have used Unix systems a lot in the past and know about most of the commands I needed to use. This helped with debugging when things looked different than how the tutorials I was using suggested they would look. But I think with persistence anyone can do this project even without previous Unix experience. If nothing else, this project is a great way to learn about Unix.</p>\n<p>One of the first things I did was to rename my Raspberry Pi to something other than the default name. I called it \u201ccathienas\u201d. To rename the device, I typed the following command (without the quotes) at the command prompt in Terminal: \u201chostname cathienas\u201c.</p>\n<p>So the basic idea for this project is that I wanted to have storage attached to the Pi that I can both read from and write to wirelessly from my other devices (laptops, phone, iPad). In doing research before starting the project, I decided that I wanted to set the NAS to be set up as a RAID (redundant array of inexpensive disks). This means that when I write a file to the NAS, it is copied to 2 storage devices automatically. This is helpful because if one of the devices fails for some reason, you still have a copy of all of your files. Plus, I just thought it would be fun and challenging to set up a RAID since I have never done it before.</p>\n<p>The next decision that I had to make was what devices to use for the storage. My first thought was that I would use a couple of portable external hard drives (something like <a href=\"https://www.bhphotovideo.com/c/product/1487010-REG/sandisk_sdssde80_1t00_a25_extremepro_1tb_portable_ssd.html?SID=kj7w9jsmj701vop902fa9\">this</a>). This kind of drive is powered through a USB connection but the Pi isn\u2019t powerful enough to power 2 external hard drives. So to use portable hard drives, I would also need to use a powered USB hub (something like <a href=\"https://www.bhphotovideo.com/c/product/1496361-REG/xcellon_sh4_3h1hc_2_4_port_powered_usb_3_0.html\">this</a>). A second option is to use 2 desktop hard drive that each have their own independent power supply (something like <a href=\"https://www.staples.com/Seagate-Backup-Plus-Hub-Desktop-Hard-Drive-4TB/product_2431928\">this</a>). Note that my links to these products does not represent a recommendation for those particular options. I didn\u2019t choose either of these alternatives for storage so I can\u2019t vouch for any of those products. Instead, I chose to use 2 thumb drives for my RAID because I can see myself reusing these in other projects should I decide to abandon my NAS. So I purchased 2 <a href=\"https://www.bestbuy.com/site/sandisk-ultra-512gb-usb-3-0-type-a-flash-drive-with-hardware-encryption-black/6422265.p?skuId=6422265&ref=212&loc=1&extStoreId=868&ref=212&loc=1&gclid=Cj0KCQiA_qD_BRDiARIsANjZ2LCEW1gEtKaG2xsvT62C0hIRnKQi1iuBjVG0RH8zYuckXzL2GFBQEMoaApV4EALw_wcB&gclsrc=aw.ds\">SanDisk 512GB thumb drives</a>. Note that the Raspberry Pi that I purchased only supports USB 2.0 and these thumb drives are USB 3.0. Luckily, the 3.0 standard is backward compatible to 2.0 so I was confident these drives would work.</p>\n<p>Once I plugged the thumb drives into the Pi, I was ready to set up the RAID. I relied on <a href=\"https://magpi.raspberrypi.org/articles/build-a-raspberry-pi-nas\">this tutorial</a> although I did have to change a couple of things. All of the following commands (which are in blue) should be typed at the command prompt in Terminal (see above).</p>\n<p>First, check to make sure the drives are available to the system. Type \u201clsblk\u201d (without the quotes) at the command prompt. This command means list all block devices that are part of the system. There should be 3 (unless you have added something other than what I\u2019ve talked about in this post). The first one is \u201cmmcblk0\u201d which is the microSD card that contains the Raspbian operating system. The other two should be \u201csda\u201d and \u201csdb\u201d (storage device a and storage device b).</p>\n<p>Second, format sda and sdb so they can be used as part of the RAID. Type \u201csudo fdisk /dev/sda\u201d at the command prompt. \u201csudo\u201d means \u201csuperuser do\u201d and will run the fdisk command with the privileges of the superuser. \u201cfdisk\u201d mean \u201cformat disk\u201d and \u201c/dev/sda\u201d is the directory path for storage device a. Within the fdisk command, I first had to delete the current partition on the drive by typing \u201cd\u201d and then I could create a new partition by typing \u201cn\u201c. I answered all of the questions that came up by just pressing Enter (which means to use the default answer). Once all of the questions have been answered, type \u201cw\u201d to write these changes to the disk (that is, save the changes). This will cause fdisk to exit back to the command prompt.</p>\n<p>Next, repeat the steps above for sdb. That is, type \u201csudo fdisk /dev/sdb\u201c, delete its current partition, create a new partition with default settings, and write the changes to the disk.</p>\n<p>At this point, I had to make sure my operating system was up-to-date. To do this, type \u201csudo apt update\u201c. Recall that \u201csudo\u201d means \u201csuperuser do\u201d. This time, we are running the \u201capt\u201d command which stands for \u201cadvanced package tool\u201d and we\u2019re telling it to \u201cupdate\u201d. Then type \u201csudo apt -dist upgrade\u201d which asks the advanced package tool to upgrade the distribution of the operating system. Don\u2019t forget the single minus sign in front of dist in the command.</p>\n<p>Now we are ready to create the RAID. To do this, we need to make the Pi see sda and sdb as one storage location that it will write every file to twice (once on sda and once on sdb). We need to install the RAID manager which is called mdadm (which stands for Multiple Disk And Device Management). Type \u201csudo apt install mdadm\u201d which I think is self-explanatory.</p>\n<p>Next, we need to tell mdadm to create the RAID. Type \u201csudo mdadm \u2013create \u2013verbose /dev/md0 \u2013level=mirror \u2013raid-devices=2 /dev/sda1 /dev/sdb1\u201d all in one long command. Note the double minus signs in front of create, verbose, level, and raid-devices. The command runs the RAID manager and asks it to create a new device with a root directory of /dev/md0. This device will be a mirrored device (\u2013level=mirror) which means that it will make multiple copies of anything added to it and it will have two RAID devices. The first will be the partition we created on sda (which is called sda1 and don\u2019t forget the 1 or you will get an error) and the second will be the partition we created on sdb (and again don\u2019t forget the 1). \u2013verbose asks the mdadm command to give long feedback about what it is encountering. Now Pi will see the 2 thumb drives as 1 device.</p>\n<p>In Unix-based systems, we need to \u201cmount\u201d storage devices in order for the system to see them. So in order for our Raspbian operating system to see our new RAID, we need to mount /dev/md0. This will take several commands. First, type \u201csudo mkdir -p /mnt/raid1\u201c. \u201cmkdir\u201d means \u201cmake directory\u201d. A directory in Unix is the same as a folder in Windows. So this command says make a directory called \u201craid1\u201d inside the directory called \u201cmnt\u201d. The -p (that\u2019s with a single minus sign) says to make the parent directories if they don\u2019t already exist. In other words, if the directory called \u201cmnt\u201d doesn\u2019t already exist, create it. Next, type \u201csudo mkfs.ext4 /dev/md0\u201d which means make a new file system (of type extension 4 which is too complicated to explain here) for our RAID (which is called /dev/md0). Next, we will actually mount the RAID by typing \u201csudo mount /dev/md0 /mnt/raid1/\u201c. (Note the / after raid1.) So our mounted RAID will be located in the directory /mnt/raid1/. To list the contents of our mounted RAID, type \u201cls -l /mnt/raid1/\u201c. \u201cls\u201d means \u201clist\u201d and \u201c-l\u201d (with a single minus sign) means in long format. You see only the item \u201clost+found\u201d in the list and that\u2019s how you know the RAID is operational.</p>\n<p>We don\u2019t want to have to manually mount the RAID every time we reboot the Raspberry Pi so we will need to add a command in the start up instructions for the file system. These start up instructions are located in a file called fstab which stands for file system table. To do this, we will use a text editor called nano. Type \u201csudo nano /etc/fstab\u201d which will open the fstab file in nano. Type the following line somewhere within the file: \u201c/dev/md0 /mnt/raid1/ ext4 defaults,noatime 0 1\u201c. This adds the RAID to the file system table. To exit nano, type CTRL-x and answer the question about overwriting the file with \u201cy\u201c.</p>\n<p>Now to make sure the RAID mounts correctly on start up, type \u201csudo mdadm \u2013detail \u2013scan | sudo tee -a /etc/mdadm/mdadm.conf\u201c. This command uses the pipe operator | to feed the results of \u201csudo mdadm \u2013detail \u2013scan\u201d (with double minus signs in front of detail and scan) into \u201csudo tee -a /etc/mdadm/mdadm.config\u201d (with single minus sign in front of a). So this command puts the details of the current mdadm set up into the configuration file for mdadm. When the Raspberry Pi reboots, that configuration file will set up mdadm as it is set up now.</p>\n<p>Reboot the Raspberry Pi and the RAID is ready to use.</p>\n<p>But how do we access files on the RAID from other devices on the network? We will use the SMB protocol but since that protocol is not installed by default on the Pi, we will need to install it. The protocol is known as Samba on the Pi. So to install the protocol, type \u201csudo install samba samba-common-bin\u201c. Answer any questions with the default answer.</p>\n<p>We have to make sure that we have a shared space on the RAID that is accessible to people on our network. We will make a directory to be shared by typing \u201csudo mkdir /mnt/raid1/shared\u201c. Note that the directory name \u201cshared\u201d can be any name that you choose. There is nothing magic about the word \u201cshared\u201d. Now we need to make that directory available for everyone to read, write, and execute (or run programs). Type \u201csudo chmod 777 /mnt/raid1/shared\u201c. \u201cchmod\u201d is the command to change file permissions in Unix. One of my favorite parts of the Unix OS is how it handles file permissions. There are three groups of people that you can give permissions to for each file: the person who owns the file, people in the file\u2019s group, and everyone else. For each of these 3 groups, you can give read (can open and view the file), write (can edit, modify, and delete the file), and execute (can run the file if it is a script or program of some sort) access. Typically, the permissions for the owner of the file are set to rwe which means that person can read, write, and execute the file. This would be written as 111. If for some reason, the owner did not have access to execute the file, their permission would be rw- or 110. In binary, 111 is 7 and 110 is 6. So a 7 in the first position of the number after \u201cchmod\u201d means that the owner has read, write, and execute access to this directory and the files within the directory. The second 7 means anyone in the group also has read, write, and execute access. The third 7 means everyone else has read, write, and execute access as well. Knowing binary helps here: 7=111=rwe, 6=110=read and write, 5=101=read and execute, 4=100=read only, 3=011=write and execute, 2=010=write only, and 1=001=execute only. Isn\u2019t that cool?</p>\n<p>Next, we need to tell Samba to make the RAID shared directory available on the network. To do that, we will change the Samba configuration file using nano. Type \u201csudo nano /etc/samba/smb.conf\u201c. Scroll to the bottom of the file using the arrow keys and type each of the following on a separate line: \u201c[shared]\u201c, \u201cpath = /mnt/raid1/shared\u201c, \u201cwriteable=Yes\u201c, \u201cmask=0777\u201c, \u201cdirectory mask=0777\u201c, \u201cpublic=no\u201c. Exit the file by typing CTRL-x and answer \u201cy\u201d to the question about overwriting the file. Now restart Samba by typing \u201csudo systemctl restart smbd\u201c. This command uses the systemctl tool to restart the SMB daemon which is the software that runs the SMB protocol.</p>\n<p>The default user on the Raspberry Pi is called pi. We have to give that user a password to access the Samba share from other devices. Type \u201csudo smbpassword -a pi\u201c. \u201c-a\u201d (with a single minus sign) means add the user \u201cpi\u201d to the list of smbpasswords. You will be prompted for a password which you will need to enter twice.</p>\n<p>How do we now access this shared space on the RAID from other devices? If you\u2019re using a Windows computer, you will map a network drive to the RAID. In Windows 10, you do this by opening File Explorer and navigating to \u201cThis PC\u201d. At the top of the window, you will see \u201cComputer\u201d as shown below:</p>\n<p><img src=\"https://i0.wp.com/cathieleblanc.com/wp-content/uploads/Screenshot-2020-12-27-23.22.37-1.png?resize=1024%2C681&ssl=1\" alt=\"\" /></p>\n\n<p>Click on \u201cComputer\u201d and then click on \u201cMap Network Drive\u201d. You will see the following dialog box:</p>\n<p><img src=\"https://i2.wp.com/cathieleblanc.com/wp-content/uploads/Screenshot-2020-12-27-23.30.45.png?resize=1024%2C672&ssl=1\" alt=\"\" /></p>\n<p>Change the drive to whichever letter you want and then type \u201c\\\\cathienas\\shared\u201d in the Folder box but replace \u201ccathienas\u201d with whatever you named your Pi and \u201cshared\u201d with whatever you called your shared folder. Be sure to check the box that says \u201cConnect using different credentials\u201d. You will then be prompted to enter the username (probably \u201cpi\u201d) and password that you created for Samba. A new window will open that contains the contents of your shared folder on your Raspberry Pi RAID and you can treat it like any other folder on your Windows 10 computer.</p>\n<p><img src=\"https://i2.wp.com/cathieleblanc.com/wp-content/uploads/Screenshot-2020-12-27-23.39.26.png?resize=1024%2C262&ssl=1\" alt=\"\" /></p>\n<p>To access the shared folder on my Android phone, I downloaded a new File Manager app that has the SMB protocol built into it. I chose File Manager Plus from the Google Play store. I installed it and navigated to the Home page which looks like:</p>\n<p><img src=\"https://i0.wp.com/cathieleblanc.com/wp-content/uploads/Screenshot_20201227-184317.png?resize=512%2C1024&ssl=1\" alt=\"\" /></p>\n<p>Click on the Remote icon at the bottom of the screen. Choose Add a remote location and you will be prompted for the type of remote location you want to add. Choose SMB and enter \u201c//cathienas/shared\u201d again replacing \u201ccathienas\u201d and \u201cshared\u201d as needed. Enter your username and password using the ones you set up on your Raspberry Pi. You will now have access to the shared folder on the Pi RAID on your phone.</p>\n<p>As I said, this was a really fun project. And I have a networked location to store the photos that I take. I\u2019m still figuring out the work flow but it\u2019s certain to be more convenient than the non-networked work flow I have been using up until now.</p>",
"text": "Like a lot of people, I am spending this Christmas/New Year holiday by myself because of COVID-19. It really hasn\u2019t been a bad thing but I did want to plan something different for me to do on Christmas Day. I decided to try to build a network accessible storage (NAS) server to use primarily for my photos. I wanted to create storage that would be accessible from any of my devices while I\u2019m at home. I have a Dropbox subscription that works really well for this for most of my files but I have chosen not to store my photos there, primarily because there are so many of them. I could have bought an NAS server like this one but I thought it would be fun to build one myself. And it was fun!\nI decided that I would base my NAS on the Raspberry Pi, mainly because I thought it would be fun to try out a couple of different projects. For those who don\u2019t know, a Raspberry Pi is a credit card sized computer that can be customized for a variety of tasks. It provides a way to learn about and practice a lot of computing skills.\n\nFor my playing, I chose a starter kit from Vilros. As you can see in the image above, the kit comes with a Raspberry Pi board which includes a number of ways to connect to other devices (USB, Ethernet, wireless LAN, HDMI), a case to enclose the board, a couple of heat sinks that need to be installed, a power supply, a slot for a microSD card, and the NOOBS (New Out of the Box Software) installer on the card to install the Raspberry Pi operating system which is a version of Unix designed specifically for the Pi. I followed the instructions in the Quick Start Guide to insert the heat sinks. I then followed the instructions to insert the 32GB microSD card.\nIn order to work on the Raspberry PI, you need to attach a monitor and keyboard. I used the HDMI cable to connect the Pi to my TV for use as a monitor. I already owned an Eagletec wireless keyboard and mouse so I inserted the wireless dongle into one of the Pi\u2019s USB ports. I then plugged the Pi into the power supply and followed the instructions to install and configure the operating system which is called Raspbian.\nRaspbian provides a graphical desktop environment that looks a lot like Windows or macOS. But most of the work that I did in this project is easier to do using text-based commands. Raspbian provides a tool called Terminal to allow you enter these commands. It looks like this:\n\nIn doing this project, it was definitely helpful that I already know how to use the command line. It was also helpful that I have used Unix systems a lot in the past and know about most of the commands I needed to use. This helped with debugging when things looked different than how the tutorials I was using suggested they would look. But I think with persistence anyone can do this project even without previous Unix experience. If nothing else, this project is a great way to learn about Unix.\nOne of the first things I did was to rename my Raspberry Pi to something other than the default name. I called it \u201ccathienas\u201d. To rename the device, I typed the following command (without the quotes) at the command prompt in Terminal: \u201chostname cathienas\u201c.\nSo the basic idea for this project is that I wanted to have storage attached to the Pi that I can both read from and write to wirelessly from my other devices (laptops, phone, iPad). In doing research before starting the project, I decided that I wanted to set the NAS to be set up as a RAID (redundant array of inexpensive disks). This means that when I write a file to the NAS, it is copied to 2 storage devices automatically. This is helpful because if one of the devices fails for some reason, you still have a copy of all of your files. Plus, I just thought it would be fun and challenging to set up a RAID since I have never done it before.\nThe next decision that I had to make was what devices to use for the storage. My first thought was that I would use a couple of portable external hard drives (something like this). This kind of drive is powered through a USB connection but the Pi isn\u2019t powerful enough to power 2 external hard drives. So to use portable hard drives, I would also need to use a powered USB hub (something like this). A second option is to use 2 desktop hard drive that each have their own independent power supply (something like this). Note that my links to these products does not represent a recommendation for those particular options. I didn\u2019t choose either of these alternatives for storage so I can\u2019t vouch for any of those products. Instead, I chose to use 2 thumb drives for my RAID because I can see myself reusing these in other projects should I decide to abandon my NAS. So I purchased 2 SanDisk 512GB thumb drives. Note that the Raspberry Pi that I purchased only supports USB 2.0 and these thumb drives are USB 3.0. Luckily, the 3.0 standard is backward compatible to 2.0 so I was confident these drives would work.\nOnce I plugged the thumb drives into the Pi, I was ready to set up the RAID. I relied on this tutorial although I did have to change a couple of things. All of the following commands (which are in blue) should be typed at the command prompt in Terminal (see above).\nFirst, check to make sure the drives are available to the system. Type \u201clsblk\u201d (without the quotes) at the command prompt. This command means list all block devices that are part of the system. There should be 3 (unless you have added something other than what I\u2019ve talked about in this post). The first one is \u201cmmcblk0\u201d which is the microSD card that contains the Raspbian operating system. The other two should be \u201csda\u201d and \u201csdb\u201d (storage device a and storage device b).\nSecond, format sda and sdb so they can be used as part of the RAID. Type \u201csudo fdisk /dev/sda\u201d at the command prompt. \u201csudo\u201d means \u201csuperuser do\u201d and will run the fdisk command with the privileges of the superuser. \u201cfdisk\u201d mean \u201cformat disk\u201d and \u201c/dev/sda\u201d is the directory path for storage device a. Within the fdisk command, I first had to delete the current partition on the drive by typing \u201cd\u201d and then I could create a new partition by typing \u201cn\u201c. I answered all of the questions that came up by just pressing Enter (which means to use the default answer). Once all of the questions have been answered, type \u201cw\u201d to write these changes to the disk (that is, save the changes). This will cause fdisk to exit back to the command prompt.\nNext, repeat the steps above for sdb. That is, type \u201csudo fdisk /dev/sdb\u201c, delete its current partition, create a new partition with default settings, and write the changes to the disk.\nAt this point, I had to make sure my operating system was up-to-date. To do this, type \u201csudo apt update\u201c. Recall that \u201csudo\u201d means \u201csuperuser do\u201d. This time, we are running the \u201capt\u201d command which stands for \u201cadvanced package tool\u201d and we\u2019re telling it to \u201cupdate\u201d. Then type \u201csudo apt -dist upgrade\u201d which asks the advanced package tool to upgrade the distribution of the operating system. Don\u2019t forget the single minus sign in front of dist in the command.\nNow we are ready to create the RAID. To do this, we need to make the Pi see sda and sdb as one storage location that it will write every file to twice (once on sda and once on sdb). We need to install the RAID manager which is called mdadm (which stands for Multiple Disk And Device Management). Type \u201csudo apt install mdadm\u201d which I think is self-explanatory.\nNext, we need to tell mdadm to create the RAID. Type \u201csudo mdadm \u2013create \u2013verbose /dev/md0 \u2013level=mirror \u2013raid-devices=2 /dev/sda1 /dev/sdb1\u201d all in one long command. Note the double minus signs in front of create, verbose, level, and raid-devices. The command runs the RAID manager and asks it to create a new device with a root directory of /dev/md0. This device will be a mirrored device (\u2013level=mirror) which means that it will make multiple copies of anything added to it and it will have two RAID devices. The first will be the partition we created on sda (which is called sda1 and don\u2019t forget the 1 or you will get an error) and the second will be the partition we created on sdb (and again don\u2019t forget the 1). \u2013verbose asks the mdadm command to give long feedback about what it is encountering. Now Pi will see the 2 thumb drives as 1 device.\nIn Unix-based systems, we need to \u201cmount\u201d storage devices in order for the system to see them. So in order for our Raspbian operating system to see our new RAID, we need to mount /dev/md0. This will take several commands. First, type \u201csudo mkdir -p /mnt/raid1\u201c. \u201cmkdir\u201d means \u201cmake directory\u201d. A directory in Unix is the same as a folder in Windows. So this command says make a directory called \u201craid1\u201d inside the directory called \u201cmnt\u201d. The -p (that\u2019s with a single minus sign) says to make the parent directories if they don\u2019t already exist. In other words, if the directory called \u201cmnt\u201d doesn\u2019t already exist, create it. Next, type \u201csudo mkfs.ext4 /dev/md0\u201d which means make a new file system (of type extension 4 which is too complicated to explain here) for our RAID (which is called /dev/md0). Next, we will actually mount the RAID by typing \u201csudo mount /dev/md0 /mnt/raid1/\u201c. (Note the / after raid1.) So our mounted RAID will be located in the directory /mnt/raid1/. To list the contents of our mounted RAID, type \u201cls -l /mnt/raid1/\u201c. \u201cls\u201d means \u201clist\u201d and \u201c-l\u201d (with a single minus sign) means in long format. You see only the item \u201clost+found\u201d in the list and that\u2019s how you know the RAID is operational.\nWe don\u2019t want to have to manually mount the RAID every time we reboot the Raspberry Pi so we will need to add a command in the start up instructions for the file system. These start up instructions are located in a file called fstab which stands for file system table. To do this, we will use a text editor called nano. Type \u201csudo nano /etc/fstab\u201d which will open the fstab file in nano. Type the following line somewhere within the file: \u201c/dev/md0 /mnt/raid1/ ext4 defaults,noatime 0 1\u201c. This adds the RAID to the file system table. To exit nano, type CTRL-x and answer the question about overwriting the file with \u201cy\u201c.\nNow to make sure the RAID mounts correctly on start up, type \u201csudo mdadm \u2013detail \u2013scan | sudo tee -a /etc/mdadm/mdadm.conf\u201c. This command uses the pipe operator | to feed the results of \u201csudo mdadm \u2013detail \u2013scan\u201d (with double minus signs in front of detail and scan) into \u201csudo tee -a /etc/mdadm/mdadm.config\u201d (with single minus sign in front of a). So this command puts the details of the current mdadm set up into the configuration file for mdadm. When the Raspberry Pi reboots, that configuration file will set up mdadm as it is set up now.\nReboot the Raspberry Pi and the RAID is ready to use.\nBut how do we access files on the RAID from other devices on the network? We will use the SMB protocol but since that protocol is not installed by default on the Pi, we will need to install it. The protocol is known as Samba on the Pi. So to install the protocol, type \u201csudo install samba samba-common-bin\u201c. Answer any questions with the default answer.\nWe have to make sure that we have a shared space on the RAID that is accessible to people on our network. We will make a directory to be shared by typing \u201csudo mkdir /mnt/raid1/shared\u201c. Note that the directory name \u201cshared\u201d can be any name that you choose. There is nothing magic about the word \u201cshared\u201d. Now we need to make that directory available for everyone to read, write, and execute (or run programs). Type \u201csudo chmod 777 /mnt/raid1/shared\u201c. \u201cchmod\u201d is the command to change file permissions in Unix. One of my favorite parts of the Unix OS is how it handles file permissions. There are three groups of people that you can give permissions to for each file: the person who owns the file, people in the file\u2019s group, and everyone else. For each of these 3 groups, you can give read (can open and view the file), write (can edit, modify, and delete the file), and execute (can run the file if it is a script or program of some sort) access. Typically, the permissions for the owner of the file are set to rwe which means that person can read, write, and execute the file. This would be written as 111. If for some reason, the owner did not have access to execute the file, their permission would be rw- or 110. In binary, 111 is 7 and 110 is 6. So a 7 in the first position of the number after \u201cchmod\u201d means that the owner has read, write, and execute access to this directory and the files within the directory. The second 7 means anyone in the group also has read, write, and execute access. The third 7 means everyone else has read, write, and execute access as well. Knowing binary helps here: 7=111=rwe, 6=110=read and write, 5=101=read and execute, 4=100=read only, 3=011=write and execute, 2=010=write only, and 1=001=execute only. Isn\u2019t that cool?\nNext, we need to tell Samba to make the RAID shared directory available on the network. To do that, we will change the Samba configuration file using nano. Type \u201csudo nano /etc/samba/smb.conf\u201c. Scroll to the bottom of the file using the arrow keys and type each of the following on a separate line: \u201c[shared]\u201c, \u201cpath = /mnt/raid1/shared\u201c, \u201cwriteable=Yes\u201c, \u201cmask=0777\u201c, \u201cdirectory mask=0777\u201c, \u201cpublic=no\u201c. Exit the file by typing CTRL-x and answer \u201cy\u201d to the question about overwriting the file. Now restart Samba by typing \u201csudo systemctl restart smbd\u201c. This command uses the systemctl tool to restart the SMB daemon which is the software that runs the SMB protocol.\nThe default user on the Raspberry Pi is called pi. We have to give that user a password to access the Samba share from other devices. Type \u201csudo smbpassword -a pi\u201c. \u201c-a\u201d (with a single minus sign) means add the user \u201cpi\u201d to the list of smbpasswords. You will be prompted for a password which you will need to enter twice.\nHow do we now access this shared space on the RAID from other devices? If you\u2019re using a Windows computer, you will map a network drive to the RAID. In Windows 10, you do this by opening File Explorer and navigating to \u201cThis PC\u201d. At the top of the window, you will see \u201cComputer\u201d as shown below:\n\n\nClick on \u201cComputer\u201d and then click on \u201cMap Network Drive\u201d. You will see the following dialog box:\n\nChange the drive to whichever letter you want and then type \u201c\\\\cathienas\\shared\u201d in the Folder box but replace \u201ccathienas\u201d with whatever you named your Pi and \u201cshared\u201d with whatever you called your shared folder. Be sure to check the box that says \u201cConnect using different credentials\u201d. You will then be prompted to enter the username (probably \u201cpi\u201d) and password that you created for Samba. A new window will open that contains the contents of your shared folder on your Raspberry Pi RAID and you can treat it like any other folder on your Windows 10 computer.\n\nTo access the shared folder on my Android phone, I downloaded a new File Manager app that has the SMB protocol built into it. I chose File Manager Plus from the Google Play store. I installed it and navigated to the Home page which looks like:\n\nClick on the Remote icon at the bottom of the screen. Choose Add a remote location and you will be prompted for the type of remote location you want to add. Choose SMB and enter \u201c//cathienas/shared\u201d again replacing \u201ccathienas\u201d and \u201cshared\u201d as needed. Enter your username and password using the ones you set up on your Raspberry Pi. You will now have access to the shared folder on the Pi RAID on your phone.\nAs I said, this was a really fun project. And I have a networked location to store the photos that I take. I\u2019m still figuring out the work flow but it\u2019s certain to be more convenient than the non-networked work flow I have been using up until now."
},
"name": "Raspberry Pi Christmas Project",
"post-type": "article",
"_id": "17340730",
"_source": "2782"
}
My emotional support pug, Eliza 🐶
{
    "type": "entry",
    "published": "2020-12-28T05:54:14+00:00",
    "url": "https://twitter.com/cleverdevil/status/1343435065347477506",
    "photo": [
        "https://pbs.twimg.com/media/EqTXEoQXAAA-de_.jpg"
    ],
    "content": {
        "text": "My emotional support pug, Eliza \ud83d\udc36"
    },
    "author": {
        "type": "card",
        "name": "Jonathan LaCour",
        "url": "https://twitter.com/cleverdevil",
        "photo": "https://pbs.twimg.com/profile_images/744804831064317952/W-gMo7AO.jpg"
    },
    "post-type": "photo",
    "_id": "17339800",
    "_source": "2773"
}
In order to free yourself from the surveillance capitalism of your TV, you’ll need to find a streaming device that respects your privacy!
Good luck. As far as I can tell, none of the major players do (Roku, Google, Amazon). Apple TV is overpriced, but Apple cares about privacy.
Why? Because modern TVs are part of the surveillance capitalism machine. Why can you buy an amazing TV for peanuts? Because the vendors sell them at cost so they can trac...
{
    "type": "entry",
    "published": "2020-12-28T05:24:25+00:00",
    "url": "https://twitter.com/cleverdevil/status/1343427563855650816",
    "quotation-of": "https://twitter.com/cleverdevil/status/1343425421292040192",
    "content": {
        "text": "In order to free yourself from the surveillance capitalism of your TV, you\u2019ll need to find a streaming device that respects your privacy!\n\nGood luck. As far as I can tell, none of the major players do (Roku, Google, Amazon). Apple TV is overpriced, but Apple cares about privacy."
    },
    "author": {
        "type": "card",
        "name": "Jonathan LaCour",
        "url": "https://twitter.com/cleverdevil",
        "photo": "https://pbs.twimg.com/profile_images/744804831064317952/W-gMo7AO.jpg"
    },
    "post-type": "note",
    "refs": {
        "https://twitter.com/cleverdevil/status/1343425421292040192": {
            "type": "entry",
            "published": "2020-12-28T05:15:54+00:00",
            "url": "https://twitter.com/cleverdevil/status/1343425421292040192",
            "content": {
                "text": "Why? Because modern TVs are part of the surveillance capitalism machine. Why can you buy an amazing TV for peanuts? Because the vendors sell them at cost so they can track you and sell your information to the highest bidder.\n\nStick it to the man. Don\u2019t connect your TV to Wi-Fi!\ntwitter.com/cleverdevil/st\u2026",
                "html": "Why? Because modern TVs are part of the surveillance capitalism machine. Why can you buy an amazing TV for peanuts? Because the vendors sell them at cost so they can track you and sell your information to the highest bidder.\n\nStick it to the man. Don\u2019t connect your TV to Wi-Fi!\n<a href=\"https://twitter.com/cleverdevil/status/1343423517551853569\">twitter.com/cleverdevil/st\u2026</a>"
            },
            "author": {
                "type": "card",
                "name": "Jonathan LaCour",
                "url": "https://twitter.com/cleverdevil",
                "photo": "https://pbs.twimg.com/profile_images/744804831064317952/W-gMo7AO.jpg"
            },
            "post-type": "note"
        }
    },
    "_id": "17339551",
    "_source": "2773"
}