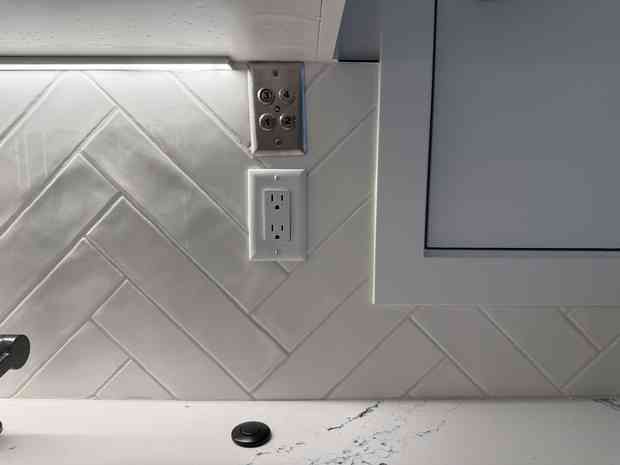
{
    "type": "entry",
    "published": "2025-11-25T15:23:38-08:00",
    "url": "https://aaronparecki.com/2025/11/25/18/",
    "category": [
        "triplex",
        "365"
    ],
    "photo": [
        "https://aperture-media.p3k.io/aaronparecki.com/51c5a64516fe96f92871565707c7c2ab7c2ad76f370c58b03d5e72a1fb90fd68.jpg"
    ],
    "content": {
        "text": "The elevator guy installed the dumbwaiter call buttons today! It's going to drive me crazy that it's crooked though so I am going to have to fix it."
    },
    "author": {
        "type": "card",
        "name": "Aaron Parecki",
        "url": "https://aaronparecki.com/",
        "photo": "https://aperture-media.p3k.io/aaronparecki.com/41061f9de825966faa22e9c42830e1d4a614a321213b4575b9488aa93f89817a.jpg"
    },
    "post-type": "photo",
    "_id": "46627491",
    "_source": "16"
}
There's too many new things to get into everything, but there are two big changes I am most excited about 👀
📝 Client ID Metadata Documents (CIMD) - a simpler way to manage client registrations, clients describe themselves with a URL they control 🔐 Enterprise-Managed Authorization extension (aka Cross App Access) - eliminate the OAuth redirect and get tokens for an MCP server by requesting them from the enterprise IdP
It's been great working on this with folks like Den Delimarsky, Paul Carleton, David Soria Parra, Nick Cooper, Tyler Leonhardt, and more!
{
    "type": "entry",
    "published": "2025-11-25T15:11:00-08:00",
    "url": "https://aaronparecki.com/2025/11/25/11/mcp-update",
    "category": [
        "oauth",
        "cimd",
        "xaa",
        "mcp"
    ],
    "syndication": [
        "https://www.linkedin.com/posts/aaronparecki_client-registration-and-enterprise-management-share-7399223369528852480-Tt07",
        "https://bsky.app/profile/did:plc:s2koow7r6t7tozgd4slc3dsg/post/3m6ihsdvlr22c",
        "https://bsky.app/profile/aaronpk.com/post/3m6ihsdvpo22c"
    ],
    "content": {
        "text": "The new MCP spec just dropped! \ud83c\udf89 \n\nThere's too many new things to get into everything, but there are two big changes I am most excited about \ud83d\udc40 \n\n\ud83d\udcdd Client ID Metadata Documents (CIMD) - a simpler way to manage client registrations, clients describe themselves with a URL they control \n\ud83d\udd10 Enterprise-Managed Authorization extension (aka Cross App Access) - eliminate the OAuth redirect and get tokens for an MCP server by requesting them from the enterprise IdP \n\nIt's been great working on this with folks like Den Delimarsky, Paul Carleton, David Soria Parra, Nick Cooper, Tyler Leonhardt, and more! \n\nRead more about what these mean for you in my full post \n\ud83d\udc49 https://aaronparecki.com/2025/11/25/1/mcp-authorization-spec-update",
        "html": "The new MCP spec just dropped! <a href=\"https://aaronparecki.com/emoji/%F0%9F%8E%89\">\ud83c\udf89</a> <br /><br />There's too many new things to get into everything, but there are two big changes I am most excited about <a href=\"https://aaronparecki.com/emoji/%F0%9F%91%80\">\ud83d\udc40</a> <br /><br /><a href=\"https://aaronparecki.com/emoji/%F0%9F%93%9D\">\ud83d\udcdd</a> Client ID Metadata Documents (CIMD) - a simpler way to manage client registrations, clients describe themselves with a URL they control <br /><a href=\"https://aaronparecki.com/emoji/%F0%9F%94%90\">\ud83d\udd10</a> Enterprise-Managed Authorization extension (aka Cross App Access) - eliminate the OAuth redirect and get tokens for an MCP server by requesting them from the enterprise IdP <br /><br />It's been great working on this with folks like Den Delimarsky, Paul Carleton, David Soria Parra, Nick Cooper, Tyler Leonhardt, and more! <br /><br />Read more about what these mean for you in my full post <br /><a href=\"https://aaronparecki.com/emoji/%F0%9F%91%89\">\ud83d\udc49</a> <a href=\"https://aaronparecki.com/2025/11/25/1/mcp-authorization-spec-update\"><span>https://</span>aaronparecki.com/2025/11/25/1/mcp-authorization-spec-update</a>"
    },
    "author": {
        "type": "card",
        "name": "Aaron Parecki",
        "url": "https://aaronparecki.com/",
        "photo": "https://aperture-media.p3k.io/aaronparecki.com/41061f9de825966faa22e9c42830e1d4a614a321213b4575b9488aa93f89817a.jpg"
    },
    "post-type": "note",
    "_id": "46611982",
    "_source": "16"
}
The New MCP Authorization Spec is Here! Today marks the one-year anniversary of the Model Context Protocol, and with it, the launch of the new 2025-11-25 specification.
{
    "type": "entry",
    "published": "2025-11-25T13:25:00-08:00",
    "summary": "The New MCP Authorization Spec is Here! Today marks the one-year anniversary of the Model Context Protocol, and with it, the launch of the new 2025-11-25 specification.",
    "url": "https://aaronparecki.com/2025/11/25/1/mcp-authorization-spec-update",
    "category": [
        "cimd",
        "oauth",
        "mcp",
        "ai"
    ],
    "name": "Client Registration and Enterprise Management in the November 2025 MCP Authorization Spec",
    "author": {
        "type": "card",
        "name": "Aaron Parecki",
        "url": "https://aaronparecki.com/",
        "photo": "https://aperture-media.p3k.io/aaronparecki.com/41061f9de825966faa22e9c42830e1d4a614a321213b4575b9488aa93f89817a.jpg"
    },
    "post-type": "article",
    "_id": "46611333",
    "_source": "16"
}
In October, I launched an instance of Meetable for the MCP Community. They've been using it to post working group meetings as well as in-person community events. In just 2 months it already has 41 events listed!
{
    "type": "entry",
    "published": "2025-11-25T08:07:14-08:00",
    "summary": "In October, I launched an instance of Meetable for the MCP Community. They've been using it to post working group meetings as well as in-person community events. In just 2 months it already has 41 events listed!",
    "url": "https://aaronparecki.com/2025/11/25/5/meetable-release-notes-november-2025",
    "category": [
        "meetable",
        "indieweb",
        "events"
    ],
    "name": "Recurring Events for Meetable",
    "author": {
        "type": "card",
        "name": "Aaron Parecki",
        "url": "https://aaronparecki.com/",
        "photo": "https://aperture-media.p3k.io/aaronparecki.com/41061f9de825966faa22e9c42830e1d4a614a321213b4575b9488aa93f89817a.jpg"
    },
    "post-type": "article",
    "_id": "46608333",
    "_source": "16"
}
{
    "type": "entry",
    "published": "2025-11-24T13:23:17-0500",
    "url": "https://martymcgui.re/2025/11/24/machine-knitting-neckline--show-and-tell/",
    "category": [
        "machine-knitting",
        "sweater",
        "KnitFactoryImpl",
        "neckline",
        "knitalong"
    ],
    "name": "Machine knitting: neckli(n)e / show-and-tell!",
    "content": {
        "text": "This post is part of a series, as I play catch-up on KnitFactoryImpl's knitalong of a set in sleeve crew neck sweater for channel members.\nAfter completing the front panel, only one major on-the-machine task remains for this sweater, and that's the neckline.\nThis is easy to explain conceptually: connect the front and the back by seaming them together at one shoulder, rehang all the stitches on the knitting machine, knit some rows for the collar, then cast off on waste yarn.\nStill, I was dreading this for some reason, so I procrastinated on it all day and then hemmed-and-hawed as I did it.\nOne shoulder: seamed! The view from the inside.The seam viewed from the outside.Technically, the last bits of shoulder seams should include some purple stitches, but I found it too mind-bending to think about how to change colors while so many needles were going into hold and being wrapped. It's really just a few stitches so I don't think anyone will notice in the final sweater.\nI then took a long break for food, exercise, and a shower, and only actually started hanging the neckline on the machine about 15 minutes before the live show-and-tell. \ud83e\udee3\nCan I knit and participate in a livestream event at the same time? Not really!I really enjoyed the show-and-tell. It was encouraging to hear KnitFactoryImpl's own challenges and inspiring to see the final (extremely fluffy!) cardigan. I was delighted and honored that she shared my posts from\u00a0this very website\u00a0with some kind comments on my knitting setup and progress photos. I loved seeing photos from other participants, too! It was nice to have enough context to understand and appreciate some of the choices made in terms of stitch variety, yarn types, and (of course) colors and patterns!\nI ended up waiting until after the livestream to finish hanging the stitches.\nOnce it was all back on the bed, following KnitFactoryImpl's advice, I:\nhung a bunch of weights.\n  knit one row of normal knitting (at a slightly looser tension than the main body).\n  transferred half of the stitches to the ribber for 1x1 rib.\n  added more weights.\n  set up the carriages to knit the rib the same as I had done the cuffs and body panel hems.\nI even got to use these cool weight hangers on the edges!\nThese made no sense to me until I saw a photo in the KR-850 manual.After all the effort to hang the stitches, set the weights, set up the carriage, knit the one row of stockinette, remove the carriage, transfer half the stitches, set more weights, and set up the carriages again, I was feeling pretty nervous about this going awry.\nSo I knit 12 rows of 1x1 rib\u00a0very slowly, checking each stitch after every row. This was made more challenging by the fact that my main yarn is pitch black. \ud83d\ude05\nTo my relief, those 12 rows went great! It was time to cast off onto waste yarn with circular knitting. So, I switched yarns, set the carriages for circular knitting, knit a few rows back and forth-\n- and realize something was going very wrong! The tension from the weights just seemed to be not\u00a0working. A bunch of stitches piled up loosely and then started dropping.\nI didn't panic, but I did remove all the weights and start painstakingly removing the tangled knitting from the bed.\nYikes. Only one or two loops of the pink waste yarn are protecting the live stitches at the end of the collar.Most of the actual rib came off the machine fine. A few stitches have dropped but, in theory, I can fix those while sewing up to finish the seam.\u00a0HOWEVER: sewing up seams is definitely one of my weaker skills, so I am not sure I trust myself to do it without making a huge mess of things.\nFor the sake of my future as a machine knitter, I think I will probably pull all this ribbing off and try again. It will be a time-consuming process, but it's safe to do. Importantly, it will give me a chance to figure out what bits of the knitting machine / stand / cast-on comb / hanging weights are interfering with one another, causing the stitches to bunch up after that dozen-or-so rows.\nI could also stand to practice seaming and mending, a good reason to try and \"rescue\" this delicate collar situation.\nWhich will I choose? Will I let this project languish now that the knitalong is over?\u00a0Stay tuned to find out!\nMeanwhile, many thanks to KnitFactoryImpl\u00a0for running this knitalong, for providing a super versatile free pattern generator, making extra videos to detail each piece, and pulling together and sharing photos and more from the community! Also, you know, for the tons of great instructional and inspirational machine knitting content! Go subscribe and support her channel, already!",
        "html": "<p>This post is part of a series, as I play catch-up on <a href=\"https://www.youtube.com/watch?v=1kntNWiaZVM\">KnitFactoryImpl's knitalong of a set in sleeve crew neck sweater for channel members</a>.</p>\n<p>After <a href=\"https://martymcgui.re/2025/11/22/machine-knitting-front-panel--looking-forward/\">completing the front panel</a>, only one major on-the-machine task remains for this sweater, and that's the neckline.</p>\n<p>This is easy to explain conceptually: connect the front and the back by seaming them together at one shoulder, rehang all the stitches on the knitting machine, knit some rows for the collar, then cast off on waste yarn.</p>\n<p>Still, I was dreading this for some reason, so I procrastinated on it all day and then hemmed-and-hawed as I did it.</p>\n<img src=\"https://media.martymcgui.re/84/50/dd/49/f1ad6e79cf31d0df06cbbdbe2a927a3677ab7d1d7637c0408691c310.\" alt=\"\" />One shoulder: seamed! The view from the inside.<img src=\"https://media.martymcgui.re/5b/50/33/19/ff9d893cab91913967254f673da123e088318eeee138b4835cda9130.\" alt=\"\" />The seam viewed from the outside.<p>Technically, the last bits of shoulder seams should include some purple stitches, but I found it too mind-bending to think about how to change colors while so many needles were going into hold and being wrapped. It's really just a few stitches so I don't think anyone will notice in the final sweater.</p>\n<p>I then took a long break for food, exercise, and a shower, and only actually started hanging the neckline on the machine about 15 minutes before the live show-and-tell. \ud83e\udee3</p>\n<img src=\"https://media.martymcgui.re/6d/a8/73/0f/99046d53a0daf4a8b3360f49099a408642d95ce4898ad7306d11c1f3.\" alt=\"\" />Can I knit and participate in a livestream event at the same time? Not really!<p>I really enjoyed the show-and-tell. It was encouraging to hear KnitFactoryImpl's own challenges and inspiring to see the final (extremely fluffy!) cardigan. I was delighted and honored that she shared my posts from\u00a0<i>this very website</i>\u00a0with some kind comments on my knitting setup and progress photos. I <i>loved</i> seeing photos from other participants, too! It was nice to have enough context to understand and appreciate some of the choices made in terms of stitch variety, yarn types, and (of course) colors and patterns!</p>\n<p>I ended up waiting until after the livestream to finish hanging the stitches.</p>\n<p>Once it was all back on the bed, following KnitFactoryImpl's advice, I:</p>\n<ul><li>hung a bunch of weights.</li>\n  <li>knit one row of normal knitting (at a slightly looser tension than the main body).</li>\n  <li>transferred half of the stitches to the ribber for 1x1 rib.</li>\n  <li>added more weights.</li>\n  <li>set up the carriages to knit the rib the same as I had done the cuffs and body panel hems.</li>\n</ul><p>I even got to use these cool weight hangers on the edges!</p>\n<img src=\"https://media.martymcgui.re/ba/98/49/93/84d767e97a8849cb522533e66d5766280e723fbfb68a7eb2d287769a.\" alt=\"\" />These made no sense to me until I saw a photo in <a href=\"https://mkmanuals.com/brother-kr850-ribber-user-guide.html\">the KR-850 manual</a>.<p>After all the effort to hang the stitches, set the weights, set up the carriage, knit the one row of stockinette, remove the carriage, transfer half the stitches, set more weights, and set up the carriages again, I was feeling pretty nervous about this going awry.</p>\n<p>So I knit 12 rows of 1x1 rib\u00a0<i>very slowly</i>, checking each stitch after every row. This was made more challenging by the fact that my main yarn is pitch black. \ud83d\ude05</p>\n<p>To my relief, those 12 rows went great! It was time to cast off onto waste yarn with circular knitting. So, I switched yarns, set the carriages for circular knitting, knit a few rows back and forth-</p>\n<p>- and realize something was going very wrong! The tension from the weights just seemed to be <i>not\u00a0working</i>. A bunch of stitches piled up loosely and then started dropping.</p>\n<p>I didn't panic, but I did remove all the weights and start painstakingly removing the tangled knitting from the bed.</p>\n<img src=\"https://media.martymcgui.re/0c/07/11/19/a4dcbc260b98e6dafb2e7bb89e227058e23bd35f268b17302f124f6b.\" alt=\"\" />Yikes. Only one or two loops of the pink waste yarn are protecting the live stitches at the end of the collar.<p>Most of the actual rib came off the machine fine. A few stitches have dropped but, in theory, I can fix those while sewing up to finish the seam.\u00a0<b>HOWEVER</b>: sewing up seams is definitely one of my weaker skills, so I am not sure I trust myself to do it without making a huge mess of things.</p>\n<p>For the sake of my future as a machine knitter, I think I will probably pull all this ribbing off and try again. It will be a time-consuming process, but it's safe to do. Importantly, it will give me a chance to figure out what bits of the knitting machine / stand / cast-on comb / hanging weights are interfering with one another, causing the stitches to bunch up after that dozen-or-so rows.</p>\n<p>I could also stand to practice seaming and mending, a good reason to try and \"rescue\" this delicate collar situation.</p>\n<p>Which will I choose? Will I let this project languish now that the knitalong is over?\u00a0<i>Stay tuned to find out!</i></p>\n<p>Meanwhile, many thanks to <a href=\"https://www.youtube.com/@KnitFactoryImpl\">KnitFactoryImpl</a>\u00a0for running this knitalong, for providing a super versatile free pattern generator, making extra videos to detail each piece, and pulling together and sharing photos and more from the community! Also, you know, for the tons of great instructional and inspirational machine knitting content! Go subscribe and support her channel, already!</p>"
    },
    "author": {
        "type": "card",
        "name": "Marty McGuire",
        "url": "https://martymcgui.re/",
        "photo": "https://martymcgui.re/images/logo.jpg"
    },
    "post-type": "article",
    "_id": "46601915",
    "_source": "175"
}
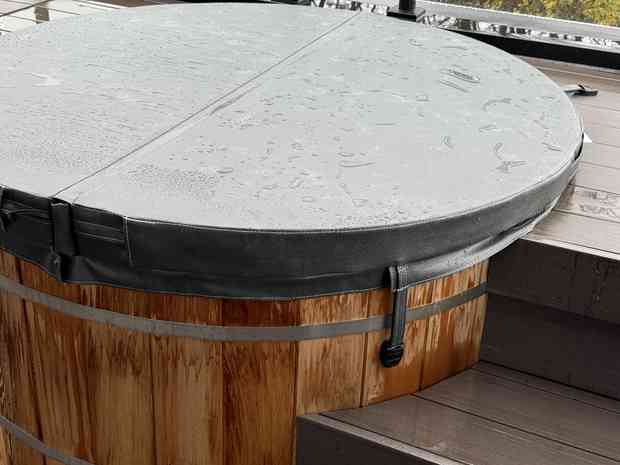
The hot tub cover finally arrived! I had to screw the little clamps in for the straps, and it felt more than a little terrifying to drill a hole in the wood with it full of water.
{
    "type": "entry",
    "published": "2025-11-23T11:39:03-08:00",
    "url": "https://aaronparecki.com/2025/11/23/9/",
    "category": [
        "365",
        "triplex",
        "hottub",
        "spa"
    ],
    "photo": [
        "https://aperture-media.p3k.io/aaronparecki.com/02bcbd4efc67254374781771952a8ef37044dd89af63c46949a3b7f4ab13f368.jpg"
    ],
    "content": {
        "text": "The hot tub cover finally arrived! I had to screw the little clamps in for the straps, and it felt more than a little terrifying to drill a hole in the wood with it full of water."
    },
    "author": {
        "type": "card",
        "name": "Aaron Parecki",
        "url": "https://aaronparecki.com/",
        "photo": "https://aperture-media.p3k.io/aaronparecki.com/41061f9de825966faa22e9c42830e1d4a614a321213b4575b9488aa93f89817a.jpg"
    },
    "post-type": "photo",
    "_id": "46593626",
    "_source": "16"
}
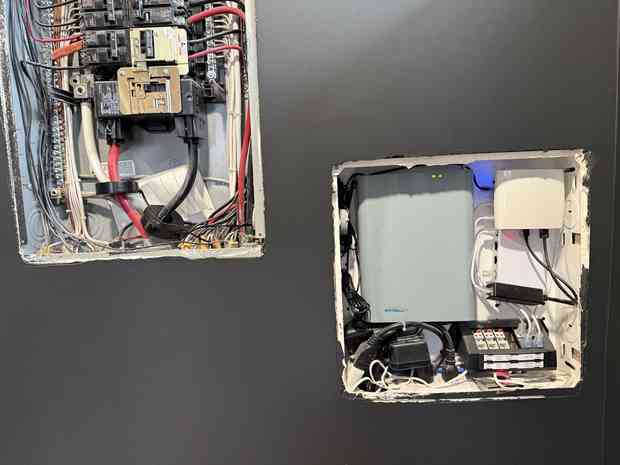
Today I hooked up the CT clamps to the main breaker panel, and now I have continuous monitoring of how much power the house is using! It's very cool. I'm going to have my electrician run CTs to each individual circuit next time he's here.
{
    "type": "entry",
    "published": "2025-11-20T15:55:52-08:00",
    "url": "https://aaronparecki.com/2025/11/20/12/",
    "category": [
        "triplex",
        "homeautomation",
        "365"
    ],
    "photo": [
        "https://aperture-media.p3k.io/aaronparecki.com/90cfd37dbaee280efafb986509385f4fbe25800a5d609c164df3d8de2d87dbc2.jpg"
    ],
    "content": {
        "text": "Today I hooked up the CT clamps to the main breaker panel, and now I have continuous monitoring of how much power the house is using! It's very cool. I'm going to have my electrician run CTs to each individual circuit next time he's here."
    },
    "author": {
        "type": "card",
        "name": "Aaron Parecki",
        "url": "https://aaronparecki.com/",
        "photo": "https://aperture-media.p3k.io/aaronparecki.com/41061f9de825966faa22e9c42830e1d4a614a321213b4575b9488aa93f89817a.jpg"
    },
    "post-type": "photo",
    "_id": "46593628",
    "_source": "16"
}
{
    "type": "entry",
    "published": "2025-11-22T15:16:29-0500",
    "url": "https://martymcgui.re/2025/11/22/machine-knitting-front-panel--looking-forward/",
    "category": [
        "machine-knitting",
        "sweater",
        "KnitFactoryImpl",
        "body",
        "knitalong"
    ],
    "name": "Machine knitting: front panel / looking forward",
    "content": {
        "text": "This post is part of a series, as I play catch-up on KnitFactoryImpl's knitalong of a set in sleeve crew neck sweater for channel members.\nAt the dawn of the final day of the knitalong, I was determined to finish the machine-knit portions of the build. That means making the front panel, seaming the front and back along one shoulder, rehanging the neckline, and knitting the collar.\nThe front panel is constructed about the same as the back panel, but with differences in the neck and shoulder shaping. Compared with my rough go of it on the back panel, the front panel went much easier. I found myself tripping over the combination of working the pattern and switching yarns for the colored stripes. And I'm afraid that no one on Earth knows exactly how the stitch and row counts on the arm hole and neck actually shaping turned out. Future me will, unfortunately, become the one to solve this puzzle.\nGreat success up to the arm hole bind off!I played gravity chicken with the cast-on comb and weights and, unfortunately, they were near touching the ground just as the pattern called for the long series of decreases for arm hole shaping. I was able to hang the regular cast-on comb, but it added some complication with moving those stitches. If I had to do it again, I'd make sure to re-hang all the weights 10 or so rows before that.\nYarn (and my stress levels) under tension as I work the left neck and shoulder.I also regret being precious and/or clever with managing the out-of-work yarn. To keep down the number of ends to work in, I let the out-of-work yarn float from one section to the next. For straight sections, I should be able to hide the floats in a seam. For areas with decreases and bind-offs, I should have just snipped yarn and worked in the ends as I went. I think I'll be cutting and adding extra yarn to several floats that ended up being pulled shorter than the stitches they are meant to hide among. \ud83d\ude29\nLooks like a body panel of a sweater!Hanging it on my body has me worried about the arm hole depth, but we march onward!With breaks for food and stretching, it took me about 4 hours to get through this body panel. With my other obligations for the day, I don't think I'll be able to finish the neckline tonight. But, hey, there's always tomorrow!\nI'm not super confident in how this is gonna turn out, but I'm proud that I've pushed through so far!\u00a0Plus I got to try draping all the major pieces on!\n\ud83d\udc4d\ud83c\udffb",
        "html": "<p>This post is part of a series, as I play catch-up on <a href=\"https://www.youtube.com/watch?v=1kntNWiaZVM\">KnitFactoryImpl's knitalong of a set in sleeve crew neck sweater for channel members</a>.</p>\n<p>At the dawn of the final day of the knitalong, I was determined to finish the machine-knit portions of the build. That means making the front panel, seaming the front and back along one shoulder, rehanging the neckline, and knitting the collar.</p>\n<p>The front panel is constructed about the same as the back panel, but with differences in the neck and shoulder shaping. Compared with my <a href=\"https://martymcgui.re/2025/11/21/machine-knitting-back-panel--backlog/\">rough go of it on the back panel</a>, the front panel went much easier. I found myself tripping over the combination of working the pattern and switching yarns for the colored stripes. And I'm afraid that no one on Earth knows exactly how the stitch and row counts on the arm hole and neck actually shaping turned out. Future me will, unfortunately, become the one to solve this puzzle.</p>\n<img src=\"https://media.martymcgui.re/5c/b0/e8/d4/ce14a4da8f472065f6dad910ab7e61b61a5bc04cfcc0e5056a343376.\" alt=\"\" />Great success up to the arm hole bind off!<p>I played gravity chicken with the cast-on comb and weights and, unfortunately, they were near touching the ground just as the pattern called for the long series of decreases for arm hole shaping. I was able to hang the regular cast-on comb, but it added some complication with moving those stitches. If I had to do it again, I'd make sure to re-hang all the weights 10 or so rows before that.</p>\n<img src=\"https://media.martymcgui.re/93/7e/91/22/e3ce37482b738a99019c46fb87a8515d527fd2370670358d74575957.\" alt=\"\" />Yarn (and my stress levels) under tension as I work the left neck and shoulder.<p>I also regret being precious and/or clever with managing the out-of-work yarn. To keep down the number of ends to work in, I let the out-of-work yarn float from one section to the next. For straight sections, I should be able to hide the floats in a seam. For areas with decreases and bind-offs, I should have just snipped yarn and worked in the ends as I went. I think I'll be cutting and adding extra yarn to several floats that ended up being pulled shorter than the stitches they are meant to hide among. \ud83d\ude29</p>\n<img src=\"https://media.martymcgui.re/14/8a/ed/c4/29f4b762bd2f6c14724bb4c78d44098bf2cacf498b5921ab2cdcbc2c.\" alt=\"\" />Looks like a body panel of a sweater!<img src=\"https://media.martymcgui.re/f6/37/d0/d2/0a0a601a327270791d3e66df3421d1ae940c3d95067452e2d2d8382d.\" alt=\"\" />Hanging it on my body has me worried about the arm hole depth, but we march onward!<p>With breaks for food and stretching, it took me about 4 hours to get through this body panel. With my other obligations for the day, I don't think I'll be able to finish the neckline tonight. But, hey, there's always tomorrow!</p>\n<p>I'm not super confident in how this is gonna turn out, but I'm proud that I've pushed through so far!\u00a0Plus I got to try draping all the major pieces on!</p>\n<img src=\"https://media.martymcgui.re/c3/f4/66/0b/44b05b09cd35bf278b0bd5a3ee72e39e32ae24aafd276d00f343d77c.\" alt=\"\" /><p>\ud83d\udc4d\ud83c\udffb</p>"
    },
    "author": {
        "type": "card",
        "name": "Marty McGuire",
        "url": "https://martymcgui.re/",
        "photo": "https://martymcgui.re/images/logo.jpg"
    },
    "post-type": "article",
    "_id": "46585986",
    "_source": "175"
}
{
    "type": "entry",
    "published": "2025-11-21T23:15:13-0500",
    "url": "https://martymcgui.re/2025/11/21/machine-knitting-back-panel--backlog/",
    "category": [
        "machine-knitting",
        "sweater",
        "KnitFactoryImpl",
        "body",
        "knitalong"
    ],
    "name": "Machine knitting: back panel / backlog",
    "content": {
        "text": "This post is part of a series, as I play catch-up on\u00a0KnitFactoryImpl's knitalong of a set in sleeve crew neck sweater for channel members.\nIn the first installment of this series, I made some sleeves, putting me well on time for the knitalong. Since then, however, I spent two weeks in Berlin, a few days sick, and some days catching up on work. All that adds up to: the knitalong is already practically over! \ud83d\ude31\nHowever, I can't let that get me down. It's not homework, there's no grade. I just want to practice some skills, learn some new ones, and make producer Amy a nice sweater. So, let's cast on and get back to it.\nThe second video in the knitalong series is on body panels. I started with the back. A process that was meant to look something like:\nCast on 1x1 rib and knit the bottom hem.\n  Transfer stitches to the main bed and knit the body (a long rectangle of plain knitting).\n  Shape the arm holes by binding off some stitches, then decreasing for a bunch of rows.\n  Shape the shoulder and neck by working one side at a time.\nBecause I'm working this sweater with a pattern of stripes, I peppered the printed instructions with the row count and color for each color change. This would become important when switching \"sections\" of pattern that restart the row counter to 000, and doubly important for the shoulder shaping, which has to be worked twice.\nTough to see in black yarn, but here's a ribbed hem for a body panel!This was my first time casting on a 1x1 rib across almost the entire bed. I found it challenging to get the ribber's full-bed cast-on comb. In my first failed attempt the comb was one needle too far to the right and got caught on a piece of the machine. For the second attempt, one of the weights got stuck on a piece of my knitting machine stand, causing stitches on that side to bunch up and drop. Seen above: I finally got it right!\nAfter transferring the stitches from the ribber to the main bed, it should have been smooth sailing for the main body. Unfortunately, working the striped pattern proved challenging with so many stitches on the bed. The area for \"parking\" the non-active yarn ends up under the carriage, making it easy to tangle and create long loops. And, oh no-\nDropped about half the stitches off the bed during a color change. \ud83d\ude2d\n  Just over halfway through the main body, after switching colors and,\u00a0I SWEAR, checking that the new yarn was properly in the carriage feeder, I dropped off a ton of stitches.\nThankfully, this was recoverable, if tedious.\nRemove all weights from the work.\n  Carefully remove the work from the machine.\n  Go back to the last row of the previous color stripe and re-hang the live stitches. At 185 stitches this was quite tedious!\n  Reset the row counter to match.\n  Hang a cast-on comb and some weights.\n  Resume knitting, redoing the stripe that was dropped. It will be removed after taking the piece off the machine.\nThe new, somewhat ridiculous, weight configuration. Photo taken after several successful stripes.The more recent rows of stripes. The ribber sure gets in the way of photos!That was, thankfully, the only major disaster.\nWhen I made it to shoulder bind-off, I pulled up the knitalong video to start double-checking steps. The bind-off went fine. The reductions for the shoulder holes was made more complicated by needing to switch colors in the middle, but went pretty okay!\nReady for neck and shoulders. Lolly cat is staring because I'm wearing a neck light and moving lights cannot be trusted.At this point, it was time to work the shoulders one at a time. I referred to the video multiple times. I goofed up and dropped some stitches that I was thankfully able to recover. I took it slow and sweat the details. I nodded along at the concept of short rowing on two sides as I watched the video a 5th and 6th time. I ver-ry care-ful-ly bound off stitches. I counted and recounted and still somehow ended up off-by-one stitch somewhere along the way.\nBut I finished! And I think it will be okay!\nTest fitting by laying it on my back. Sure! Seems like a thing!I'm expecting this to relax and shrink up\u00a0 after washing!I worked on this piece on and off all day, in between work and meetings and phone calls. I definitely putting in at least a few solid hours of work, mostly in recovering from mistakes. I wrapped around 10pm to write this post!\nI'll be back at it tomorrow! My hope is to at least finish the front panel and the neckline and get a post online in time for the knitalong's Sunday show and tell. I'll still need to seam the final shoulder, sleeves, and sides, but I'll have finished the\u00a0machine knitting\u00a0part of it, and that should feel pretty good.\nOK, see you tomorrow!",
        "html": "<p>This post is part of a series, as I play catch-up on\u00a0<a href=\"https://www.youtube.com/watch?v=1kntNWiaZVM\">KnitFactoryImpl's knitalong of a set in sleeve crew neck sweater for channel members</a>.</p>\n<p>In the <a href=\"https://martymcgui.re/2025/10/26/machine-knitting-sleeves/\">first installment of this series, I made some sleeves</a>, putting me well on time for the knitalong. Since then, however, I spent two weeks in Berlin, a few days sick, and some days catching up on work. All that adds up to: the knitalong is already practically over! \ud83d\ude31</p>\n<p>However, I can't let that get me down. It's not homework, there's no grade. I just want to practice some skills, learn some new ones, and make producer Amy a nice sweater. So, let's cast on and get back to it.</p>\n<p>The second video in the knitalong series is on body panels. I started with the back. A process that was meant to look something like:</p>\n<ul><li>Cast on 1x1 rib and knit the bottom hem.</li>\n  <li>Transfer stitches to the main bed and knit the body (a long rectangle of plain knitting).</li>\n  <li>Shape the arm holes by binding off some stitches, then decreasing for a bunch of rows.</li>\n  <li>Shape the shoulder and neck by working one side at a time.</li>\n</ul><p>Because I'm working this sweater with a pattern of stripes, I peppered the printed instructions with the row count and color for each color change. This would become important when switching \"sections\" of pattern that restart the row counter to 000, and doubly important for the shoulder shaping, which has to be worked twice.</p>\n<img src=\"https://media.martymcgui.re/e1/ab/8e/cb/0626e210a7e10d240820e36b3ccc8ddfb98c5230318a51c91ddd12ee.\" alt=\"\" />Tough to see in black yarn, but here's a ribbed hem for a body panel!<p>This was my first time casting on a 1x1 rib across almost the entire bed. I found it challenging to get the ribber's full-bed cast-on comb. In my first failed attempt the comb was one needle too far to the right and got caught on a piece of the machine. For the second attempt, one of the weights got stuck on a piece of my knitting machine stand, causing stitches on that side to bunch up and drop. Seen above: I finally got it right!</p>\n<p>After transferring the stitches from the ribber to the main bed, it should have been smooth sailing for the main body. Unfortunately, working the striped pattern proved challenging with so many stitches on the bed. The area for \"parking\" the non-active yarn ends up under the carriage, making it easy to tangle and create long loops. And, oh no-</p>\n<img src=\"https://media.martymcgui.re/41/bb/25/9d/1083d6ad3eea87d8d16b8b640ea72ecd98838f35bc39b411ba82f8a1.\" alt=\"\" /><p>Dropped about half the stitches off the bed during a color change. \ud83d\ude2d</p>\n  <p>Just over halfway through the main body, after switching colors and,\u00a0<i>I SWEAR</i>, checking that the new yarn was properly in the carriage feeder, I dropped off a ton of stitches.</p>\n<p>Thankfully, this was recoverable, if tedious.</p>\n<ul><li>Remove all weights from the work.</li>\n  <li>Carefully remove the work from the machine.</li>\n  <li>Go back to the last row of the previous color stripe and re-hang the live stitches. At 185 stitches this was quite tedious!</li>\n  <li>Reset the row counter to match.</li>\n  <li>Hang a cast-on comb and some weights.</li>\n  <li>Resume knitting, redoing the stripe that was dropped. It will be removed after taking the piece off the machine.</li>\n</ul><img src=\"https://media.martymcgui.re/a2/1f/5e/36/b4608ca84e211811b4e76caa2826a0903934ce4434aea6b3b3c50077.\" alt=\"\" />The new, somewhat ridiculous, weight configuration. Photo taken after several successful stripes.<img src=\"https://media.martymcgui.re/a0/97/11/bb/41be81c6d531a8bc80f6c458c6f1591e0c74d57b386d49cedcd47cf6.\" alt=\"\" />The more recent rows of stripes. The ribber sure gets in the way of photos!<p>That was, thankfully, the only major disaster.</p>\n<p>When I made it to shoulder bind-off, I pulled up the knitalong video to start double-checking steps. The bind-off went fine. The reductions for the shoulder holes was made more complicated by needing to switch colors in the middle, but went pretty okay!</p>\n<img src=\"https://media.martymcgui.re/81/c3/71/0c/360c2cc53aceaf86b8b6de9ee9461fb47fcee464782e80c13f9ad408.\" alt=\"\" />Ready for neck and shoulders. Lolly cat is staring because I'm wearing a neck light and moving lights cannot be trusted.<p>At this point, it was time to work the shoulders one at a time. I referred to the video multiple times. I goofed up and <a href=\"https://www.youtube.com/watch?v=VpjXiRZ_rLc\">dropped some stitches that I was thankfully able to recover</a>. I took it slow and sweat the details. I nodded along at the concept of short rowing on two sides as I watched the video a 5th and 6th time. I ver-ry care-ful-ly bound off stitches. I counted and recounted and still somehow ended up off-by-one stitch somewhere along the way.</p>\n<p>But I finished! And I think it will be okay!</p>\n<img src=\"https://media.martymcgui.re/41/18/6e/6e/17bfd76dbc11342b6083ec2c2373bbd88322d0b908b42196a267744d.\" alt=\"\" />Test fitting by laying it on my back. Sure! Seems like a thing!<img src=\"https://media.martymcgui.re/d3/ce/21/1d/26878b23161d36ac57a616d0b4d440161fa917a358c66d971efc7937.\" alt=\"\" />I'm expecting this to relax and shrink up\u00a0 after washing!<p>I worked on this piece on and off all day, in between work and meetings and phone calls. I definitely putting in at least a few solid hours of work, mostly in recovering from mistakes. I wrapped around 10pm to write this post!</p>\n<p>I'll be back at it tomorrow! My hope is to at least finish the front panel and the neckline and get a post online in time for the knitalong's Sunday show and tell. I'll still need to seam the final shoulder, sleeves, and sides, but I'll have finished the\u00a0<i>machine knitting</i>\u00a0part of it, and that should feel pretty good.</p>\n<p>OK, see you tomorrow!</p>"
    },
    "author": {
        "type": "card",
        "name": "Marty McGuire",
        "url": "https://martymcgui.re/",
        "photo": "https://martymcgui.re/images/logo.jpg"
    },
    "post-type": "article",
    "_id": "46581749",
    "_source": "175"
}