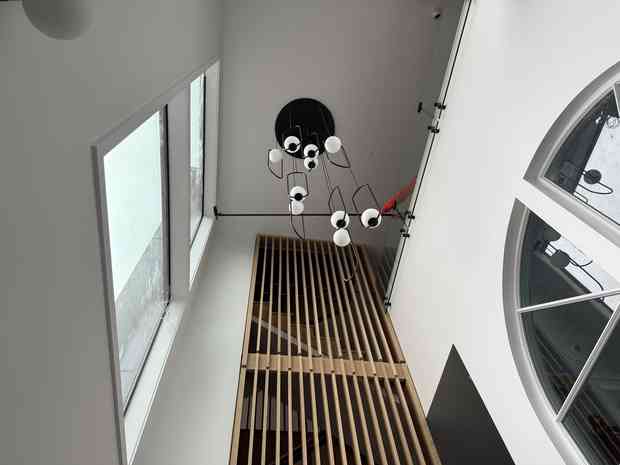
{
"type": "entry",
"published": "2025-12-13T09:20:14-08:00",
"url": "https://aaronparecki.com/2025/12/13/9/",
"category": [
"triplex",
"electrical",
"homeautomation",
"homeassistant"
],
"photo": [
"https://aperture-media.p3k.io/aaronparecki.com/f3a1ca5540e2bbd8a95131159336d01476c8b07132a639eed02c8fc85e7dac9d.jpg",
"https://aperture-media.p3k.io/aaronparecki.com/540f3f26d75067c406a4bfa346815c8bb5af197993df8f9536bab5e47236382a.jpg",
"https://aperture-media.p3k.io/aaronparecki.com/193872b16610173bb7c23d2aeae3899b4c458772bba76025b6997d47765794ec.png"
],
"content": {
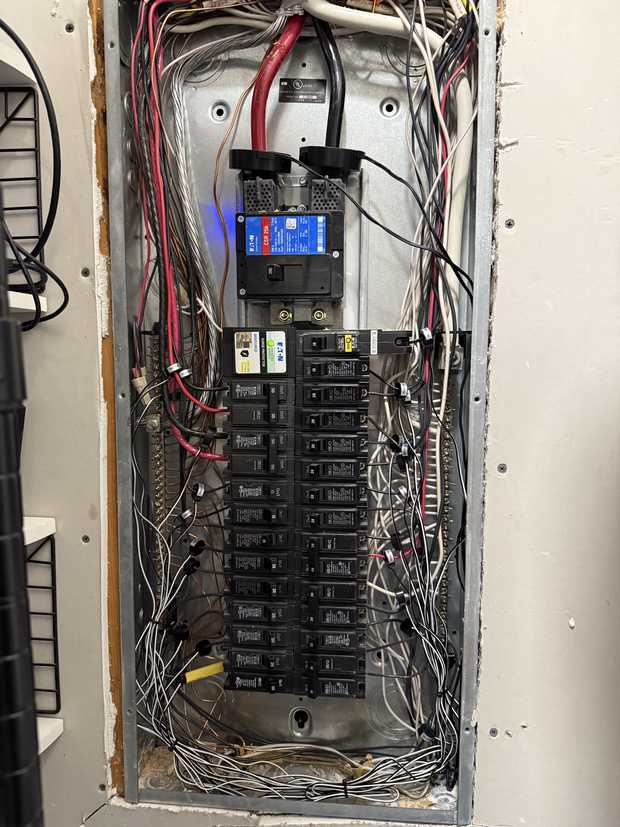
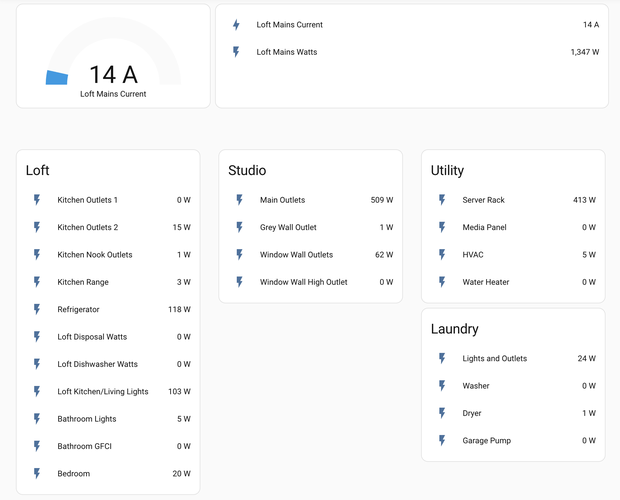
"text": "Finally finished the last two breakers, and now I have every circuit in the loft hooked up to the power monitoring system!"
},
"author": {
"type": "card",
"name": "Aaron Parecki",
"url": "https://aaronparecki.com/",
"photo": "https://aperture-media.p3k.io/aaronparecki.com/41061f9de825966faa22e9c42830e1d4a614a321213b4575b9488aa93f89817a.jpg"
},
"post-type": "photo",
"_id": "46776649",
"_source": "16"
}
{
"type": "entry",
"published": "2025-12-13T12:39:16-0500",
"url": "https://martymcgui.re/2025/12/13/machine-knittin-moar-mittens/",
"category": [
"machine-knitting",
"fingerless",
"mitts"
],
"name": "Machine knittin': moar mittens",
"content": {
"text": "I am pleased to report that producer Amy approved of the mittens I posted a couple of weeks ago, which were a bit too small for me.\n\"Sooo cozy!\" was the text accompanying this photo of Amy's hand with pearlescent nail polish and a woollen knit mitt.\"How nice,\" I thought, \"to have made something functional and enjoyable. Now to make a new pair for me. I'll use this different sock yarn, that Amy bought me in Berlin, so we can easily tell them apart. This should be nice and straightforward!\"\nHa ha ha! Ha-ha! Ha.\nReaders to enjoy a tl;dr: this worked out fine, but not before multiple failures and some wrestling with broken self-confidence.\nPalms up, blue and gray variegated mitts on my hands. My left pinky has a tell-tale Band-aid visible.Palms down view.This is still a variant of\u00a0the Fingerless Mitt to Knit by Diana Sullivan (from Austin, TX). Here were the changes that finally worked for me, with this yarn:\nBody of the mitt is 55 stitches wide. Thumb is 4 stitches wider, using needles from 14L to 15R.\n Knitting tension is T7 on both carriages. Near (but not at!) the loosest possible tension for my ribber carriage.\n Manually loosen the yarn in the tension mast before knitting each row. The carriages screeched and often jammed, but I was able to jiggle them across with great anxiety about breaking my machine.\n For the top of the mitts, I learned how to do a proper 1x1 rib bind-off. I liked Diana's \"Simpler Smiles & Frowns Bind-Off\" video for this.\nI really like how they turned out! I'm excited to put them to the test in the cold season!\nNow, for the strong-willed reader, let's talk about some challenges!\nLike most machine knitting projects, my issues can mostly be traced back to skipping the swatching step(s). This design relies on the stretchiness of two types of rib. The mitts \"at rest\" appear quite small, then stretch to snugly cover the hands. I'm not confident I would have been able to consistently measure gauge in a way that allowed comparing the stretched size of different yarns and tensions. But I should have tried!! I might have decided early on what I believe now, which is that this particular sock yarn is too thick to work well with my standard gauge machine.\nInstead, I jumped right into a first attempt with extra stitches and rows, but holding everything else the same, including the tension. This was a miserable experience, with the carriages jamming constantly. The machine was basically telling me \"no no no, stop, no\" the whole time. Would that I had listened! I managed (through sweat and anxiety) to finish it, but the resulting fabric was uncomfortably thick and tight. The loop-through-loop bind-off at the top of the mitt was also still too tight to spread my fingers while wearing it.\nFor attempt number two, I decided to up the tension to T6, but otherwise go back to the original stitch and row counts. This went a little better in terms of process and the fabric, but it was still too tight to wear.\nI got a lot of practice doing the hand sewing to make-up the pieces into the mitts. This was starting to feel like a lot of work for two disappointments. So I ended up taking a break for several days. I spent some of that time researching properly stretchy bind-offs and focusing on non-knitting projects, but mostly I was just feeling the sting of failure, haha.\nFinally, I did some practice at looser tensions, doing a few rows at T7 and T8 to see if I could find a technique that would actually knit smoothly with this yarn. I couldn't! But I did found that T7 was the\u00a0least\u00a0likely to bind up. I finished the body of the mitt at T7 well enough. I decided to \"do an easier version\" of the bind-off, skipping the step of casting off onto waste yarn and stitching it up on the machine, freeing each stitch from the machine as I sewed it up.\nIt was during a break in this process with many needles out in hold position, that I carelessly waved my hand and impaled my left pinky finger on 2 or 3 needles.\u00a0With some help from producer Amy, I got bandaged up and returned to work.\ud83e\ude78\ud83e\ude79\nThe result was... fine? It looks very inconsistent when the mitt is at rest, but it's very nice and stretchy and, when stretched out on the hand, I think it looks OK. Hooray, mobility!\nFor the last mitt, I combined all my hard-earned knowledge so far, and did a proper waste yarn bind-off to finish the top ribbing. The added steps felt more time-consuming, but I think the sewing up went a lot faster. It certainly looks a lot better!\nI'm not sure what I'll do with the failed mitts and the as-yet-unused portion of sock yarn. The machine definitely\u00a0does not like it. Probably it should be used for someone else's hand knit or crochet project.\nThanks for reading! I have more knitting projects I'm looking forward to posting soon.",
"html": "<p>I am pleased to report that producer Amy approved of the <a href=\"https://martymcgui.re/2025/12/02/machine-knittin-some-mittens/\">mittens I posted a couple of weeks ago</a>, which were a bit too small for me.</p>\n<img src=\"https://media.martymcgui.re/ea/5d/53/98/ed6d641bff1677469784ce7569edd02bb6e2135354a7d58d9be0a026.\" alt=\"\" />\"Sooo cozy!\" was the text accompanying this photo of Amy's hand with pearlescent nail polish and a woollen knit mitt.<p>\"How nice,\" I thought, \"to have made something functional and enjoyable. Now to make a new pair for me. I'll use this different sock yarn, that Amy bought me in Berlin, so we can easily tell them apart. This should be nice and straightforward!\"</p>\n<p>Ha ha ha! Ha-ha! Ha.</p>\n<p>Readers to enjoy a tl;dr: this worked out fine, but not before multiple failures and some wrestling with broken self-confidence.</p>\n<img src=\"https://media.martymcgui.re/20/bd/af/0c/c11d090a150bf3297c53014d7eb86511a16e6a25e8f52a010228d26a.\" alt=\"\" />Palms up, blue and gray variegated mitts on my hands. My left pinky has a tell-tale Band-aid visible.<img src=\"https://media.martymcgui.re/ed/54/3c/bd/bc49d75e4d33a2dc297f02fa3891dd33e5df2b48d07ed89b5452b164.\" alt=\"\" />Palms down view.<p>This is still a variant of\u00a0the <a href=\"https://www.youtube.com/watch?v=5e0EDazD9tc\">Fingerless Mitt to Knit by Diana Sullivan</a> (from Austin, TX). Here were the changes that finally worked for me, with this yarn:</p>\n<ul><li>Body of the mitt is 55 stitches wide. Thumb is 4 stitches wider, using needles from 14L to 15R.</li>\n <li>Knitting tension is T7 on both carriages. Near (but not at!) the loosest possible tension for my ribber carriage.</li>\n <li>Manually loosen the yarn in the tension mast before knitting each row. The carriages screeched and often jammed, but I was able to jiggle them across with great anxiety about breaking my machine.</li>\n <li>For the top of the mitts, I learned how to do a proper 1x1 rib bind-off. I liked <a href=\"https://youtu.be/tA5YisKe1Ac\">Diana's \"Simpler Smiles & Frowns Bind-Off\" video</a> for this.</li>\n</ul><p>I really like how they turned out! I'm excited to put them to the test in the cold season!</p>\n<p>Now, for the strong-willed reader, let's talk about some challenges!</p>\n<p>Like most machine knitting projects, my issues can mostly be traced back to skipping the swatching step(s). This design relies on the stretchiness of two types of rib. The mitts \"at rest\" appear quite small, then stretch to snugly cover the hands. I'm not confident I would have been able to consistently measure gauge in a way that allowed comparing the stretched size of different yarns and tensions. But I should have tried!! I might have decided early on what I believe now, which is that this particular sock yarn is too thick to work well with my standard gauge machine.</p>\n<p>Instead, I jumped right into a first attempt with extra stitches and rows, but holding everything else the same, including the tension. This was a miserable experience, with the carriages jamming constantly. The machine was basically telling me \"no no no, stop, no\" the whole time. Would that I had listened! I managed (through sweat and anxiety) to finish it, but the resulting fabric was uncomfortably thick and tight. The loop-through-loop bind-off at the top of the mitt was also still too tight to spread my fingers while wearing it.</p>\n<p>For attempt number two, I decided to up the tension to T6, but otherwise go back to the original stitch and row counts. This went a little better in terms of process and the fabric, but it was still too tight to wear.</p>\n<p>I got a lot of practice doing the hand sewing to make-up the pieces into the mitts. This was starting to feel like a lot of work for two disappointments. So I ended up taking a break for several days. I spent some of that time researching properly stretchy bind-offs and focusing on non-knitting projects, but mostly I was just feeling the sting of failure, haha.</p>\n<p>Finally, I did some practice at looser tensions, doing a few rows at T7 and T8 to see if I could find a technique that would actually knit smoothly with this yarn. I couldn't! But I did found that T7 was the\u00a0<i>least</i>\u00a0likely to bind up. I finished the body of the mitt at T7 well enough. I decided to \"do an easier version\" of the bind-off, skipping the step of casting off onto waste yarn and stitching it up on the machine, freeing each stitch from the machine as I sewed it up.</p>\n<p>It was during a break in this process with many needles out in hold position, that I carelessly waved my hand and impaled my left pinky finger on 2 or 3 needles.\u00a0With some help from producer Amy, I got bandaged up and returned to work.\ud83e\ude78\ud83e\ude79</p>\n<p>The result was... fine? It looks very inconsistent when the mitt is at rest, but it's very nice and stretchy and, when stretched out on the hand, I think it looks OK. Hooray, mobility!</p>\n<p>For the last mitt, I combined all my hard-earned knowledge so far, and did a proper waste yarn bind-off to finish the top ribbing. The added steps felt more time-consuming, but I think the sewing up went a lot faster. It certainly looks a lot better!</p>\n<p>I'm not sure what I'll do with the failed mitts and the as-yet-unused portion of sock yarn. The machine definitely<i>\u00a0does not like it</i>. Probably it should be used for someone else's hand knit or crochet project.</p>\n<p>Thanks for reading! I have more knitting projects I'm looking forward to posting soon.</p>"
},
"author": {
"type": "card",
"name": "Marty McGuire",
"url": "https://martymcgui.re/",
"photo": "https://martymcgui.re/images/logo.jpg"
},
"post-type": "article",
"_id": "46775297",
"_source": "175"
}
{
"type": "entry",
"published": "2025-12-13T11:27:07-0500",
"url": "https://martymcgui.re/2025/12/13/112707/",
"category": [
"machine-knitting",
"bow"
],
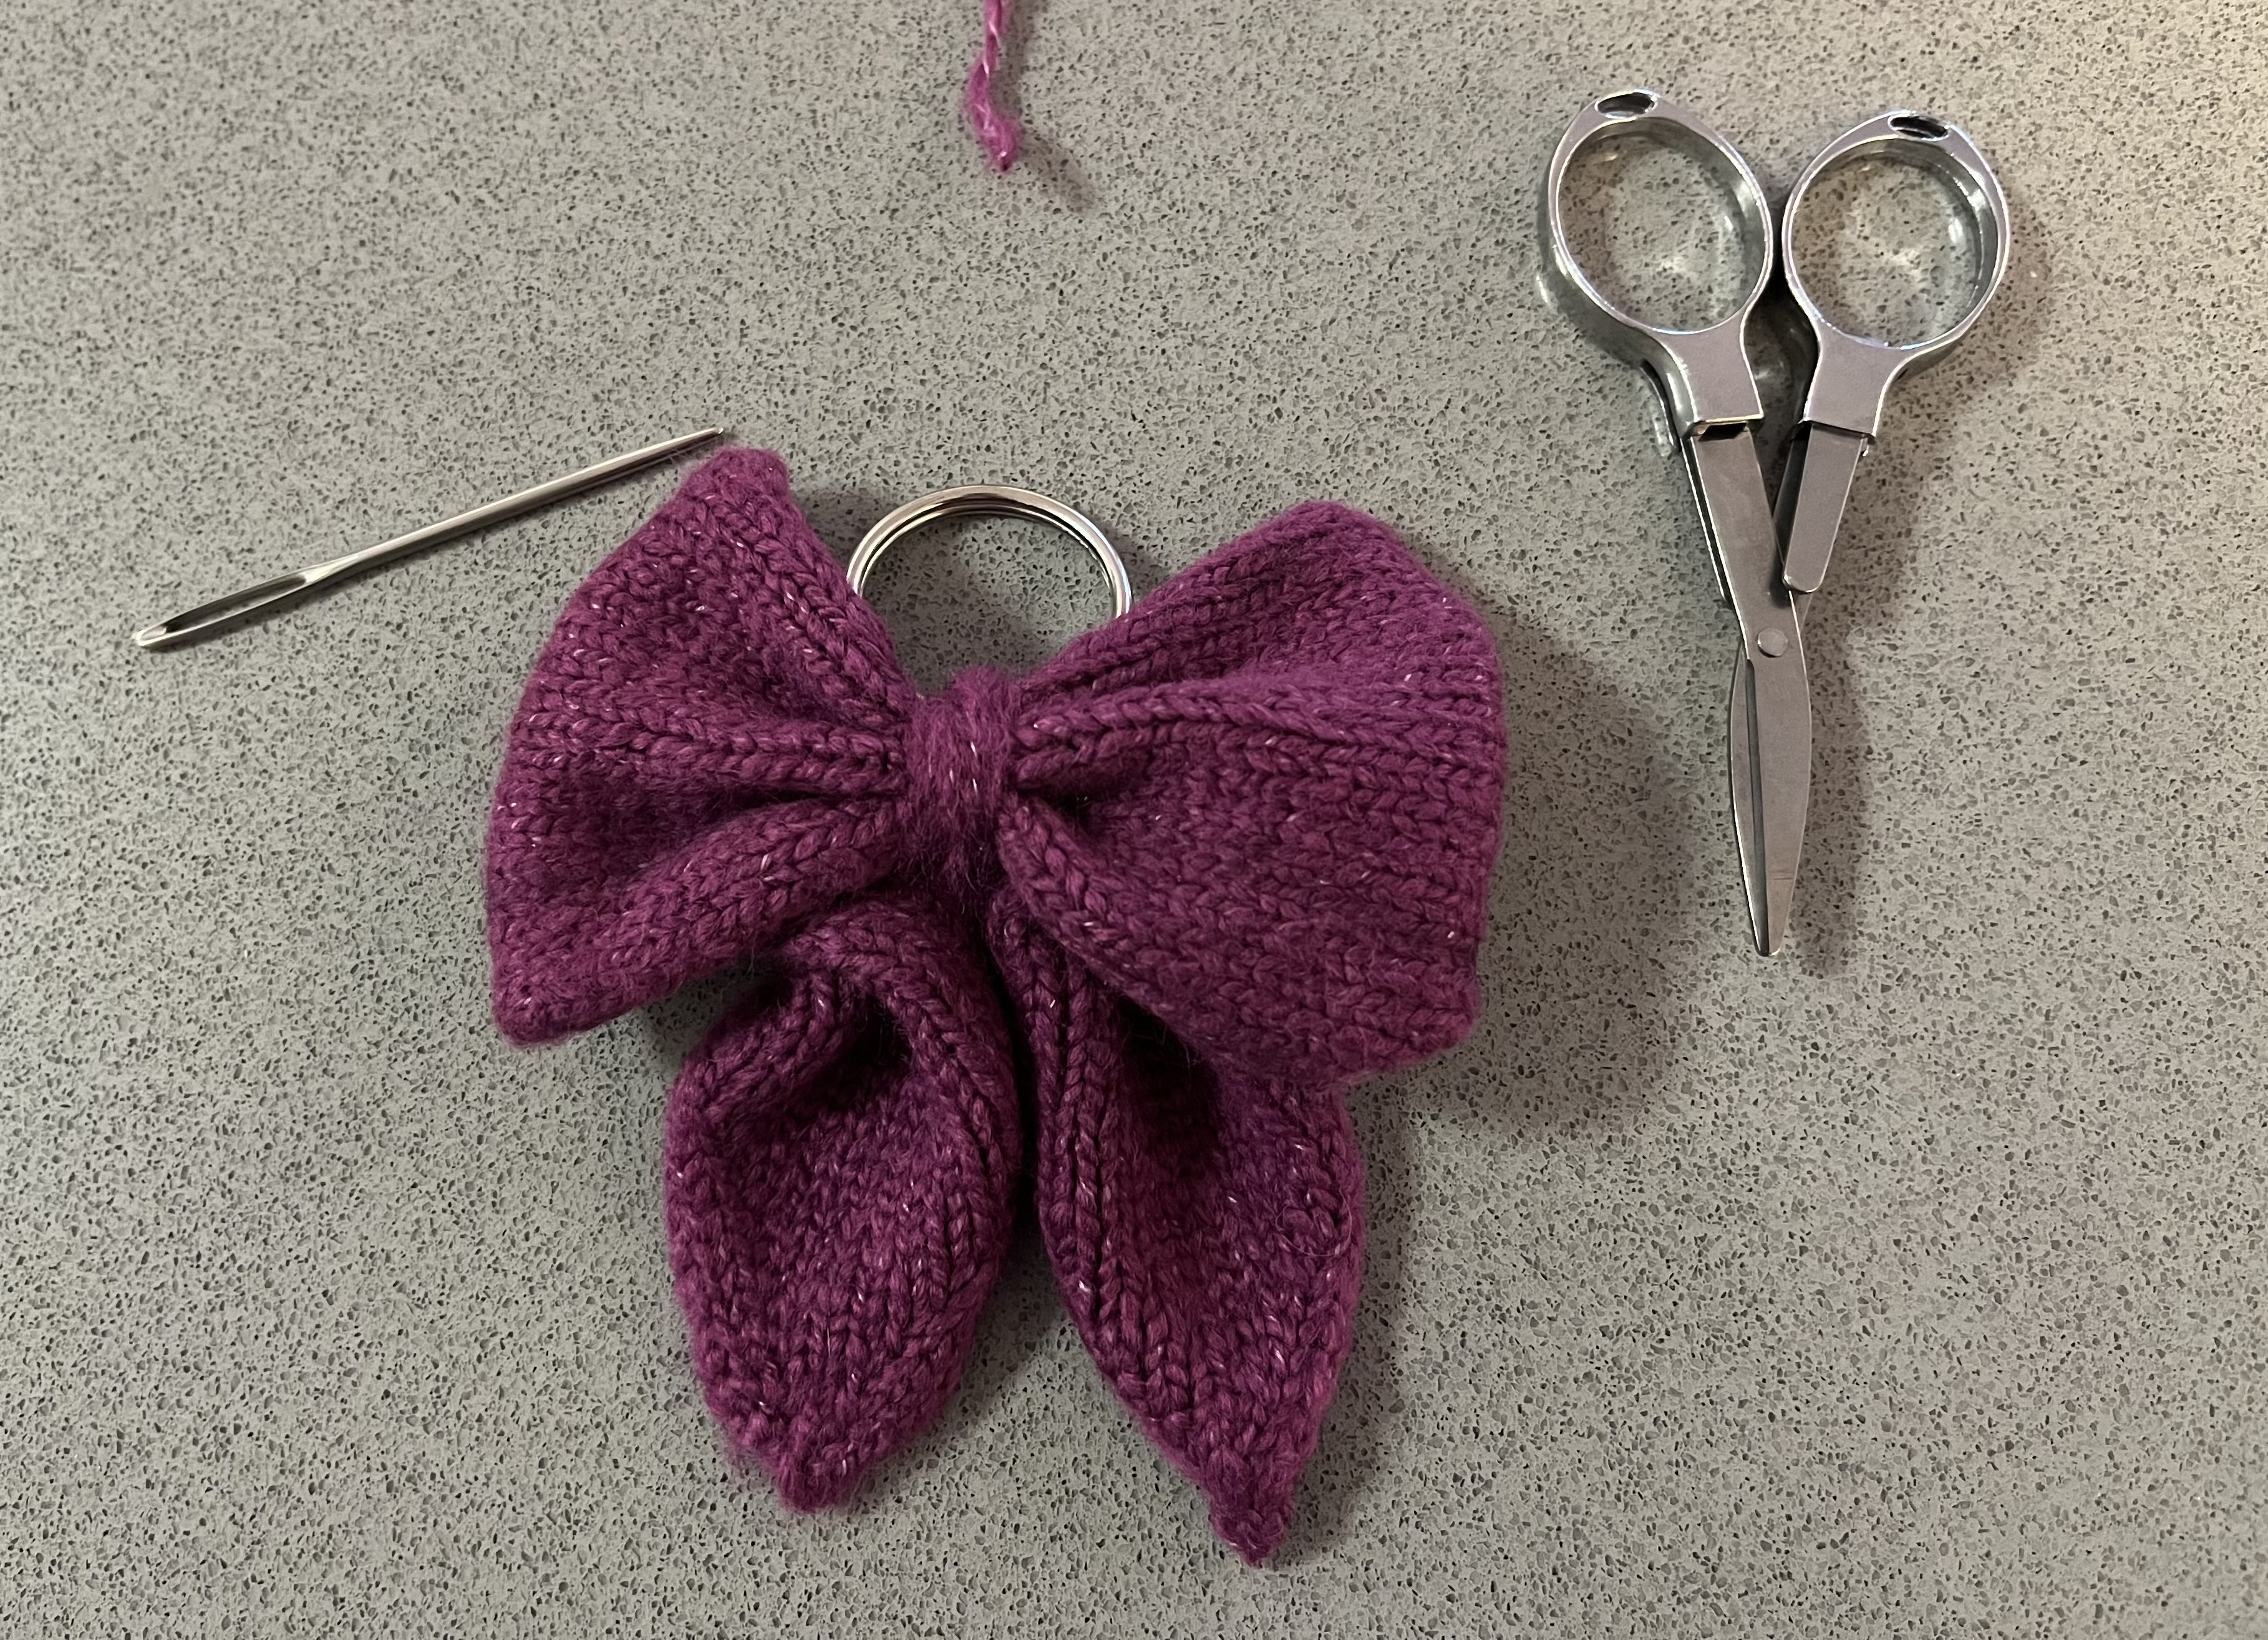
"photo": [
"https://res.cloudinary.com/schmarty/image/fetch/w_960,c_fill/https://media.martymcgui.re/c0/75/33/74/7d4ccaed13b0c6a5e46a4fa53c33940bfe8fdab40e2c5c977f3de312.jpeg"
],
"syndication": [
"https://fed.brid.gy/"
],
"content": {
"text": "Yesterday was a good day to make a little bow.",
"html": "<p>Yesterday was a good day to make a little bow.</p>\n\n \n <a href=\"https://media.martymcgui.re/c0/75/33/74/7d4ccaed13b0c6a5e46a4fa53c33940bfe8fdab40e2c5c977f3de312.jpeg\"></a>"
},
"author": {
"type": "card",
"name": "Marty McGuire",
"url": "https://martymcgui.re/",
"photo": "https://martymcgui.re/images/logo.jpg"
},
"post-type": "photo",
"_id": "46773224",
"_source": "175"
}
{
    "type": "entry",
    "published": "2025-12-12T00:31:52-08:00",
    "url": "https://beesbuzz.biz/blog/1499-Vehicle-updates",
    "category": [
        "vehicles",
        "ebike",
        "car"
    ],
    "name": "Vehicle updates",
    "content": {
        "text": "The ebike has been working great!\n\nBut it\u2019s gotten super rainy, and it\u2019s not always great to ride in this weather.\n\nAlso having an empty carport has turned my house into a theft target, and I\u2019ve been locked in a battle with a dude who is absolutely determined to steal the bike at this point.\n\nOne of my ideals had been to go with an older shitbox car with a stick shift, and I happened to be checking Craigslist on my monthly search for a stickshift shitbox, and came across a 2008 Corolla which seemed to be in good shape, and which is basically the same innards and platform as the 2006 Matrix I loved so much.\n\nEarlier today the seller was free and so we met up and I gave it a test drive, and I ended up buying it, somewhat impulsively but, hey, it wouldn\u2019t be the worst car purchase decision I\u2019ve made in the last few years\u2026\n\nJust as I thought, a stickshift is a lot more fun to drive, and doesn\u2019t fill me with as much anxiety as a car that tries to do everything for me and makes me feel like I\u2019m not in control. It\u2019s a super basic car by today\u2019s standards; no blind-spot monitoring, no automatic headlights, no backup camera. Heck, it still has its factory stereo which only has a 6-CD changer and no aux input. (The seller threw in his Bluetooth-to-FM converter thing.) There\u2019s also a bunch of little things that need to be sorted out (I\u2019ll probably be taking it to my neighborhood mechanic tomorrow to see what work they recommend). It\u2019s also beige (which looks surprisingly nice compared to today\u2019s bland sea of black/white/grey boringness) and the paint is peeling and it\u2019s been in a few fender benders. It\u2019s not much of a looker, and it doesn\u2019t really need to be.\n\nI ended up ordering a CarPlay head unit since I do want in-dash navigation and better music integration and such, and also since the car only came with a single key and no door remote I ordered some remotes (which are apparently very easy to program yourself) and found a local locksmith who will duplicate and program the key for not too much.\n\nAnyway. I still wish I hadn\u2019t gotten rid of the Mazda3 when I did, but overall this feels like the right spot for me: a car that I don\u2019t feel guilty about not-driving, and which doesn\u2019t make me so anxious to drive.",
        "html": "<p>The ebike has been working great!</p><p>But it\u2019s gotten super rainy, and it\u2019s not always great to ride in this weather.</p><p>Also having an empty carport has turned my house into a theft target, and I\u2019ve been locked in a battle with a dude who is absolutely <em>determined</em> to steal the bike at this point.</p><p>One of my ideals had been to go with an older shitbox car with a stick shift, and I happened to be checking Craigslist on my monthly search for a stickshift shitbox, and came across a 2008 Corolla which seemed to be in good shape, and which is basically the same innards and platform as the 2006 Matrix I loved so much.</p><p>Earlier today the seller was free and so we met up and I gave it a test drive, and I ended up buying it, somewhat impulsively but, hey, it wouldn\u2019t be the <em>worst</em> car purchase decision I\u2019ve made in the last few years\u2026</p><p>Just as I thought, a stickshift is a lot more fun to drive, and doesn\u2019t fill me with as much anxiety as a car that tries to do everything for me and makes me feel like I\u2019m not in control. It\u2019s a super basic car by today\u2019s standards; no blind-spot monitoring, no automatic headlights, no backup camera. Heck, it still has its factory stereo which only has a 6-CD changer and no aux input. (The seller threw in his Bluetooth-to-FM converter thing.) There\u2019s also a bunch of little things that need to be sorted out (I\u2019ll probably be taking it to my neighborhood mechanic tomorrow to see what work they recommend). It\u2019s also beige (which looks surprisingly nice compared to today\u2019s bland sea of black/white/grey boringness) and the paint is peeling and it\u2019s been in a few fender benders. It\u2019s not much of a looker, and it doesn\u2019t really need to be.</p><p>I ended up ordering a <a href=\"https://www.crutchfield.com/p_070DCPA723/Dual-DCPA723W.html\">CarPlay head unit</a> since I <em>do</em> want in-dash navigation and better music integration and such, and also since the car only came with a single key and no door remote I ordered some remotes (which are apparently very easy to program yourself) and found a local locksmith who will duplicate and program the key for not too much.</p><p>Anyway. I still wish I hadn\u2019t gotten rid of the Mazda3 when I did, but overall this feels like the right spot for me: a car that I don\u2019t feel guilty about not-driving, and which doesn\u2019t make me so anxious to drive.</p>"
    },
    "author": {
        "type": "card",
        "name": "fluffy",
        "url": "https://beesbuzz.biz/",
        "photo": "https://beesbuzz.biz/static/headshot.jpg"
    },
    "post-type": "article",
    "_id": "46760441",
    "_source": "2778"
}
Just learned you can create QR codes pretty easily in LibreOffice:
Menu: Insert > OLE Object > QR and Barcode
Enter the URL and tada!
It inserts an object in the document at that point, so it can be resized and moved around. It is not an image that can be exported separately from the document (or at least, I have not found out how to do so yet). This worked OK for my needs, though, which was creating a PDF document with some QR codes in it.
{
"type": "entry",
"published": "2025-12-11 20:40-0800",
"url": "https://gregorlove.com/2025/12/just-learned-you-can/",
"category": [
"dev"
],
"content": {
"text": "Just learned you can create QR codes pretty easily in LibreOffice:\n\nMenu: Insert > OLE Object > QR and Barcode\n\tEnter the URL and tada!\nIt inserts an object in the document at that point, so it can be resized and moved around. It is not an image that can be exported separately from the document (or at least, I have not found out how to do so yet). This worked OK for my needs, though, which was creating a PDF document with some QR codes in it.\n\nVia help.libreoffice.org page",
"html": "<p>Just learned you can create QR codes pretty easily in <a href=\"https://libreoffice.org/\">LibreOffice</a>:</p>\n\n<ul><li>Menu: Insert > OLE Object > QR and Barcode</li>\n\t<li>Enter the URL and tada!</li>\n</ul><p>It inserts an <i>object</i> in the document at that point, so it can be resized and moved around. It is not an image that can be exported separately from the document (or at least, I have not found out how to do so yet). This worked OK for my needs, though, which was creating a PDF document with some QR codes in it.</p>\n\n<p>Via <a href=\"https://help.libreoffice.org/latest/en-GB/text/shared/01/qrcode.html?DbPAR=SHARED#bm_id901566317201860\">help.libreoffice.org</a> page</p>"
},
"author": {
"type": "card",
"name": "gRegor Morrill",
"url": "https://gregorlove.com/",
"photo": "https://gregorlove.com/site/assets/files/6268/profile-2021-square.300x0.jpg"
},
"post-type": "note",
"_id": "46759486",
"_source": "95"
}
{
"type": "entry",
"published": "2025-12-08T10:10:21-08:00",
"url": "https://aaronparecki.com/2025/12/08/15/",
"category": [
"365"
],
"photo": [
"https://aperture-media.p3k.io/aaronparecki.com/94d00ba3b42591709be15dd93e697eefbe2277895b458658e7a817f4db392234.jpg"
],
"content": {
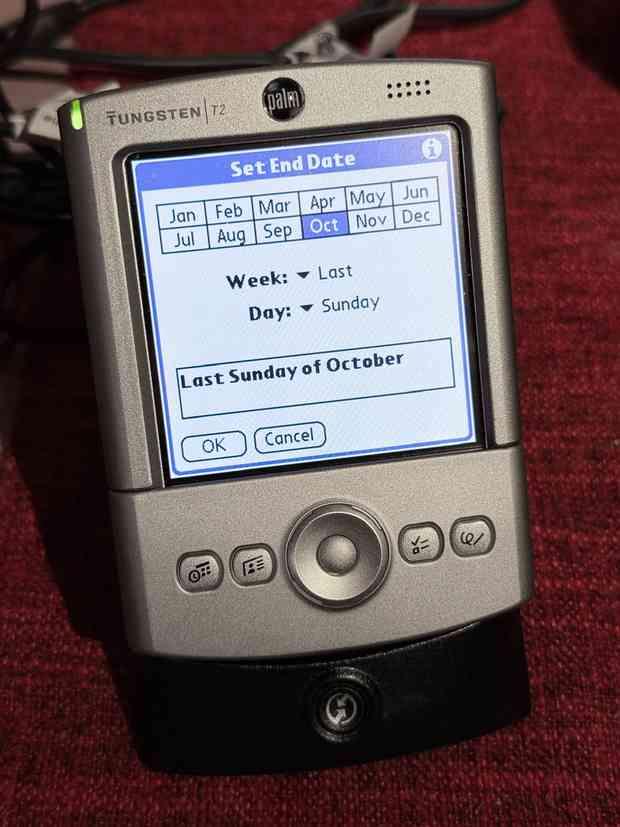
"text": "I had to re-buy my old Palm Tungsten T2 as well. It was my first color palm and I have such fond memories of it!"
},
"author": {
"type": "card",
"name": "Aaron Parecki",
"url": "https://aaronparecki.com/",
"photo": "https://aperture-media.p3k.io/aaronparecki.com/41061f9de825966faa22e9c42830e1d4a614a321213b4575b9488aa93f89817a.jpg"
},
"post-type": "photo",
"_id": "46758373",
"_source": "16"
}


