One of my favorite features of my new site is invisible to visitors — an integrated feed reader with support for first-class IndieWeb interactions — likes, replies, bookmarks, and reposts. Still iterating on it, but it’s already lovely to use.
{
    "type": "entry",
    "published": "2026-03-03T05:03:00.418743+00:00",
    "url": "https://cleverdevil.io/2026/one-of-my-favorite-features-of-my-new-si",
    "syndication": [
        "https://cleverdevil.club/@jonathan/116163489364720178",
        "https://bsky.app/profile/cleverdevil.io/post/3mg4yj4ljvr2c"
    ],
    "content": {
        "text": "One of my favorite features of my new site is invisible to visitors \u2014 an integrated feed reader with support for first-class IndieWeb interactions \u2014 likes, replies, bookmarks, and reposts. Still iterating on it, but it\u2019s already lovely to use.",
        "html": "<p>One of my favorite features of my new site is invisible to visitors \u2014 an integrated feed reader with support for first-class IndieWeb interactions \u2014 likes, replies, bookmarks, and reposts. Still iterating on it, but it\u2019s already lovely to use.</p>"
    },
    "author": {
        "type": "card",
        "name": "Jonathan LaCour",
        "url": "https://cleverdevil.io",
        "photo": "https://cleverdevil.io/profile/photo"
    },
    "post-type": "note",
    "_id": "47516680",
    "_source": "10"
}
I really enjoyed watching Winged Migration (2001). Some breathtaking footage of bird migrations all around the world. I was shocked how close some of the footage was and learned via Wikipedia that the filmmakers raised several species from birth so they would imprint on the staff and be accustomed to the ultralights and camera equipment.
{
    "type": "entry",
    "published": "2026-03-02 12:18-0800",
    "url": "https://gregorlove.com/2026/02/i-really-enjoyed/",
    "category": [
        "movies"
    ],
    "content": {
        "text": "I really enjoyed watching Winged Migration (2001). Some breathtaking footage of bird migrations all around the world. I was shocked how close some of the footage was and learned via Wikipedia that the filmmakers raised several species from birth so they would imprint on the staff and be accustomed to the ultralights and camera equipment.\n\nThanks to Fractal Kitty for the recommendation for IndieWeb Movie Club!",
        "html": "<p>I really enjoyed watching <i><a href=\"https://en.wikipedia.org/wiki/Winged_Migration\">Winged Migration</a></i> (2001). Some breathtaking footage of bird migrations all around the world. I was shocked how close some of the footage was and learned via Wikipedia that the filmmakers raised several species from birth so they would imprint on the staff and be accustomed to the ultralights and camera equipment.</p>\n\n<p>Thanks to <a class=\"h-card\" href=\"https://banjomagpi.com/\">Fractal Kitty</a> for the <a href=\"https://banjomagpi.com/movies/winged-migration/\">recommendation</a> for IndieWeb Movie Club!</p>"
    },
    "author": {
        "type": "card",
        "name": "gRegor Morrill",
        "url": "https://gregorlove.com/",
        "photo": "https://gregorlove.com/site/assets/files/6268/profile-2021-square.300x0.jpg"
    },
    "post-type": "note",
    "_id": "47514516",
    "_source": "95"
}
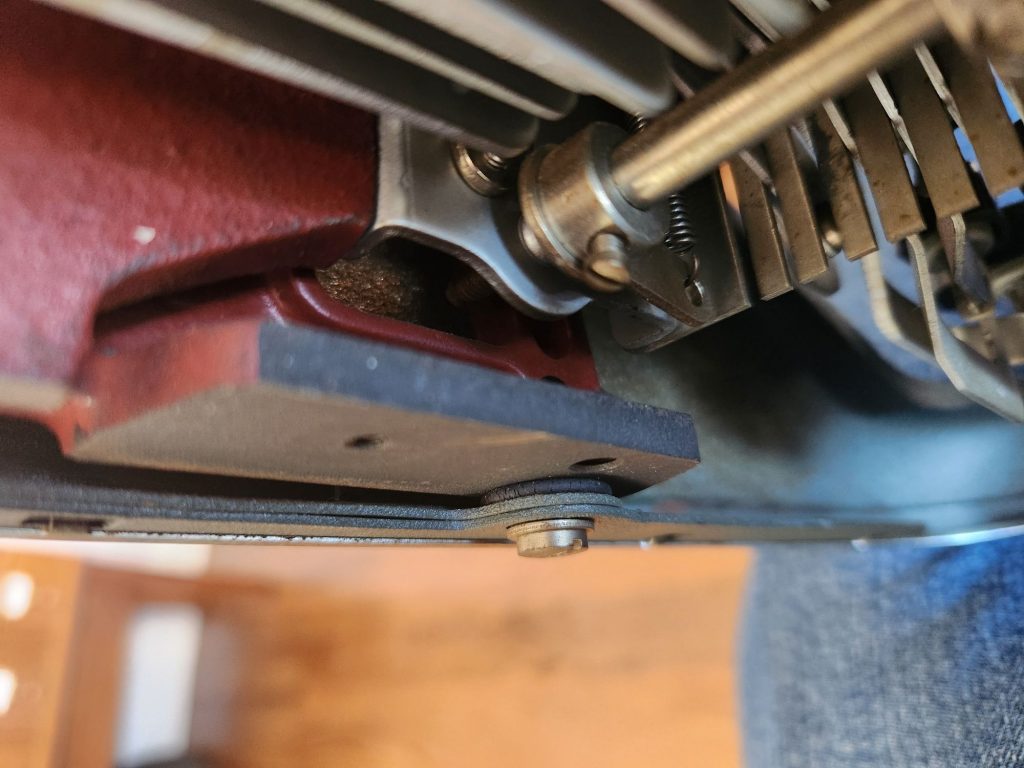
Over the weekend I made a major push on beginning restoration of the Olympia SG1 standard typewriter I picked up this past month.
One of the small issues I encountered was finding four crushed rubber bushings between the exterior typewriter shell and the main chassis at the four corners on the bottom of the machine.
[caption id="attachment_55834794" align="aligncenter" width="660"] This black rubber bushing is so smashed you almost can't see it above the silver screw head at the bottom of the typewriter frame. The typewriter's foot has been removed from the vacant screw hole just to the left of the bushing screw to provide better visibility.[/caption]
This is a common repair issue for the Olympia SM3 machines and one which can dramatically impair that typewriter's functionality after several decades. I expected this would be a common enough problem, so I searched a few fora, YouTube, and some specialty Facebook Groups to see how others had done the replacement and find the specs for the original part. Sadly none were forthcoming. Has no one written this up before? Perhaps because the issue isn't a huge problem from a functional perspective, no one has bothered?
But when you're doing a thorough restoration on a machine you plan to put into daily use, you go the extra mile. To that end, I thought I'd write up a few notes for those who encounter this in the future, particularly as I couldn't find quick sources on it the way one can for the SM3.
My crushed rubber husks (now more like a brittle, friable plastic) were approximately 16mmOD x 4mm ID x 2 mm, but I wanted to do better than guessing the appropriate replacement. Fortunately our friend Richard Polt has a downloadable .pdf copy of the Olympia Spare Parts Catalog and Price List for Standard Typewriters Model SG1 (Jan. 1, 1961 edition) from the Ames Supply Company on his website. Pulling it up very quickly provided a diagram of the appropriate part on page 12 and indicated it to be part number 34280-5x.6. Scrolling ahead to page 61, one discovers that the part is called a "spacing washer (rubber)" whose original specs are listed as 5⌀12⌀x4mm which originally listed for 11¢. On a German manufactured machine this is indicating a 5mm inner diameter, 12 mm outer diameter, and thickness of 4mm.
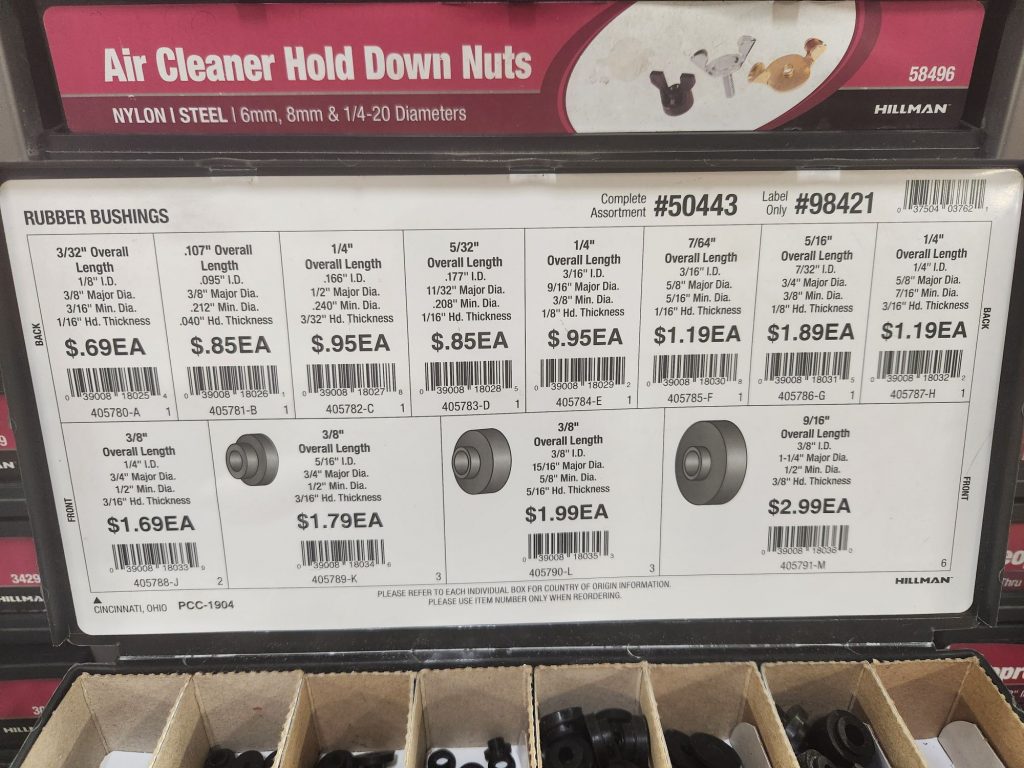
A quick spin over to the local Ace Hardware store and I was able to find a variety of Hillman rubber bushings on offer as potential replacements.
I selected Hillman part number 405784-E as the closest bushing with dimensions 1/4" overall length; 3/16" ID, 9/16" major dia.; 3/8" min. dia. and 1/8" Hd. thickness. I picked up 4 of them for $0.95 each. Depending on availability, others might find luck ordering something of similar size and dimension from purveyors like McMaster-Carr or Grainger.
[caption id="attachment_55834796" align="aligncenter" width="660"] The old (left) and the new (right).[/caption]
Back at home I inserted the smaller end into the hole of the frame and screwed the shoulder bolt and washer back in to hold the frame onto the typewriter chassis. It seemed an excellent fit and this part of the machine should be in good shape for the next few decades.
If this is the only repair you're making to your machine, I suggest you replace each one, one-at-a-time in turn. This will prevent you from needing to take apart more of the machine or removing the entire body shell to get them on and will speed up the replacement process. If you're doing it as a larger restoration, then just install them when you re-attach the body shell. For me, loosely attaching the two rear ones followed by the two at the front and then tightening/adjusting them all seemed to be the easier way to go.
If you're restoring your own SG1, I hope these details make your work and research a bit quicker and easier.
{
"type": "entry",
"published": "2026-03-01T22:51:54-08:00",
"summary": "Over the weekend I made a major push on beginning restoration of the Olympia SG1 standard typewriter I picked up this past month.\u00a0 One of the small issues I encountered was finding four crushed rubber bushings between the exterior typewriter shell and the main chassis at the four corners on the bottom of the machine. … <a href=\"https://boffosocko.com/2026/03/01/replacing-the-body-shell-rubber-bushings-on-an-olympia-sg1-typewriter/\" class=\"more-link\">Continue reading <span class=\"screen-reader-text\">Replacing the Body Shell Rubber Bushings on an Olympia SG1 Typewriter</span></a>",
"url": "https://boffosocko.com/2026/03/01/replacing-the-body-shell-rubber-bushings-on-an-olympia-sg1-typewriter/",
"featured": "https://boffosocko.com/wp-content/uploads/2026/03/Olympia-SG1-diagram-highlighted.jpg",
"category": [
"Typewriters",
"bushings",
"Olympia SG1",
"Olympia typewriters",
"typewriter restoration"
],
"content": {
"text": "Over the weekend I made a major push on beginning restoration of the Olympia SG1 standard typewriter I picked up this past month.\u00a0\n\nOne of the small issues I encountered was finding four crushed rubber bushings between the exterior typewriter shell and the main chassis at the four corners on the bottom of the machine.\n\n[caption id=\"attachment_55834794\" align=\"aligncenter\" width=\"660\"] This black rubber bushing is so smashed you almost can't see it above the silver screw head at the bottom of the typewriter frame. The typewriter's foot has been removed from the vacant screw hole just to the left of the bushing screw to provide better visibility.[/caption]\n\nThis is a common repair issue for the Olympia SM3 machines and one which can dramatically impair that typewriter's functionality after several decades. I expected this would be a common enough problem, so I searched a few fora, YouTube, and some specialty\u00a0 Facebook Groups to see how others had done the replacement and find the specs for the original part. Sadly none were forthcoming. Has no one written this up before? Perhaps because the issue isn't a huge problem from a functional perspective, no one has bothered?\n\nBut when you're doing a thorough restoration on a machine you plan to put into daily use, you go the extra mile. To that end, I thought I'd write up a few notes for those who encounter this in the future, particularly as I couldn't find quick sources on it the way one can for the SM3.\u00a0\n\nMy crushed rubber husks (now more like a brittle, friable plastic) were approximately 16mmOD x 4mm ID x 2 mm, but I wanted to do better than guessing the appropriate replacement. Fortunately our friend Richard Polt has a downloadable .pdf copy of the Olympia Spare Parts Catalog and Price List for Standard Typewriters Model SG1 (Jan. 1, 1961 edition) from the Ames Supply Company on his website. Pulling it up very quickly provided a diagram of the appropriate part on page 12 and indicated it to be part number 34280-5x.6. Scrolling ahead to page 61, one discovers that the part is called a \"spacing washer (rubber)\" whose original specs are listed as 5\u230012\u2300x4mm which originally listed for 11\u00a2. On a German manufactured machine this is indicating a 5mm inner diameter, 12 mm outer diameter, and thickness of 4mm.\n\n\n\nA quick spin over to the local Ace Hardware store and I was able to find a variety of Hillman rubber bushings on offer as potential replacements.\n\n\n\nI selected Hillman part number 405784-E as the closest bushing with dimensions 1/4\" overall length; 3/16\" ID, 9/16\" major dia.; 3/8\" min. dia. and 1/8\" Hd. thickness. I picked up 4 of them for $0.95 each. Depending on availability, others might find luck ordering something of similar size and dimension from purveyors like McMaster-Carr or Grainger.\n\n[caption id=\"attachment_55834796\" align=\"aligncenter\" width=\"660\"] The old (left) and the new (right).[/caption]\n\nBack at home I inserted the smaller end into the hole of the frame and screwed the shoulder bolt and washer back in to hold the frame onto the typewriter chassis. It seemed an excellent fit and this part of the machine should be in good shape for the next few decades.\u00a0\n\nIf this is the only repair you're making to your machine, I suggest you replace each one, one-at-a-time in turn. This will prevent you from needing to take apart more of the machine or removing the entire body shell to get them on and will speed up the replacement process. If you're doing it as a larger restoration, then just install them when you re-attach the body shell. For me, loosely attaching the two rear ones followed by the two at the front and then tightening/adjusting them all seemed to be the easier way to go.\n\nIf you're restoring your own SG1, I hope these details make your work and research a bit quicker and easier.\u00a0",
"html": "Over the weekend I made a major push on beginning restoration of the <a href=\"https://boffosocko.com/2026/02/02/1956-olympia-sg1-standard-typewriter/\">Olympia SG1 standard typewriter</a> I picked up this past month.\u00a0\n\nOne of the small issues I encountered was finding four crushed rubber bushings between the exterior typewriter shell and the main chassis at the four corners on the bottom of the machine.\n\n[caption id=\"attachment_55834794\" align=\"aligncenter\" width=\"660\"]<img src=\"https://boffosocko.com/wp-content/uploads/2026/03/wp-17724316421148620735029722440606-1024x768.jpg\" alt=\"View of the back corner underneath an Olympia SG1 typewriter featuring a crushed rubber washer between the body shell and the solid steel chassis of the typewriter. It look like it's less than a millimeter thick.\" width=\"660\" height=\"495\" /> This black rubber bushing is so smashed you almost can't see it above the silver screw head at the bottom of the typewriter frame. The typewriter's foot has been removed from the vacant screw hole just to the left of the bushing screw to provide better visibility.[/caption]\n\nThis is a <a href=\"https://boffosocko.com/2024/07/14/aggregated-resources-and-playlist-for-a-crash-course-on-the-olympia-sm3-portable-typewriter/#Olympia%20SM3%20Rubber%20Bushings%20Replacement\">common repair issue for the Olympia SM3 machines</a> and one which can dramatically impair that typewriter's functionality after several decades. I expected this would be a common enough problem, so I searched a few fora, YouTube, and some specialty\u00a0 Facebook Groups to see how others had done the replacement and find the specs for the original part. Sadly none were forthcoming. Has no one written this up before? Perhaps because the issue isn't a huge problem from a functional perspective, no one has bothered?\n\nBut when you're doing a thorough restoration on a machine you plan to put into daily use, you go the extra mile. To that end, I thought I'd write up a few notes for those who encounter this in the future, particularly as I couldn't find quick sources on it the way one can for the SM3.\u00a0\n\nMy crushed rubber husks (now more like a brittle, friable plastic) were approximately 16mmOD x 4mm ID x 2 mm, but I wanted to do better than guessing the appropriate replacement. Fortunately our friend Richard Polt has a downloadable .pdf copy of the <a href=\"https://site.xavier.edu/polt/typewriters/OlympiaSG1parts.pdf\"><em>Olympia Spare Parts Catalog and Price List for Standard Typewriters Model SG1</em></a> (Jan. 1, 1961 edition) from the Ames Supply Company on his website. Pulling it up very quickly provided a diagram of the appropriate part on page 12 and indicated it to be part number 34280-5x.6. Scrolling ahead to page 61, one discovers that the part is called a \"spacing washer (rubber)\" whose original specs are listed as 5\u230012\u2300x4mm which originally listed for 11\u00a2. On a German manufactured machine this is indicating a 5mm inner diameter, 12 mm outer diameter, and thickness of 4mm.\n\n<img src=\"https://boffosocko.com/wp-content/uploads/2026/03/Olympia-SG1-diagram-highlighted.jpg\" alt=\"Mechanical diagram of the parts pertaining to the body shell of the Olympia SG1. The rubber washer part number is highlighted in yellow.\" width=\"966\" height=\"612\" />\n\nA quick spin over to the local Ace Hardware store and I was able to find a variety of Hillman rubber bushings on offer as potential replacements.\n\n<img src=\"https://boffosocko.com/wp-content/uploads/2026/03/wp-17724316778851643970633342041167-1024x768.jpg\" alt=\"Photo of the various specifications of about a dozen rubber bushings from a display in the hardware store.\" width=\"660\" height=\"495\" />\n\nI selected <a href=\"https://amzn.to/4l2YNG8\">Hillman part number 405784-E</a> as the closest bushing with dimensions 1/4\" overall length; 3/16\" ID, 9/16\" major dia.; 3/8\" min. dia. and 1/8\" Hd. thickness. I picked up 4 of them for $0.95 each. Depending on availability, others might find luck ordering something of similar size and dimension from purveyors like McMaster-Carr or Grainger.\n\n[caption id=\"attachment_55834796\" align=\"aligncenter\" width=\"660\"]<img src=\"https://boffosocko.com/wp-content/uploads/2026/03/wp-17724317095074657823087389083679-1024x768.jpg\" alt=\"Comparison of the old bushings on the left with the new rubber bushings on the right separated by the shoulder bolts and washers in the middle.\" width=\"660\" height=\"495\" /> The old (left) and the new (right).[/caption]\n\nBack at home I inserted the smaller end into the hole of the frame and screwed the shoulder bolt and washer back in to hold the frame onto the typewriter chassis. It seemed an excellent fit and this part of the machine should be in good shape for the next few decades.\u00a0\n\nIf this is the only repair you're making to your machine, I suggest you replace each one, one-at-a-time in turn. This will prevent you from needing to take apart more of the machine or removing the entire body shell to get them on and will speed up the replacement process. If you're doing it as a larger restoration, then just install them when you re-attach the body shell. For me, loosely attaching the two rear ones followed by the two at the front and then tightening/adjusting them all seemed to be the easier way to go.\n\nIf you're restoring your own SG1, I hope these details make your work and research a bit quicker and easier.\u00a0"
},
"author": {
"type": "card",
"name": null,
"url": null,
"photo": null
},
"post-type": "note",
"_id": "47507191",
"_source": "2785"
}
{
    "type": "entry",
    "published": "2026-03-02T06:55:23.037837+00:00",
    "url": "https://cleverdevil.io/2026/my-wife-is-out-of-town-and-i-miss-her-ve",
    "syndication": [
        "https://cleverdevil.club/@jonathan/116158268937543869",
        "https://bsky.app/profile/cleverdevil.io/post/3mg2od5gjao2h"
    ],
    "content": {
        "text": "My wife is out of town and I miss her very much, but have also been reminded how much I miss running the ceiling fan in my bedroom \ud83d\ude02",
        "html": "<p>My wife is out of town and I miss her very much, but have also been reminded how much I miss running the ceiling fan in my bedroom \ud83d\ude02</p>"
    },
    "author": {
        "type": "card",
        "name": "Jonathan LaCour",
        "url": "https://cleverdevil.io",
        "photo": "https://cleverdevil.io/profile/photo"
    },
    "post-type": "note",
    "_id": "47506678",
    "_source": "10"
}
{
    "type": "event",
    "name": "\ud83d\uddd3\ufe0f The Level Up",
    "published": "2026-02-28T22:30:00-0500",
    "start": "2026-02-28T22:30:00-0500",
    "url": "https://martymcgui.re/2026/02/28/the-level-up/",
    "featured": "https://res.cloudinary.com/schmarty/image/fetch/w_960,c_fill/https://media.martymcgui.re/ab/5d/97/71/6c25e2c42ccba31a79d63e4aaf5190b0a320eb7d2fdca8c18435b8b3.jpg",
    "category": [
        "improv",
        "show"
    ],
    "location": {
        "type": "card",
        "name": "Magnet Theater",
        "url": "https://magnettheater.com/"
    },
    "content": {
        "text": "The Level Up is an indie improv showcase. Join us as we watch amazing New York indie improv talents gain XP on the Magnet stage, unlock new achievements, and reach new milestones. Or do comedy.\n\nCome support Michael as he dons his hosting-duties cap for three exciting indie teams!\nHALALRIOUS\nGOOD TOWEL\nDJ SOGGY BOTTOM\nI\u2019ll be playing with Michael and the rest of the Level Up!\nLooking forward to it! And to seeing you there!! (Yes, you. Come on out!!!)\nSaturday Feb 28th, 2026 @ 10:30pm\n\nMagnet Theater\n\n254 West 29th St (btwn 7th and 8th Ave.)\n\nNew York City, NY 10001\n\nTickets $10: https://magnettheater.com/show/tickets/60380/",
        "html": "<blockquote>\n<p>The Level Up is an indie improv showcase. Join us as we watch amazing New York indie improv talents gain XP on the Magnet stage, unlock new achievements, and reach new milestones. Or do comedy.</p>\n</blockquote>\n<p>Come support Michael as he dons his hosting-duties cap for three exciting indie teams!</p>\n<ul><li>HALALRIOUS</li>\n<li>GOOD TOWEL</li>\n<li>DJ SOGGY BOTTOM</li>\n</ul><p>I\u2019ll be playing with Michael and the rest of the Level Up!</p>\n<p>Looking forward to it! And to seeing you there!! (Yes, you. Come on out!!!)</p>\n<p>Saturday Feb 28th, 2026 @ 10:30pm<br />\nMagnet Theater<br />\n254 West 29th St (btwn 7th and 8th Ave.)<br />\nNew York City, NY 10001<br />\nTickets $10: <a href=\"https://magnettheater.com/show/tickets/60380/\">https://magnettheater.com/show/tickets/60380/</a></p>"
    },
    "author": {
        "type": "card",
        "name": "Marty McGuire",
        "url": "https://martymcgui.re/",
        "photo": "https://martymcgui.re/images/logo.jpg"
    },
    "post-type": "event",
    "_id": "47501500",
    "_source": "175"
}
My wife and daughter are in Manhattan to catch a few shows, so my son and I are having a geeky boys weekend. I took him to learn how to play Magic at a local game store today and we are going to watch Lord of the Rings tonight. 🤓
{
    "type": "entry",
    "published": "2026-03-01T02:18:09.836825+00:00",
    "url": "https://cleverdevil.io/2026/my-wife-and-daughter-are-in-manhattan-to",
    "syndication": [
        "https://cleverdevil.club/@jonathan/116151516557969781",
        "https://bsky.app/profile/cleverdevil.io/post/3mfxoejek222k"
    ],
    "content": {
        "text": "My wife and daughter are in Manhattan to catch a few shows, so my son and I are having a geeky boys weekend. I took him to learn how to play Magic at a local game store today and we are going to watch Lord of the Rings tonight. \ud83e\udd13",
        "html": "<p>My wife and daughter are in Manhattan to catch a few shows, so my son and I are having a geeky boys weekend. I took him to learn how to play Magic at a local game store today and we are going to watch Lord of the Rings tonight. \ud83e\udd13</p>"
    },
    "author": {
        "type": "card",
        "name": "Jonathan LaCour",
        "url": "https://cleverdevil.io",
        "photo": "https://cleverdevil.io/profile/photo"
    },
    "post-type": "note",
    "_id": "47496740",
    "_source": "10"
}
{
    "type": "event",
    "name": "\ud83d\uddd3\ufe0f Bizzo at The PIT's March Madness!",
    "published": "2026-02-27T20:30:00-0500",
    "start": "2026-02-27T20:30:00-0500",
    "url": "https://martymcgui.re/2026/02/27/bizzo-at-the-pits-march-madness/",
    "featured": "https://res.cloudinary.com/schmarty/image/fetch/w_960,c_fill/https://media.martymcgui.re/ea/38/44/d9/09a5b7ee8ee16b24bb0d5fefde121118b3a410cd97f225b53323eb8e.jpg",
    "category": [
        "improv",
        "show"
    ],
    "content": {
        "text": "Bizzo is among 32 improv teams battling for a spot in the Sweet 16!\nPlease come out and \ud83d\udd25 scream for us \ud83d\udd25!!\nWho will take home prize money, a Mainstage residency, and March Madness glory? That\u2019s up to our judges and, of course, the audience! Follow the tournament from the start in our Qualifier Matches.\nFriday Feb 27, 2026 @ 8:30pm\n\nThe PIT Loft  - 154 W. 29th St., New York, NY, 10001\n\nTickets $15: https://thepit-nyc.com/events/march-madness-26-qualifiers/",
        "html": "<p>Bizzo is among 32 improv teams battling for a spot in the Sweet 16!</p>\n<p>Please come out and \ud83d\udd25 <strong>scream for us</strong> \ud83d\udd25!!</p>\n<p>Who will take home prize money, a Mainstage residency, and March Madness glory? That\u2019s up to our judges and, of course, the audience! Follow the tournament from the start in our Qualifier Matches.</p>\n<p>Friday Feb 27, 2026 @ 8:30pm<br />\nThe PIT Loft  - 154 W. 29th St., New York, NY, 10001<br />\nTickets $15: <a href=\"https://thepit-nyc.com/events/march-madness-26-qualifiers/\">https://thepit-nyc.com/events/march-madness-26-qualifiers/</a></p>"
    },
    "author": {
        "type": "card",
        "name": "Marty McGuire",
        "url": "https://martymcgui.re/",
        "photo": "https://martymcgui.re/images/logo.jpg"
    },
    "post-type": "event",
    "_id": "47495604",
    "_source": "175"
}
This nearly indestructible black and gray powder-coated 20 gauge steel constructed 8 drawer cabinet with art deco flourishes has 36 linear feet of storage space for over 2,000 Field Notes notebooks.
This is enough space for over 83 years' worth of subscription to the quarterly notebooks. Literally enough space for a lifetime of notes.
Staple Day, eat your heart out! We’re stalking down the elusive 4 Drawer Day!
{
"type": "entry",
"published": "2026-02-27T08:58:49-08:00",
"summary": "This nearly indestructible black and gray powder-coated 20 gauge steel constructed 8 drawer cabinet with art deco flourishes has 36 linear feet of storage space for over 2,000 Field Notes notebooks. This is enough space for over 83 years’ worth of subscription to the quarterly notebooks. Literally enough space for a lifetime of notes. Staple … <a href=\"https://boffosocko.com/2026/02/27/the-deluxe-steelcase-field-notes-notebooks-archive/\" class=\"more-link\">Continue reading <span class=\"screen-reader-text\">The Deluxe Steelcase Field Notes Notebooks Archive\u00a0</span></a>",
"url": "https://boffosocko.com/2026/02/27/the-deluxe-steelcase-field-notes-notebooks-archive/",
"featured": "https://boffosocko.com/wp-content/uploads/2026/02/wp-17722106250333280836451988495684.jpg",
"category": [
"Furniture",
"Note taking",
"Field Notes",
"filing cabinets",
"Steelcase"
],
"content": {
"text": "This nearly indestructible black and gray powder-coated 20 gauge steel constructed 8 drawer cabinet with art deco flourishes has 36 linear feet of storage space for over 2,000 Field Notes notebooks.\n\nThis is enough space for over 83 years' worth of subscription to the quarterly notebooks. Literally enough space for a lifetime of notes.\n\nStaple Day, eat your heart out! We\u2019re stalking down the elusive 4 Drawer Day!",
"html": "This nearly indestructible black and gray powder-coated 20 gauge steel constructed 8 drawer cabinet with art deco flourishes has 36 linear feet of storage space for over 2,000 Field Notes notebooks.\n\nThis is enough space for over 83 years' worth of subscription to the quarterly notebooks. Literally enough space for a lifetime of notes.\n\nStaple Day, eat your heart out! We\u2019re stalking down the elusive 4 Drawer Day!\n\n<img src=\"https://boffosocko.com/wp-content/uploads/2024/02/wp-17085550179307187979295038805435-768x1024.jpg\" alt=\"Fully assembled Steelcase card index filing cabinet next to a bookcase\" width=\"660\" height=\"880\" /><img src=\"https://boffosocko.com/wp-content/uploads/2024/02/wp-17085549273745939808367771131824-1024x768.jpg\" alt=\"Eight empty drawers lined up on the floor in a 4x2 matrix makes it easy to see the storage capacity of the Steelcase card index.\" width=\"660\" height=\"495\" /><img src=\"https://boffosocko.com/wp-content/uploads/2024/02/wp-17085551505044444611495511562309-1024x503.jpg\" alt=\"Close up of the Steelcase nameplate and first drawer at the top of the filing cabinet.\" width=\"660\" height=\"324\" />"
},
"author": {
"type": "card",
"name": null,
"url": null,
"photo": null
},
"post-type": "note",
"_id": "47485512",
"_source": "2785"
}
{
    "type": "entry",
    "published": "2026-02-27T17:35:56.189343+00:00",
    "url": "https://cleverdevil.io/2026/several-people-have-asked-for-some-detai",
    "syndication": [
        "https://cleverdevil.club/@jonathan/116143800779912749",
        "https://bsky.app/profile/cleverdevil.io/post/3mfuaps777l2a"
    ],
    "content": {
        "text": "Several people have asked for some detail on the new site. I am working on a write-up, but it\u2019ll take some time to finish. There\u2019s a lot to cover!",
        "html": "<p>Several people have asked for some detail on the new site. I am working on a write-up, but it\u2019ll take some time to finish. There\u2019s a lot to cover!</p>"
    },
    "author": {
        "type": "card",
        "name": "Jonathan LaCour",
        "url": "https://cleverdevil.io",
        "photo": "https://cleverdevil.io/profile/photo"
    },
    "post-type": "note",
    "_id": "47485121",
    "_source": "10"
}
Had a fun evening in Nashville for a work event. Our creative events team rented a jewelry store, brought in a bar and food, and gave 10 clients some gift cards. Smart cookies, those folks. Back to LA tomorrow.
{
    "type": "entry",
    "published": "2026-02-27T07:04:01.854766+00:00",
    "url": "https://cleverdevil.io/2026/had-a-fun-evening-in-nashville-for-a-wor",
    "syndication": [
        "https://cleverdevil.club/@jonathan/116141316003991405",
        "https://bsky.app/profile/cleverdevil.io/post/3mft5ftps2o25"
    ],
    "content": {
        "text": "Had a fun evening in Nashville for a work event. Our creative events team rented a jewelry store, brought in a bar and food, and gave 10 clients some gift cards. Smart cookies, those folks. Back to LA tomorrow.",
        "html": "<p>Had a fun evening in Nashville for a work event. Our creative events team rented a jewelry store, brought in a bar and food, and gave 10 clients some gift cards. Smart cookies, those folks. Back to LA tomorrow.</p>"
    },
    "author": {
        "type": "card",
        "name": "Jonathan LaCour",
        "url": "https://cleverdevil.io",
        "photo": "https://cleverdevil.io/profile/photo"
    },
    "post-type": "note",
    "_id": "47479866",
    "_source": "10"
}
{
    "type": "entry",
    "published": "2026-02-26T16:17:22-0500",
    "url": "https://martymcgui.re/2026/02/26/161722/",
    "category": [
        "machine-knitting",
        "hats"
    ],
    "name": "Machine Knitting: the empire strikes hat",
    "content": {
        "text": "Play bad title pun games, win bad title pun prizes.\nThe Chattie hat continues to tempt and taunt me. After my first test Chattie\ncame out OK despite some major issues during construction, and my second\nChattie didn\u2019t work out.\nProducer Amy has ultimately adopted the \u201ctest\u201d Chattie as her own, wearing it\nthrough this strange NYC winter, and even held onto it when a friend and\ncolleague politely but firmly attempted to transfer ownership. Consequently,\nI received a commission request for a new Chattie.\nPlanning-wise, the commission called for something in dark colors, slightly\nsmaller than the one Amy wore, but similarly fuzzy and warm. I had a spool\nof fuzzy cotton from the \u201cSkinny Latte\u201d series that I picked up at Fab Scrap\nin black, that should work exactly as well as the white yarn I used for the\n\u201ctest\u201d hat.\nConstruction began with the top body, which is knit sideways with 10 sections of\nshort rows. It went astonishingly smoothly! This yarn is quite thick, knitting\nat a T9 tension when doing single-bed, and T4 on both carriages for ribbing. My\ntension mast also didn\u2019t want to feed this yarn nicely, but I settled into a\nrhythm of moving the carriage slowly and pausing as needed to pull more yarn\nthrough.\n\n\nI was in such a good mood about my progress that Amy snapped this photo of me asking \"This could become a hat, right?\"Not Pictured: Struggles\nI\u2019ve been watching eBay for accessories for my standard gauge Brother knitting\nmachine setup, which has included a Brother KA-8300 Transfer Carriage and a\nBrother KA-8310 Linker Carriage.\n\n\n\nKA-8300: An elephant is about to charge through your live stitches.\n\nKA-8310: \ud83c\udfbcJust turn the crank, snap the plank, boot the marble right down the chute- \ud83c\udfb6\n\nI knit about 3.5\" inches worth of 1x1 rib, across enough stitches to form a\nreasonable circumference for the brim of the hat. After the Dishcloth Chattie\nfiasco, I knew to use make the rib at least 2/3 the number of needles wide as\nthere were rows in the top of the cap.\nWhen done with the ribbing, I used the Transfer Carriage to move the stitches\nfrom the front ribber bed onto the empty stitches on the main bed. This mostly\nworked, actually, leaving me with just a couple to transfer by hand.\nI then took the whole brim off on waste yarn. This got a bit weird, with not\nevery stitch actually knitting cleanly onto the first row of waste yarn. I\nmanaged it, but it was weird, and probably caused problems to come. I believe I\nshould have knit a final row of regular knitting before taking things off onto\nwaste yarn.\nFor the next step, I could have grafted / seamed the brim and hat body\ntogether by hand, but I really wanted to use my new Linker Carriage. So, after\nthoroughly reading the manual several times, I:\nhung the bottom edge of the hat body (which, being knit sideways, means I was\nhanging on stitches of a finished side edge).\nhung the live stitches from the brim in front\npulled the body stitches over the live brim stitches, so the live stitches\nare the only stitches remaining on the working needles, having been pulled\nthrough the side stitches. This was a cool-sounding maneuver that in\npractice I found very fiddly.\nknit one row of a thinner (but same-colored) yarn at the loosest possible\ntension, to form a final row of live loops.\nused the Linker Carriage to crank my way across the bed, letting the carriage\npull one loop through the next all the way to the end.\nOr, well, that\u2019s how it was supposed to go.\nI had two false starts with the Linker Carriage, followed by one absolute\nfailure which locked the whole thing up, requiring several minutes of struggle\nto even free the carriage from the machine. In that chaos, I dropped several\nstitches and several f-bombs.\nAfter leaving it to rest overnight, I came back the next day and finished the\nloop-through-loop bind-off by hand, then went back and \u201crescued\u201d the dropped\nstitches.\nChecking my work afterwards, I found that somehow a couple of dozen live\nstitches from the brim, likely all from the front ribber bed side, had simply\nnot been picked up in my attempt to seam things together. So, I grabbed a\nsewing needle and a long line of waste yarn, ran it through as a \u201clifeline\u201d for\nall the dropped ribbing stitches I could find, and once again the project\ngot to rest for a day or two while I stewed about it.\nI have very little in the way of hand-sewing, hand-knitting, or hand-crochet\nskills, but I finally decided that I could \u201crescue\u201d these dropped live stitches\nas if they had been correctly handled on the machine, by running a sewing needle\ndown through the bottom edge of the hat, through a dropped live stitch, pull the\nstitch up through the edge, then secure it with a knot or a backstitch,\ndepending on how far away the next dropped stitch was. This took at least a\ncouple of hours over a couple of sessions.\nFinishing\nFinally, it was time to seam up the side of the hat. Though it had been my\noriginal plan, I opted not to try the Linker Carriage again for this. Instead,\nI made my first attempt at a Kitchener stitch, which is meant to seam together\ntwo edges of live stitches in an invisible way that looks like just another\nrow of knitting. Mine \u2026 doesn\u2019t look that nice. But it is still pretty hard\nto see unless you\u2019re looking for it, so I\u2019ll call that a win (and try harder\nnext time)!\nI also mattress stitched the ribbed hem together, making sure to put that seam\non the outside of the hat, because the brim is meant to be folded up.\n\n\nWith the waste yarn, this reminds me of Audrey II.Then it was a matter of running a line through the top 10 stitches at the top of\nthe hat to pull them together and close it up.\n\n\nBefore washing and drying, it's definitely hat-like!Then a trip through the laundry to see its final form!\n\n\nIt is a hat!I really should go ahead and make one of these for myself, and stop wearing\nbeanies that came from a store. For my version I think I would make a few\nextra changes:\nadd a row of plain knitting on top of the brim before casting off onto waste yarn.\njoin the brim to the hat with the seam on the \u201coutside\u201d, since the brim is meant\nto fold up to cover it anyway.\nprobably try the linker carriage again even though I got so burned by it. \ud83d\ude02\nThanks for reading! As bonus content, here are some photos of the finished\nChattie on the head form that Producer Amy bought for her own hat-making\npurposes!\n\n\n\n\n\n\n\n\n\n\n\nUntil next time!",
        "html": "<p>Play bad title pun games, win bad title pun prizes.</p>\n<p>The Chattie hat continues to tempt and taunt me. After my <a href=\"https://martymcgui.re/2026/01/11/machine-knitting-a-chattie/\">first test Chattie</a>\ncame out OK despite some major issues during construction, and my <a href=\"https://martymcgui.re/2026/01/24/machine-knitting-the-life-and-death-of-dishcloth-chattie/\">second\nChattie didn\u2019t work out</a>.</p>\n<p>Producer Amy has ultimately adopted the \u201ctest\u201d Chattie as her own, wearing it\nthrough this strange NYC winter, and even held onto it when a friend and\ncolleague politely but firmly attempted to transfer ownership. Consequently,\nI received a commission request for a new Chattie.</p>\n<p>Planning-wise, the commission called for something in dark colors, slightly\nsmaller than the one Amy wore, but similarly fuzzy and warm. I had a spool\nof fuzzy cotton from the \u201cSkinny Latte\u201d series that I picked up at Fab Scrap\nin black, that should work exactly as well as the white yarn I used for the\n\u201ctest\u201d hat.</p>\n<p>Construction began with the top body, which is knit sideways with 10 sections of\nshort rows. It went astonishingly smoothly! This yarn is quite thick, knitting\nat a T9 tension when doing single-bed, and T4 on both carriages for ribbing. My\ntension mast also didn\u2019t want to feed this yarn nicely, but I settled into a\nrhythm of moving the carriage slowly and pausing as needed to pull more yarn\nthrough.</p>\n<a href=\"https://media.martymcgui.re/5f/91/a2/32/89ea541ce7734d34fc8824afa330839d61c427fc84b6b097e5ddeb1c.jpg\"><img src=\"https://res.cloudinary.com/schmarty/image/fetch/w_960,c_fill/https://media.martymcgui.re/5f/91/a2/32/89ea541ce7734d34fc8824afa330839d61c427fc84b6b097e5ddeb1c.jpg\" alt=\"me posing awkwardly while holding the partially finished Chattie around my head. Sideways stitches are visible in the black yarn that the hat is made of, as well as sections of pink stitches in waste yarn at the edges.\" /></a>\n\nI was in such a good mood about my progress that Amy snapped this photo of me asking \"This could become a hat, right?\"<h2>Not Pictured: Struggles</h2>\n<p>I\u2019ve been watching eBay for accessories for my standard gauge Brother knitting\nmachine setup, which has included a Brother KA-8300 Transfer Carriage and a\nBrother KA-8310 Linker Carriage.</p>\n\n<a href=\"https://media.martymcgui.re/d5/61/0b/66/943cc4937399cb43e7d0b469ec259968a2288b1a7070794fc89b0956.jpg\"><img src=\"https://res.cloudinary.com/schmarty/image/fetch/w_480,c_fill/https://media.martymcgui.re/d5/61/0b/66/943cc4937399cb43e7d0b469ec259968a2288b1a7070794fc89b0956.jpg\" alt=\"Transfer carriage resting on knitting machine bed. Includes two knobs at 90 degree angles, a visible gear mechanism, and large vinyl decal with instructions featuring an elephant about to charge in the direction the tool is meant to move.\" /></a>\n\nKA-8300: An elephant is about to charge through your live stitches.<a href=\"https://media.martymcgui.re/f9/8a/8d/d2/8451b17da2d31d6ada2f8f88a585159a3d85bc6158b3539e71849ca9.jpg\"><img src=\"https://res.cloudinary.com/schmarty/image/fetch/w_480,c_fill/https://media.martymcgui.re/f9/8a/8d/d2/8451b17da2d31d6ada2f8f88a585159a3d85bc6158b3539e71849ca9.jpg\" alt=\"Linker carriage resting on knitting machine bed. Includes bright pink button and knob, as well as an area for stitches to enter.\" /></a>\n\nKA-8310: \ud83c\udfbcJust turn the crank, snap the plank, boot the marble right down the chute- \ud83c\udfb6\n\n<p>I knit about 3.5\" inches worth of 1x1 rib, across enough stitches to form a\nreasonable circumference for the brim of the hat. After the Dishcloth Chattie\nfiasco, I knew to use make the rib at least 2/3 the number of needles wide as\nthere were rows in the top of the cap.</p>\n<p>When done with the ribbing, I used the Transfer Carriage to move the stitches\nfrom the front ribber bed onto the empty stitches on the main bed. This <em>mostly</em>\nworked, actually, leaving me with just a couple to transfer by hand.</p>\n<p>I then took the whole brim off on waste yarn. This got a bit weird, with not\nevery stitch actually knitting cleanly onto the first row of waste yarn. I\nmanaged it, but it was weird, and probably caused problems to come. I believe I\n<em>should</em> have knit a final row of regular knitting before taking things off onto\nwaste yarn.</p>\n<p>For the next step, I <em>could</em> have grafted / seamed the brim and hat body\ntogether by hand, but I really wanted to use my new Linker Carriage. So, after\nthoroughly reading the manual several times, I:</p>\n<ul><li>hung the bottom edge of the hat body (which, being knit sideways, means I was\nhanging on stitches of a finished side edge).</li>\n<li>hung the live stitches from the brim in front</li>\n<li>pulled the body stitches <em>over</em> the live brim stitches, so the live stitches\nare the only stitches remaining on the working needles, having been pulled\n<em>through</em> the side stitches. This was a cool-sounding maneuver that in\npractice I found <em>very</em> fiddly.</li>\n<li>knit one row of a thinner (but same-colored) yarn at the loosest possible\ntension, to form a final row of live loops.</li>\n<li>used the Linker Carriage to crank my way across the bed, letting the carriage\npull one loop through the next all the way to the end.</li>\n</ul><p>Or, well, that\u2019s how it was <em>supposed</em> to go.</p>\n<p>I had two false starts with the Linker Carriage, followed by one absolute\nfailure which locked the whole thing up, requiring several minutes of struggle\nto even free the carriage from the machine. In that chaos, I dropped several\nstitches and several f-bombs.</p>\n<p>After leaving it to rest overnight, I came back the next day and finished the\nloop-through-loop bind-off by hand, then went back and \u201crescued\u201d the dropped\nstitches.</p>\n<p>Checking my work afterwards, I found that somehow a couple of dozen live\nstitches from the brim, likely all from the front ribber bed side, had simply\nnot been picked up in my attempt to seam things together. So, I grabbed a\nsewing needle and a long line of waste yarn, ran it through as a \u201clifeline\u201d for\nall the dropped ribbing stitches I could find, and once again the project\ngot to rest for a day or two while I stewed about it.</p>\n<p>I have very little in the way of hand-sewing, hand-knitting, or hand-crochet\nskills, but I finally decided that I could \u201crescue\u201d these dropped live stitches\nas if they had been correctly handled on the machine, by running a sewing needle\ndown through the bottom edge of the hat, through a dropped live stitch, pull the\nstitch <em>up</em> through the edge, then secure it with a knot or a backstitch,\ndepending on how far away the next dropped stitch was. This took at least a\ncouple of hours over a couple of sessions.</p>\n<h3>Finishing</h3>\n<p>Finally, it was time to seam up the side of the hat. Though it had been my\noriginal plan, I opted <em>not</em> to try the Linker Carriage again for this. Instead,\nI made my first attempt at a Kitchener stitch, which is meant to seam together\ntwo edges of live stitches in an invisible way that looks like just another\nrow of knitting. Mine \u2026 doesn\u2019t look that nice. But it is still pretty hard\nto see unless you\u2019re looking for it, so I\u2019ll call that a win (and try harder\nnext time)!</p>\n<p>I also mattress stitched the ribbed hem together, making sure to put that seam\non the <em>outside</em> of the hat, because the brim is meant to be folded up.</p>\n<a href=\"https://media.martymcgui.re/ef/b7/a4/7f/0431fe361328dad521e52147622ac077d8bb7addd7bd01436a6c360f.jpg\"><img src=\"https://res.cloudinary.com/schmarty/image/fetch/w_960,c_fill/https://media.martymcgui.re/ef/b7/a4/7f/0431fe361328dad521e52147622ac077d8bb7addd7bd01436a6c360f.jpg\" alt=\"Showing off the grafted side seam, with pink waste yarn still visible. A hand is lifting up the ribbed brim to get better light on the visible seam there.\" /></a>\n\nWith the waste yarn, this reminds me of Audrey II.<p>Then it was a matter of running a line through the top 10 stitches at the top of\nthe hat to pull them together and close it up.</p>\n<a href=\"https://media.martymcgui.re/d7/74/b9/3a/c03ee5b367ad49642b960279e816402f930abe3eb1041eb1919658aa.jpg\"><img src=\"https://res.cloudinary.com/schmarty/image/fetch/w_960,c_fill/https://media.martymcgui.re/d7/74/b9/3a/c03ee5b367ad49642b960279e816402f930abe3eb1041eb1919658aa.jpg\" alt=\"Posing with the hat in a mirror, so the front and back are visible. It sits loose on my head.\" /></a>\n\nBefore washing and drying, it's definitely hat-like!<p>Then a trip through the laundry to see its final form!</p>\n<a href=\"https://media.martymcgui.re/d7/de/3e/4e/19012aeca3e1c1d0ffd0d195ad4549e6940018418cea7927727b5e10.jpg\"><img src=\"https://res.cloudinary.com/schmarty/image/fetch/w_960,c_fill/https://media.martymcgui.re/d7/de/3e/4e/19012aeca3e1c1d0ffd0d195ad4549e6940018418cea7927727b5e10.jpg\" alt=\"Posing with the hat in a mirror again, to make the front and back of it visible. It sits snugly on my head.\" /></a>\n\nIt <em>is</em> a hat!<p>I really should go ahead and make one of these for <em>myself</em>, and stop wearing\nbeanies that came from a store. For my version I think I would make a few\nextra changes:</p>\n<ul><li>add a row of plain knitting on top of the brim before casting off onto waste yarn.</li>\n<li>join the brim to the hat with the seam on the \u201coutside\u201d, since the brim is meant\nto fold up to cover it anyway.</li>\n<li>probably try the linker carriage again even though I got so burned by it. \ud83d\ude02</li>\n</ul><p>Thanks for reading! As bonus content, here are some photos of the finished\nChattie on the head form that Producer Amy bought for her own hat-making\npurposes!</p>\n\n<a href=\"https://media.martymcgui.re/68/7e/f3/a0/00ae76a29c20a0e7342344f466a0f013ef5c3bd81d72a0a62d0b1024.jpg\"><img src=\"https://res.cloudinary.com/schmarty/image/fetch/w_480,c_fill/https://media.martymcgui.re/68/7e/f3/a0/00ae76a29c20a0e7342344f466a0f013ef5c3bd81d72a0a62d0b1024.jpg\" alt=\"Black Chattie on pale green mannequin head, facing left.\" /></a>\n\n<a href=\"https://media.martymcgui.re/29/f3/03/26/b848f075c175720f11225c8b586fdf6f154344112073ceae73c7a8bc.jpg\"><img src=\"https://res.cloudinary.com/schmarty/image/fetch/w_480,c_fill/https://media.martymcgui.re/29/f3/03/26/b848f075c175720f11225c8b586fdf6f154344112073ceae73c7a8bc.jpg\" alt=\"Back side of the hat.\" /></a>\n\n<a href=\"https://media.martymcgui.re/69/85/22/61/83d414eb998912cd2c319c5c0a320ac00707ce443e313c1162267fe7.jpg\"><img src=\"https://res.cloudinary.com/schmarty/image/fetch/w_480,c_fill/https://media.martymcgui.re/69/85/22/61/83d414eb998912cd2c319c5c0a320ac00707ce443e313c1162267fe7.jpg\" alt=\"Right-facing view of the mannequin wearing the Black Chattie.\" /></a>\n\n<a href=\"https://media.martymcgui.re/5a/9b/af/6e/7e127bf53921741a776a725e232a228ee3a5d728a25faa602230b54b.jpg\"><img src=\"https://res.cloudinary.com/schmarty/image/fetch/w_480,c_fill/https://media.martymcgui.re/5a/9b/af/6e/7e127bf53921741a776a725e232a228ee3a5d728a25faa602230b54b.jpg\" alt=\"Front view of the Black Chattie on the pale green mannequin. From this angle you can see small stickers give the mannequin eyes.\" /></a>\n\n\n\n<p>Until next time!</p>"
    },
    "author": {
        "type": "card",
        "name": "Marty McGuire",
        "url": "https://martymcgui.re/",
        "photo": "https://martymcgui.re/images/logo.jpg"
    },
    "post-type": "article",
    "_id": "47476548",
    "_source": "175"
}


 This black rubber bushing is so smashed you almost can't see it above the silver screw head at the bottom of the typewriter frame. The typewriter's foot has been removed from the vacant screw hole just to the left of the bushing screw to provide better visibility.[/caption]
This is a common repair issue for the Olympia SM3 machines and one which can dramatically impair that typewriter's functionality after several decades. I expected this would be a common enough problem, so I searched a few fora, YouTube, and some specialty Facebook Groups to see how others had done the replacement and find the specs for the original part. Sadly none were forthcoming. Has no one written this up before? Perhaps because the issue isn't a huge problem from a functional perspective, no one has bothered?
But when you're doing a thorough restoration on a machine you plan to put into daily use, you go the extra mile. To that end, I thought I'd write up a few notes for those who encounter this in the future, particularly as I couldn't find quick sources on it the way one can for the SM3.
My crushed rubber husks (now more like a brittle, friable plastic) were approximately 16mmOD x 4mm ID x 2 mm, but I wanted to do better than guessing the appropriate replacement. Fortunately our friend Richard Polt has a downloadable .pdf copy of the Olympia Spare Parts Catalog and Price List for Standard Typewriters Model SG1 (Jan. 1, 1961 edition) from the Ames Supply Company on his website. Pulling it up very quickly provided a diagram of the appropriate part on page 12 and indicated it to be part number 34280-5x.6. Scrolling ahead to page 61, one discovers that the part is called a "spacing washer (rubber)" whose original specs are listed as 5⌀12⌀x4mm which originally listed for 11¢. On a German manufactured machine this is indicating a 5mm inner diameter, 12 mm outer diameter, and thickness of 4mm.
This black rubber bushing is so smashed you almost can't see it above the silver screw head at the bottom of the typewriter frame. The typewriter's foot has been removed from the vacant screw hole just to the left of the bushing screw to provide better visibility.[/caption]
This is a common repair issue for the Olympia SM3 machines and one which can dramatically impair that typewriter's functionality after several decades. I expected this would be a common enough problem, so I searched a few fora, YouTube, and some specialty Facebook Groups to see how others had done the replacement and find the specs for the original part. Sadly none were forthcoming. Has no one written this up before? Perhaps because the issue isn't a huge problem from a functional perspective, no one has bothered?
But when you're doing a thorough restoration on a machine you plan to put into daily use, you go the extra mile. To that end, I thought I'd write up a few notes for those who encounter this in the future, particularly as I couldn't find quick sources on it the way one can for the SM3.
My crushed rubber husks (now more like a brittle, friable plastic) were approximately 16mmOD x 4mm ID x 2 mm, but I wanted to do better than guessing the appropriate replacement. Fortunately our friend Richard Polt has a downloadable .pdf copy of the Olympia Spare Parts Catalog and Price List for Standard Typewriters Model SG1 (Jan. 1, 1961 edition) from the Ames Supply Company on his website. Pulling it up very quickly provided a diagram of the appropriate part on page 12 and indicated it to be part number 34280-5x.6. Scrolling ahead to page 61, one discovers that the part is called a "spacing washer (rubber)" whose original specs are listed as 5⌀12⌀x4mm which originally listed for 11¢. On a German manufactured machine this is indicating a 5mm inner diameter, 12 mm outer diameter, and thickness of 4mm.
 A quick spin over to the local Ace Hardware store and I was able to find a variety of Hillman rubber bushings on offer as potential replacements.
 I selected Hillman part number 405784-E as the closest bushing with dimensions 1/4" overall length; 3/16" ID, 9/16" major dia.; 3/8" min. dia. and 1/8" Hd. thickness. I picked up 4 of them for $0.95 each. Depending on availability, others might find luck ordering something of similar size and dimension from purveyors like McMaster-Carr or Grainger.
[caption id="attachment_55834796" align="aligncenter" width="660"]
I selected Hillman part number 405784-E as the closest bushing with dimensions 1/4" overall length; 3/16" ID, 9/16" major dia.; 3/8" min. dia. and 1/8" Hd. thickness. I picked up 4 of them for $0.95 each. Depending on availability, others might find luck ordering something of similar size and dimension from purveyors like McMaster-Carr or Grainger.
[caption id="attachment_55834796" align="aligncenter" width="660"]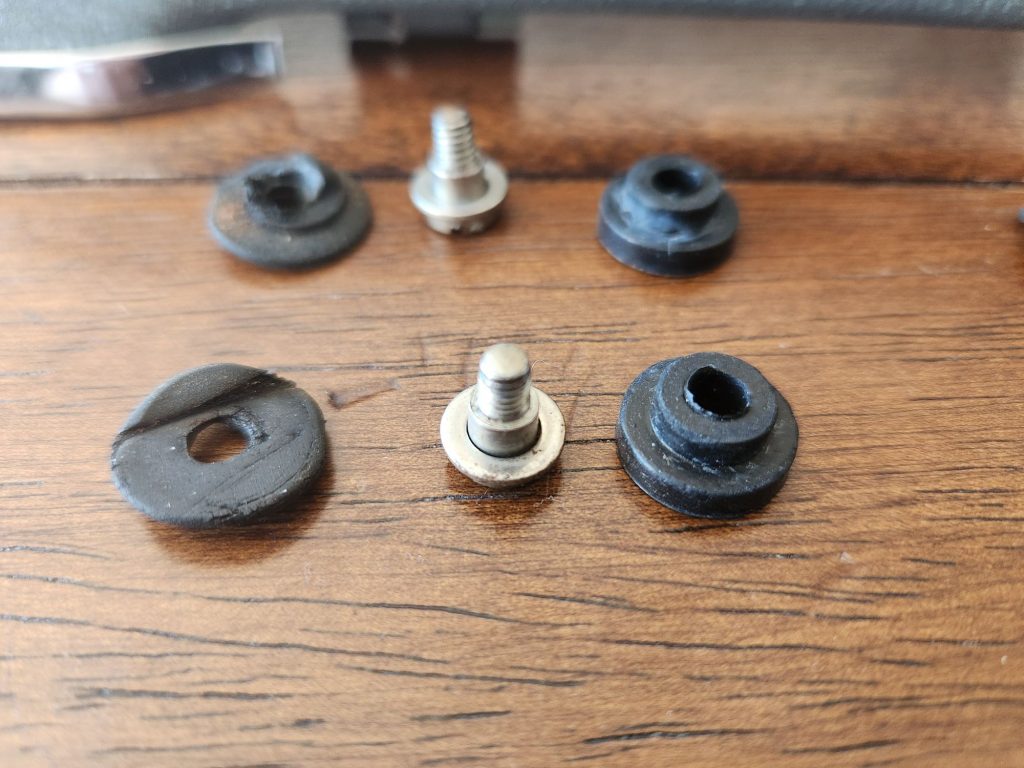 The old (left) and the new (right).[/caption]
Back at home I inserted the smaller end into the hole of the frame and screwed the shoulder bolt and washer back in to hold the frame onto the typewriter chassis. It seemed an excellent fit and this part of the machine should be in good shape for the next few decades.
If this is the only repair you're making to your machine, I suggest you replace each one, one-at-a-time in turn. This will prevent you from needing to take apart more of the machine or removing the entire body shell to get them on and will speed up the replacement process. If you're doing it as a larger restoration, then just install them when you re-attach the body shell. For me, loosely attaching the two rear ones followed by the two at the front and then tightening/adjusting them all seemed to be the easier way to go.
If you're restoring your own SG1, I hope these details make your work and research a bit quicker and easier.
The old (left) and the new (right).[/caption]
Back at home I inserted the smaller end into the hole of the frame and screwed the shoulder bolt and washer back in to hold the frame onto the typewriter chassis. It seemed an excellent fit and this part of the machine should be in good shape for the next few decades.
If this is the only repair you're making to your machine, I suggest you replace each one, one-at-a-time in turn. This will prevent you from needing to take apart more of the machine or removing the entire body shell to get them on and will speed up the replacement process. If you're doing it as a larger restoration, then just install them when you re-attach the body shell. For me, loosely attaching the two rear ones followed by the two at the front and then tightening/adjusting them all seemed to be the easier way to go.
If you're restoring your own SG1, I hope these details make your work and research a bit quicker and easier.