Om Malik opines on the MacBook Neo, Apple's new budget laptop with a mobile phone chip inside, and all of the premium Apple vibe on the outside. But, what is the logic for releasing such a product, as Apple generally hasn't been interested in competing in the lower end of the market? Malik takes a defensible position: its a Trojan Horse.
Apple needs to convince millions of people to buy this low-end laptop, and steal users away from Chromebook and Windows ecosystems. And hope that these switchers could eventually buy more things from Apple, especially those high-margin services.
But, will that strategy be effective? A $599 laptop is certainly "cheap" for a Mac, its not all that competitive with even cheaper Chromebooks, which dominate in education. I am sure that Apple will pursue that market, and high-volume purchasers like schools will get an even lower price point, but I have a hard time being convinced that they'll unseat Chromebooks as the dominant computer by volume in education, but I wouldn't be surprised if they earn a significant revenue share.
That said, there is some market context that Malik explores:
The timing for the launch of the new Neo computer is fortuitous. Microsoft’s ham-fisted approach to grafting Artificial Intelligence (AI) into Windows 11 has been an unmitigated disaster. Whether it was privacy-invading Recall, barely good Copilot or invasive advertising, Windows 11 has left many long-time Windows users searching for alternatives including Linux.
This is where it gets interesting to me. Spendy MacBook Pros are a common choice for businesses, in spite of their high price point. Personal computers are a different story, and the mid-market is flooded with popular laptops with similar pricing to the Neo. I'd wager that a home computer buyer is much more likely to choose a MacBook Neo, which is a premium product compared to the cheap plastic alternatives running an increasingly crap Windows experience. Malik's Trojan Horse thesis makes more sense to me in this specific market, where iPhones hold a very strong market share, and the services drag is sky high. I'll be interested to see how it unfolds!
{
    "type": "entry",
    "published": "2026-03-04T13:28:00-08:00",
    "url": "https://cleverdevil.io/2026/om-malik-on-the-macbook-neo",
    "syndication": [
        "https://cleverdevil.club/@jonathan/116173428597258175",
        "https://bsky.app/profile/cleverdevil.io/post/3mgbfqxfjwp27"
    ],
    "content": {
        "text": "On my Om\n                    With Neo, Apple Goes After Windows 11 \u2013 On my Om\n                    \n                    It has been a long time since I used the words \"cute\" and \"want\" about a computer. Last time, I probably did when...\n                    \n                \n            \n            \n            \nOm Malik opines on the MacBook Neo, Apple's new budget laptop with a mobile phone chip inside, and all of the premium Apple vibe on the outside. But, what is the logic for releasing such a product, as Apple generally hasn't been interested in competing in the lower end of the market? Malik takes a defensible position: its a Trojan Horse.\n\nApple needs to convince millions of people to buy this low-end laptop, and steal users away from Chromebook and Windows ecosystems. And hope that these switchers could eventually buy more things from Apple, especially those high-margin services.\n\nBut, will that strategy be effective? A $599 laptop is certainly \"cheap\" for a Mac, its not all that competitive with even cheaper Chromebooks, which dominate in education. I am sure that Apple will pursue that market, and high-volume purchasers like schools will get an even lower price point, but I have a hard time being convinced that they'll unseat Chromebooks as the dominant computer by volume in education, but I wouldn't be surprised if they earn a significant revenue share.\nThat said, there is some market context that Malik explores:\n\nThe timing for the launch of the new Neo computer is fortuitous. Microsoft\u2019s ham-fisted approach to grafting Artificial Intelligence (AI) into Windows 11 has been an unmitigated disaster. Whether it was privacy-invading Recall, barely good Copilot or invasive advertising, Windows 11 has left many long-time Windows users searching for alternatives including Linux.\n\nThis is where it gets interesting to me. Spendy MacBook Pros are a common choice for businesses, in spite of their high price point. Personal computers are a different story, and the mid-market is flooded with popular laptops with similar pricing to the Neo. I'd wager that a home computer buyer is much more likely to choose a MacBook Neo,  which is a premium product compared to the cheap plastic alternatives running an increasingly crap Windows experience. Malik's Trojan Horse thesis makes more sense to me in this specific market, where iPhones hold a very strong market share, and the services drag is sky high. I'll be interested to see how it unfolds!",
        "html": "<a href=\"https://om.co/2026/03/04/apple-goes-after-window-11-with-neo/\">\n                \n                \n                    <img src=\"https://om.co/wp-content/uploads/2026/03/Apple-MacBook-Neo-hero-260304-scaled.jpg\" alt=\"\" />\n                \n                \n                    <span>On my Om</span>\n                    <span>With Neo, Apple Goes After Windows 11 \u2013 On my Om</span>\n                    \n                    <span>It has been a long time since I used the words \"cute\" and \"want\" about a computer. Last time, I probably did when...</span>\n                    \n                \n            </a>\n            \n            \n<p>Om Malik opines on the MacBook Neo, Apple's new budget laptop with a mobile phone chip inside, and all of the premium Apple vibe on the outside. But, what is the logic for releasing such a product, as Apple generally hasn't been interested in competing in the lower end of the market? Malik takes a defensible position: its a Trojan Horse.</p>\n<blockquote>\n<p>Apple needs to convince millions of people to buy this low-end laptop, and steal users away from Chromebook and Windows ecosystems. And hope that these switchers could eventually buy more things from Apple, especially those high-margin services.</p>\n</blockquote>\n<p>But, will that strategy be effective? A $599 laptop is certainly \"cheap\" for a Mac, its not all that competitive with even cheaper Chromebooks, which dominate in education. I am sure that Apple will pursue that market, and high-volume purchasers like schools will get an even lower price point, but I have a hard time being convinced that they'll unseat Chromebooks as the dominant computer by <em>volume</em> in education, but I wouldn't be surprised if they earn a significant <em>revenue</em> share.</p>\n<p>That said, there is some market context that Malik explores:</p>\n<blockquote>\n<p>The timing for the launch of the new Neo computer is fortuitous. Microsoft\u2019s ham-fisted approach to grafting Artificial Intelligence (AI) into Windows 11 has been an unmitigated disaster. Whether it was privacy-invading Recall, barely good Copilot or invasive advertising, Windows 11 has left many long-time Windows users searching for alternatives including Linux.</p>\n</blockquote>\n<p>This is where it gets interesting to me. Spendy MacBook Pros are a common choice for businesses, in spite of their high price point. <em>Personal computers</em> are a different story, and the mid-market is flooded with popular laptops with similar pricing to the Neo. I'd wager that a home computer buyer is much more likely to choose a MacBook Neo,  which is a premium product compared to the cheap plastic alternatives running an increasingly crap Windows experience. Malik's Trojan Horse thesis makes more sense to me in this specific market, where iPhones hold a very strong market share, and the services drag is sky high. I'll be interested to see how it unfolds!</p>"
    },
    "author": {
        "type": "card",
        "name": "Jonathan LaCour",
        "url": "https://cleverdevil.io",
        "photo": "https://cleverdevil.io/profile/photo"
    },
    "post-type": "note",
    "_id": "47537266",
    "_source": "10"
}
I am sure reasonable people can disagree with me, but I’m happy that at least one of the AI giants is willing to stand its ground in the face of authoritarian pressure.
{
    "type": "entry",
    "published": "2026-02-28T00:27:18.881569+00:00",
    "url": "https://cleverdevil.io/2026/anthropic-holds-its-ground-pays-the-pric",
    "syndication": [
        "https://cleverdevil.club/@jonathan/116145418366122777",
        "https://bsky.app/profile/cleverdevil.io/post/3mfuxpfald225"
    ],
    "content": {
        "text": "Apple\n                    President Trump bans Anthropic from use in government systems\n                    \n                    Trump called the AI lab a \"RADICAL LEFT, WOKE COMPANY\" in a social media post. The Pentagon also ordered all...\n                    \n                \n            \n            \n            I am sure reasonable people can disagree with me, but I\u2019m happy that at least one of the AI giants is willing to stand its ground in the face of authoritarian pressure.",
        "html": "<a href=\"https://apple.news/APQfXGZeWTK-Eypb6CWpNNA\">\n                \n                \n                    <img src=\"https://c.apple.news/AgEXQVBRZlhHWmVXVEstRXlwYjZDV3BOTkEAMA\" alt=\"\" />\n                \n                \n                    <span>Apple</span>\n                    <span>President Trump bans Anthropic from use in government systems</span>\n                    \n                    <span>Trump called the AI lab a \"RADICAL LEFT, WOKE COMPANY\" in a social media post. The Pentagon also ordered all...</span>\n                    \n                \n            </a>\n            \n            <p>I am sure reasonable people can disagree with me, but I\u2019m happy that at least one of the AI giants is willing to stand its ground in the face of authoritarian pressure.</p>"
    },
    "author": {
        "type": "card",
        "name": "Jonathan LaCour",
        "url": "https://cleverdevil.io",
        "photo": "https://cleverdevil.io/profile/photo"
    },
    "post-type": "note",
    "_id": "47537267",
    "_source": "10"
}
{
    "type": "entry",
    "published": "2026-03-04T11:25:42-0500",
    "url": "https://martymcgui.re/2026/03/04/machine-knitting-a-chattie-of-ones-own/",
    "category": [
        "machine-knitting",
        "hats"
    ],
    "name": "Machine Knitting: a Chattie of one's own",
    "content": {
        "text": "After a somewhat fraught Chattie hat commission\u00a0I decided to go ahead and make one for myself!\n\n  \n\nI think it came out ... fine!\nLessons learned:\nTransfers: I'm still having a hard time using my transfer carriage to move ribbing stitches from the front ribber bed to the back main bed. This time I bent a needle on each bed! \ud83d\ude31 I also discovered that this transfer process is where some of my dropped stitches came from in the previous hat. I ended up recovering most of these before seaming, which saved a lot of fixing up time later! \ud83d\ude05\nJoining / seaming: somehow, for the second time, I have set out with the intention of joining the hat body to the brim with the seam on the knit side of the hat body, where it will be hidden by the folded brim, but ended up with it on the purl side, against the head. I'm also still getting the feel for seaming things on the machine. I decided to hang the hat body on directly to the needles with the finished brim and do a transfer-tool bind-off, but found the hung-on stitches really got in the way. After dropping a stitch (and some f-bombs) and losing the yarn tail, I backed things up and did a crochet-style bind-off with the latch tool, instead. I\u00a0still\u00a0managed to drop four or so stitches along the way. I manually repaired these later.\nGrafting: I had a better time seaming up the side of the hat using Kitchener stitch. After my last go at it, I found a video tutorial on Kitchener for machine knitting from Diana Sullivan\u00a0that made a lot more sense. This time I only screwed up one thing about it. Unfortunately that thing makes the resulting seam pretty obvious! A Kitchener stitch graft is supposed to look invisible, because you're basically creating new knit stitches by hand. However, if you create those new stitches\u00a0from the wrong side, what you get is a row of purl stitches on the knit side of the garment!\nSEAMDespite the issues, it wears just fine!\nI'm happy to wear a hat that I made for myself! I was proud to wear it on outings yesterday and this morning. Possibly the last cold days of the season! \ud83d\ude02\nWhat's next? I think I'd like to make another thing for myself. Probably a vest, using these beauties:\nThanks for reading! See you next time.",
        "html": "<p>After a <a href=\"https://martymcgui.re/2026/02/26/161722/\">somewhat fraught Chattie hat commission</a>\u00a0I decided to go ahead and make one for myself!</p>\n<p>\n  <br /></p>\n<p>I think it came out ... fine!</p>\n<p>Lessons learned:</p>\n<p><b>Transfers</b>: I'm still having a hard time using my transfer carriage to move ribbing stitches from the front ribber bed to the back main bed. This time I bent a needle on each bed! \ud83d\ude31 I also discovered that this transfer process is where some of my dropped stitches came from in the previous hat. I ended up recovering most of these before seaming, which saved a lot of fixing up time later! \ud83d\ude05</p>\n<p><b>Joining</b> / seaming: somehow, for the second time, I have set out with the intention of joining the hat body to the brim with the seam on the knit side of the hat body, where it will be hidden by the folded brim, but ended up with it on the purl side, against the head. I'm also still getting the feel for seaming things on the machine. I decided to hang the hat body on directly to the needles with the finished brim and do a transfer-tool bind-off, but found the hung-on stitches really got in the way. After dropping a stitch (and some f-bombs) and losing the yarn tail, I backed things up and did a crochet-style bind-off with the latch tool, instead. I\u00a0<i>still</i>\u00a0managed to drop four or so stitches along the way. I manually repaired these later.</p>\n<p><b>Grafting</b>: I had a better time seaming up the side of the hat using Kitchener stitch. After my last go at it, I found a <a href=\"https://www.youtube.com/watch?v=9DxHy6NGek8\">video tutorial on Kitchener for machine knitting from Diana Sullivan</a>\u00a0that made a lot more sense. This time I only screwed up one thing about it. Unfortunately that thing makes the resulting seam pretty obvious! A Kitchener stitch graft is supposed to look invisible, because you're basically creating new knit stitches by hand. However, if you create those new stitches\u00a0<i>from the wrong side</i>, what you get is a row of purl stitches on the knit side of the garment!</p>\n<img src=\"https://media.martymcgui.re/5c/2c/e5/8f/28be5767e483985737dc7a41f303473d1f621f735adee419b8b7256a.\" alt=\"\" />SEAM<p>Despite the issues, it wears just fine!</p>\n<img src=\"https://media.martymcgui.re/16/50/a1/67/1d54e04ec7cfa16d8f98051a6ad447dd832d5b05006fa207c0d80d67.\" alt=\"\" /><img src=\"https://media.martymcgui.re/80/dc/75/39/d2e7cbf7fc31b8ab1e1aba5004a3798b958db968674924350c7ea60a.\" alt=\"\" /><p>I'm happy to wear a hat that I made for myself! I was proud to wear it on outings yesterday and this morning. Possibly the last cold days of the season! \ud83d\ude02</p>\n<p>What's next? I think I'd like to make another thing for myself. Probably a vest, using these beauties:</p>\n<img src=\"https://media.martymcgui.re/6f/c8/eb/5e/768aec4960d6d053f5849b838a0ce2ef957f34aa30e78061b17d90ee.\" alt=\"\" /><p>Thanks for reading! See you next time.</p>"
    },
    "author": {
        "type": "card",
        "name": "Marty McGuire",
        "url": "https://martymcgui.re/",
        "photo": "https://martymcgui.re/images/logo.jpg"
    },
    "post-type": "article",
    "_id": "47533648",
    "_source": "175"
}
Excellent post from Ben Werdmuller about the dramatic shift that has impacted the calculus for startups and founders.
Enter AI. Almost without warning, AI-enabled tools dramatically expanded what a resource-strapped team can create. It’s a genuine sea change. The more founders and senior engineers I speak to who are actively using these tools, the more stories I hear about accelerated development. People are building smaller tools that would have taken many sprints in less than a day; founders are building entire startups that might have taken six months in less than one.
Ben does point out that there is more to consider than the up-front investment of time and energy required to make an idea a sustainable and successful product. There’s a critical human factor: giving a shit about what you create.
In a world where AI and modern tooling make it dangerously easy to spin up new software, our ultimate constraint is no longer our ability to type code. It’s our capacity to care for the things we bring into the world. Saying "no" to a project with a massive, hidden maintenance burden isn't a failure of imagination; it is how you protect your team’s time so they can focus on the journalism, the community, or the core mission that actually makes your organization special.
You don’t just need to build the dog, you also need to walk it, feed it, and give it the attention it deserves.
{
    "type": "entry",
    "published": "2026-03-03T23:38:30.639523+00:00",
    "url": "https://cleverdevil.io/2026/excellent-post-from-ben-werdmuller-about",
    "syndication": [
        "https://cleverdevil.club/@jonathan/116167875711234046",
        "https://bsky.app/profile/cleverdevil.io/post/3mg6wttoriu2o"
    ],
    "content": {
        "text": "Ben Werdmuller\n                    Can we build the dog?\n                    \n                    What resource-constrained teams need to ask before writing a line of code\n                    \n                \n            \n            \n            \nExcellent post from Ben Werdmuller about the dramatic shift that has impacted the calculus for startups and founders.\n\nEnter AI. Almost without warning, AI-enabled tools dramatically expanded what a resource-strapped team can create. It\u2019s a genuine sea change. The more founders and senior engineers I speak to who are actively using these tools, the more stories I hear about accelerated development. People are building smaller tools that would have taken many sprints in less than a day; founders are building entire startups that might have taken six months in less than one.\n\nBen does point out that there is more to consider than the up-front investment of time and energy required to make an idea a sustainable and successful product. There\u2019s a critical human factor: giving a shit about what you create.\n\nIn a world where AI and modern tooling make it dangerously easy to spin up new software, our ultimate constraint is no longer our ability to type code. It\u2019s our capacity to care for the things we bring into the world. Saying \"no\" to a project with a massive, hidden maintenance burden isn't a failure of imagination; it is how you protect your team\u2019s time so they can focus on the journalism, the community, or the core mission that actually makes your organization special.\n\nYou don\u2019t just need to build the dog, you also need to walk it, feed it, and give it the attention it deserves.",
        "html": "<a href=\"https://werd.io/can-we-build-the-dog/\">\n                \n                \n                    <img src=\"https://werd.io/content/images/size/w256h256/format/png/2025/06/thumb.webp\" alt=\"\" />\n                \n                \n                    <span>Ben Werdmuller</span>\n                    <span>Can we build the dog?</span>\n                    \n                    <span>What resource-constrained teams need to ask before writing a line of code</span>\n                    \n                \n            </a>\n            \n            \n<p>Excellent post from Ben Werdmuller about the dramatic shift that has impacted the calculus for startups and founders.</p>\n<blockquote>\n<p>Enter AI. Almost without warning, AI-enabled tools dramatically expanded what a resource-strapped team can create. It\u2019s a genuine sea change. The more founders and senior engineers I speak to who are actively using these tools, the more stories I hear about accelerated development. People are building smaller tools that would have taken many sprints in less than a day; founders are building entire startups that might have taken six months in less than one.</p>\n</blockquote>\n<p>Ben does point out that there is more to consider than the up-front investment of time and energy required to make an idea a sustainable and successful product. There\u2019s a critical human factor: giving a shit about what you create.</p>\n<blockquote>\n<p>In a world where AI and modern tooling make it dangerously easy to spin up new software, our ultimate constraint is no longer our ability to type code. It\u2019s our capacity to care for the things we bring into the world. Saying \"no\" to a project with a massive, hidden maintenance burden isn't a failure of imagination; it is how you protect your team\u2019s time so they can focus on the journalism, the community, or the core mission that actually makes your organization special.</p>\n</blockquote>\n<p>You don\u2019t just need to build the dog, you also need to walk it, feed it, and give it the attention it deserves.</p>"
    },
    "author": {
        "type": "card",
        "name": "Jonathan LaCour",
        "url": "https://cleverdevil.io",
        "photo": "https://cleverdevil.io/profile/photo"
    },
    "post-type": "note",
    "_id": "47525845",
    "_source": "10"
}
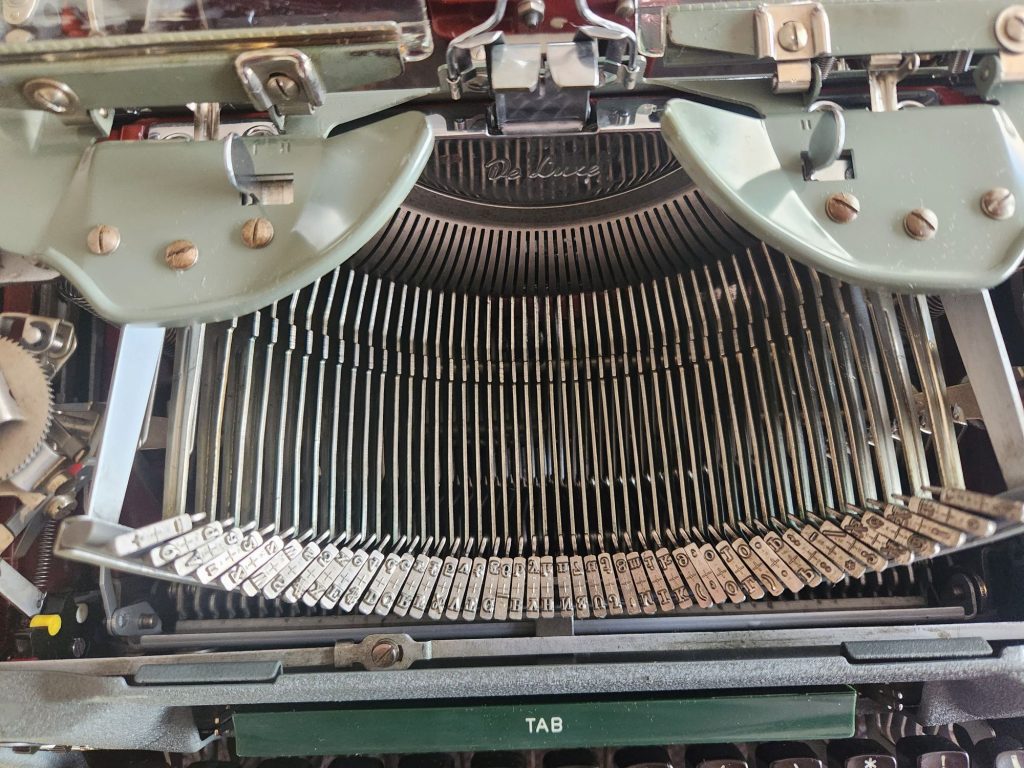
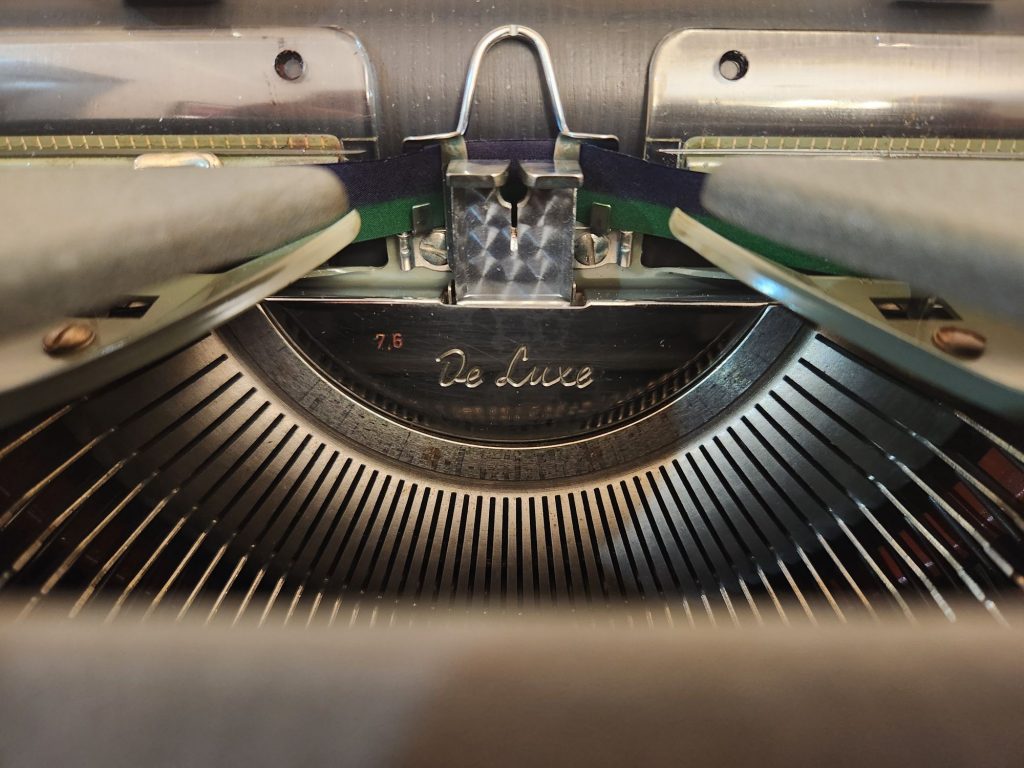
Over the weekend I stripped down my 1956 Olympia SG1 and cleaned all the body panels thoroughly. I had taken out all the old foam, but I also removed the remaining loosened felt pieces.
I flushed the internals out with lacquer thinner and blew everything out with the air compressor the following day. I replaced the rubber body bushings and replaced two missing washers on the feet. Then I put everything back together making the appropriate adjustments as I went.
Remaining servicing
Sometime in the near future I still need to replace the feet (they're reasonably passable), the platen (rock hard), and the felt/foam. I'll polish up the keys, chrome, and brights. I still need to polish up the keylevers and typebars which I decided not to remove and put through an ultrasonic cleaner.
It still needs a replacement set screw for the tab clear lever on the right hand side. I'll also eventually need to replace the underlying metal connection on the right hand side card guide—it's missing the connecting pin and part of the left metal arm. I've remediated most of the minimal rust, but there are a few remaining internal blemishes that could be polished up (low priority). I'll also need to weld back on the curved, flat "spring" on the left end of the bottom of the paper table that shore itself off at some point. The tabulator can also use a bit of additional love and attention.
For historical purposes, I left the tiniest hint of "brown nicotine stain" on the right side of the carriage where a smoker apparently kept their ash tray. That side of the machine almost appeared to be a chimney based on the discoloration which was otherwise remediated.
Beyond this, it's ready to be in the regular rotation, but will be my primary desk machine for the near future.
{
"type": "entry",
"published": "2026-03-03T02:01:18-08:00",
"summary": "Over the weekend I stripped down my 1956 Olympia SG1 and cleaned all the body panels thoroughly. I had taken out all the old foam, but I also removed the remaining loosened felt pieces. I flushed the internals out with lacquer thinner and blew everything out with the air compressor the following day. I replaced … <a href=\"https://boffosocko.com/2026/03/03/olympia-sg1-standard-typewriter-clean-oil-and-adjust/\" class=\"more-link\">Continue reading <span class=\"screen-reader-text\">Olympia SG1 Standard Typewriter Clean, Oil, and Adjust</span></a>",
"url": "https://boffosocko.com/2026/03/03/olympia-sg1-standard-typewriter-clean-oil-and-adjust/",
"featured": "https://boffosocko.com/wp-content/uploads/2026/03/wp-17725296377261695212589185083502.jpg",
"category": [
"Typewriters",
"cigarette smoking",
"Olympia SG1",
"Olympia typewriters",
"typewriter restoration"
],
"content": {
"text": "Over the weekend I stripped down my 1956 Olympia SG1 and cleaned all the body panels thoroughly. I had taken out all the old foam, but I also removed the remaining loosened felt pieces.\n\n\n\nI flushed the internals out with lacquer thinner and blew everything out with the air compressor the following day. I replaced the rubber body bushings and replaced two missing washers on the feet. Then I put everything back together making the appropriate adjustments as I went.\u00a0\n\nRemaining servicing\n\nSometime in the near future I still need to replace the feet (they're reasonably passable), the platen (rock hard), and the felt/foam. I'll polish up the keys, chrome, and brights. I still need to polish up the keylevers and typebars which I decided not to remove and put through an ultrasonic cleaner.\n\nIt still needs a replacement set screw for the tab clear lever on the right hand side. I'll also eventually need to replace the underlying metal connection on the right hand side card guide\u2014it's missing the connecting pin and part of the left metal arm. I've remediated most of the minimal rust, but there are a few remaining internal blemishes that could be polished up (low priority). I'll also need to weld back on the curved, flat \"spring\" on the left end of the bottom of the paper table that shore itself off at some point. The tabulator can also use a bit of additional love and attention.\n\nFor historical purposes, I left the tiniest hint of \"brown nicotine stain\" on the right side of the carriage where a smoker apparently kept their ash tray. That side of the machine almost appeared to be a chimney based on the discoloration which was otherwise remediated.\n\n\n\nBeyond this, it's ready to be in the regular rotation, but will be my primary desk machine for the near future.",
"html": "Over the weekend I stripped down my <a href=\"https://boffosocko.com/2026/02/02/1956-olympia-sg1-standard-typewriter/\">1956 Olympia SG1</a> and cleaned all the body panels thoroughly. I had taken out all the old foam, but I also removed the remaining loosened felt pieces.\n\n<img src=\"https://boffosocko.com/wp-content/uploads/2026/03/wp-17725297295822999704343404140557-1024x768.jpg\" alt=\"With the hood removed we see into the basket of a 1956 Olympia SG1 typewriter\" width=\"660\" height=\"495\" />\n\nI flushed the internals out with lacquer thinner and blew everything out with the air compressor the following day. I replaced the <a href=\"https://boffosocko.com/kind/article/\">rubber body bushings</a> and replaced two missing washers on the feet. Then I put everything back together making the appropriate adjustments as I went.\u00a0\n\n<img src=\"https://boffosocko.com/wp-content/uploads/2026/03/wp-17725296507997146766100349152237-1024x768.jpg\" alt=\"View through the hood of an Olympia SG1 onto the gleaming De Luxe plate in the basket of the typewriter\" width=\"660\" height=\"495\" /><h2>Remaining servicing</h2>\n\nSometime in the near future I still need to replace the feet (they're reasonably passable), the platen (rock hard), and the felt/foam. I'll polish up the keys, chrome, and brights. I still need to polish up the keylevers and typebars which I decided not to remove and put through an ultrasonic cleaner.\n\nIt still needs a replacement set screw for the tab clear lever on the right hand side. I'll also eventually need to replace the underlying metal connection on the right hand side card guide\u2014it's missing the connecting pin and part of the left metal arm. I've remediated most of the minimal rust, but there are a few remaining internal blemishes that could be polished up (low priority). I'll also need to weld back on the curved, flat \"spring\" on the left end of the bottom of the paper table that shore itself off at some point. The tabulator can also use a bit of additional love and attention.\n\nFor historical purposes, I left the tiniest hint of \"brown nicotine stain\" on the right side of the carriage where a smoker apparently kept their ash tray. That side of the machine almost appeared to be a chimney based on the discoloration which was otherwise remediated.\n\n<img src=\"https://boffosocko.com/wp-content/uploads/2026/03/wp-17725296187584883327527894042741-768x1024.jpg\" alt=\"A view of the bottom right side of the carriage. What should have been a green crinkle painted body panel and shiny silver tab at the end of the drawband were coated with a layer of brown nicotine sludge.\" width=\"660\" height=\"880\" />\n\nBeyond this, it's ready to be in the regular rotation, but will be my primary desk machine for the near future.\n\n<img src=\"https://boffosocko.com/wp-content/uploads/2026/03/wp-17725296639202366606001339012576-1024x768.jpg\" alt=\"angle on the right side of an Olympia SG1 in green crinkle paint featuring a close up of a green plastic wheel of the touch control, gleaming chrome trim and brown plastic keys on the keyboard\" width=\"660\" height=\"495\" />"
},
"author": {
"type": "card",
"name": null,
"url": null,
"photo": null
},
"post-type": "note",
"_id": "47518683",
"_source": "2785"
}
One of my favorite features of my new site is invisible to visitors — an integrated feed reader with support for first-class IndieWeb interactions — likes, replies, bookmarks, and reposts. Still iterating on it, but it’s already lovely to use.
{
    "type": "entry",
    "published": "2026-03-03T05:03:00.418743+00:00",
    "url": "https://cleverdevil.io/2026/one-of-my-favorite-features-of-my-new-si",
    "syndication": [
        "https://cleverdevil.club/@jonathan/116163489364720178",
        "https://bsky.app/profile/cleverdevil.io/post/3mg4yj4ljvr2c"
    ],
    "content": {
        "text": "One of my favorite features of my new site is invisible to visitors \u2014 an integrated feed reader with support for first-class IndieWeb interactions \u2014 likes, replies, bookmarks, and reposts. Still iterating on it, but it\u2019s already lovely to use.",
        "html": "<p>One of my favorite features of my new site is invisible to visitors \u2014 an integrated feed reader with support for first-class IndieWeb interactions \u2014 likes, replies, bookmarks, and reposts. Still iterating on it, but it\u2019s already lovely to use.</p>"
    },
    "author": {
        "type": "card",
        "name": "Jonathan LaCour",
        "url": "https://cleverdevil.io",
        "photo": "https://cleverdevil.io/profile/photo"
    },
    "post-type": "note",
    "_id": "47516680",
    "_source": "10"
}
I really enjoyed watching Winged Migration (2001). Some breathtaking footage of bird migrations all around the world. I was shocked how close some of the footage was and learned via Wikipedia that the filmmakers raised several species from birth so they would imprint on the staff and be accustomed to the ultralights and camera equipment.
{
    "type": "entry",
    "published": "2026-03-02 12:18-0800",
    "url": "https://gregorlove.com/2026/02/i-really-enjoyed/",
    "category": [
        "movies"
    ],
    "content": {
        "text": "I really enjoyed watching Winged Migration (2001). Some breathtaking footage of bird migrations all around the world. I was shocked how close some of the footage was and learned via Wikipedia that the filmmakers raised several species from birth so they would imprint on the staff and be accustomed to the ultralights and camera equipment.\n\nThanks to Fractal Kitty for the recommendation for IndieWeb Movie Club!",
        "html": "<p>I really enjoyed watching <i><a href=\"https://en.wikipedia.org/wiki/Winged_Migration\">Winged Migration</a></i> (2001). Some breathtaking footage of bird migrations all around the world. I was shocked how close some of the footage was and learned via Wikipedia that the filmmakers raised several species from birth so they would imprint on the staff and be accustomed to the ultralights and camera equipment.</p>\n\n<p>Thanks to <a class=\"h-card\" href=\"https://banjomagpi.com/\">Fractal Kitty</a> for the <a href=\"https://banjomagpi.com/movies/winged-migration/\">recommendation</a> for IndieWeb Movie Club!</p>"
    },
    "author": {
        "type": "card",
        "name": "gRegor Morrill",
        "url": "https://gregorlove.com/",
        "photo": "https://gregorlove.com/site/assets/files/6268/profile-2021-square.300x0.jpg"
    },
    "post-type": "note",
    "_id": "47514516",
    "_source": "95"
}
Over the weekend I made a major push on beginning restoration of the Olympia SG1 standard typewriter I picked up this past month.
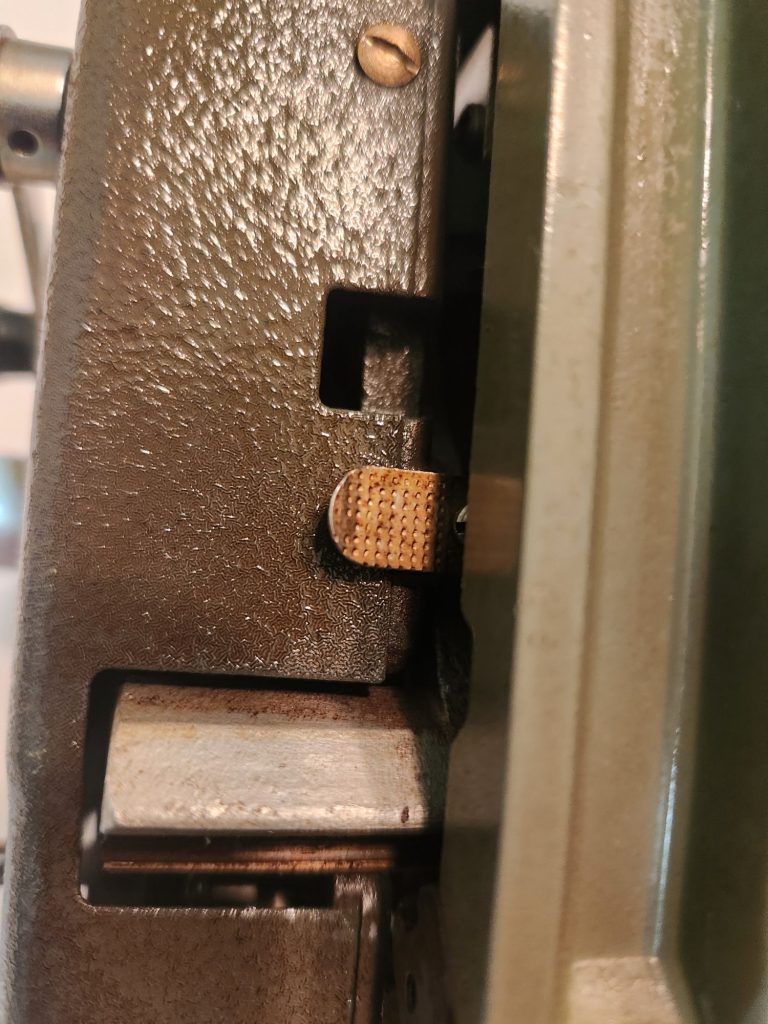
One of the small issues I encountered was finding four crushed rubber bushings between the exterior typewriter shell and the main chassis at the four corners on the bottom of the machine.
[caption id="attachment_55834794" align="aligncenter" width="660"] This black rubber bushing is so smashed you almost can't see it above the silver screw head at the bottom of the typewriter frame. The typewriter's foot has been removed from the vacant screw hole just to the left of the bushing screw to provide better visibility.[/caption]
This is a common repair issue for the Olympia SM3 machines and one which can dramatically impair that typewriter's functionality after several decades. I expected this would be a common enough problem, so I searched a few fora, YouTube, and some specialty Facebook Groups to see how others had done the replacement and find the specs for the original part. Sadly none were forthcoming. Has no one written this up before? Perhaps because the issue isn't a huge problem from a functional perspective, no one has bothered?
But when you're doing a thorough restoration on a machine you plan to put into daily use, you go the extra mile. To that end, I thought I'd write up a few notes for those who encounter this in the future, particularly as I couldn't find quick sources on it the way one can for the SM3.
My crushed rubber husks (now more like a brittle, friable plastic) were approximately 16mmOD x 4mm ID x 2 mm, but I wanted to do better than guessing the appropriate replacement. Fortunately our friend Richard Polt has a downloadable .pdf copy of the Olympia Spare Parts Catalog and Price List for Standard Typewriters Model SG1 (Jan. 1, 1961 edition) from the Ames Supply Company on his website. Pulling it up very quickly provided a diagram of the appropriate part on page 12 and indicated it to be part number 34280-5x.6. Scrolling ahead to page 61, one discovers that the part is called a "spacing washer (rubber)" whose original specs are listed as 5⌀12⌀x4mm which originally listed for 11¢. On a German manufactured machine this is indicating a 5mm inner diameter, 12 mm outer diameter, and thickness of 4mm.
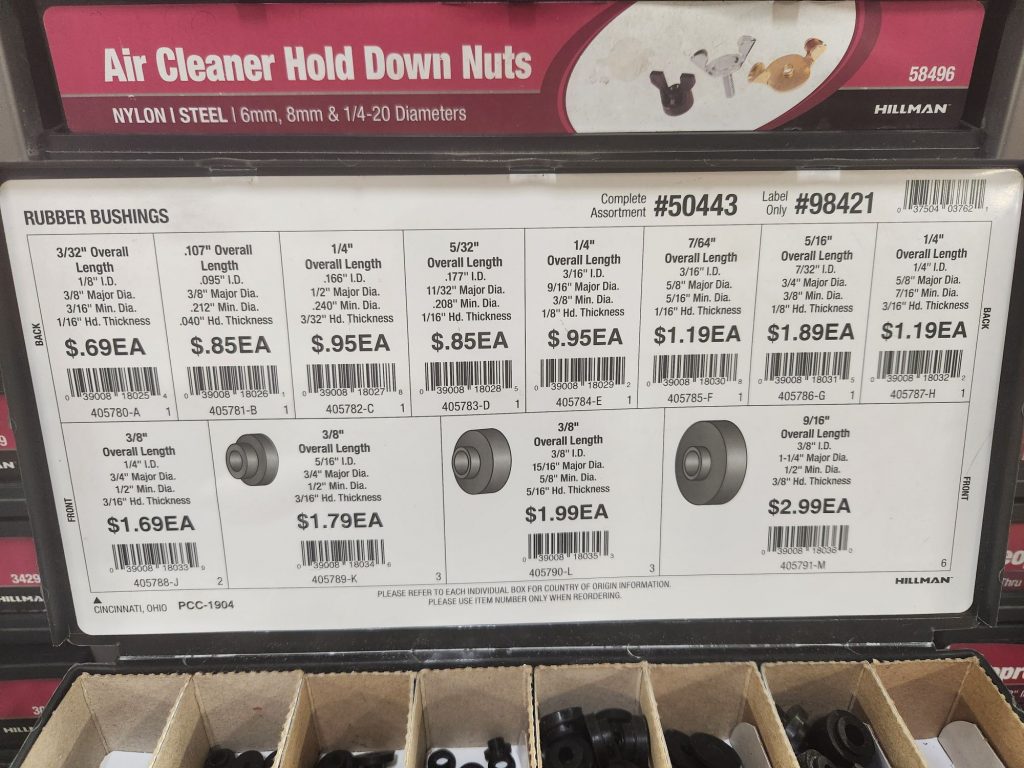
A quick spin over to the local Ace Hardware store and I was able to find a variety of Hillman rubber bushings on offer as potential replacements.
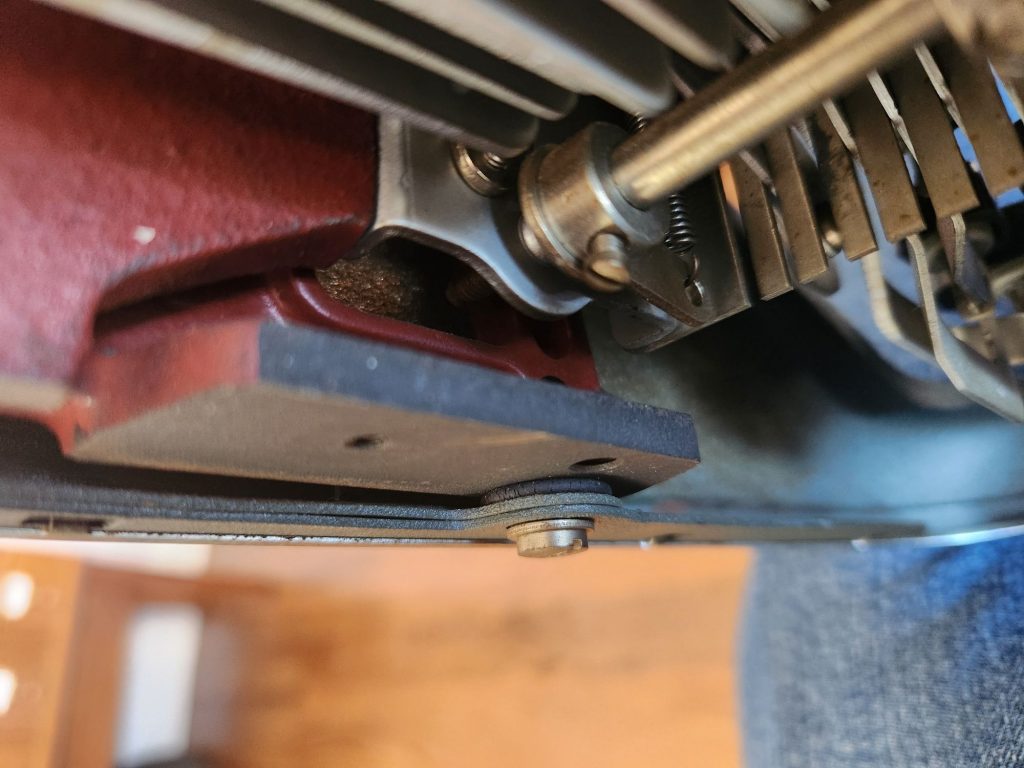
I selected Hillman part number 405784-E as the closest bushing with dimensions 1/4" overall length; 3/16" ID, 9/16" major dia.; 3/8" min. dia. and 1/8" Hd. thickness. I picked up 4 of them for $0.95 each. Depending on availability, others might find luck ordering something of similar size and dimension from purveyors like McMaster-Carr or Grainger.
[caption id="attachment_55834796" align="aligncenter" width="660"] The old (left) and the new (right).[/caption]
Back at home I inserted the smaller end into the hole of the frame and screwed the shoulder bolt and washer back in to hold the frame onto the typewriter chassis. It seemed an excellent fit and this part of the machine should be in good shape for the next few decades.
If this is the only repair you're making to your machine, I suggest you replace each one, one-at-a-time in turn. This will prevent you from needing to take apart more of the machine or removing the entire body shell to get them on and will speed up the replacement process. If you're doing it as a larger restoration, then just install them when you re-attach the body shell. For me, loosely attaching the two rear ones followed by the two at the front and then tightening/adjusting them all seemed to be the easier way to go.
If you're restoring your own SG1, I hope these details make your work and research a bit quicker and easier.
{
"type": "entry",
"published": "2026-03-01T22:51:54-08:00",
"summary": "Over the weekend I made a major push on beginning restoration of the Olympia SG1 standard typewriter I picked up this past month.\u00a0 One of the small issues I encountered was finding four crushed rubber bushings between the exterior typewriter shell and the main chassis at the four corners on the bottom of the machine. … <a href=\"https://boffosocko.com/2026/03/01/replacing-the-body-shell-rubber-bushings-on-an-olympia-sg1-typewriter/\" class=\"more-link\">Continue reading <span class=\"screen-reader-text\">Replacing the Body Shell Rubber Bushings on an Olympia SG1 Typewriter</span></a>",
"url": "https://boffosocko.com/2026/03/01/replacing-the-body-shell-rubber-bushings-on-an-olympia-sg1-typewriter/",
"featured": "https://boffosocko.com/wp-content/uploads/2026/03/Olympia-SG1-diagram-highlighted.jpg",
"category": [
"Typewriters",
"bushings",
"Olympia SG1",
"Olympia typewriters",
"typewriter restoration"
],
"content": {
"text": "Over the weekend I made a major push on beginning restoration of the Olympia SG1 standard typewriter I picked up this past month.\u00a0\n\nOne of the small issues I encountered was finding four crushed rubber bushings between the exterior typewriter shell and the main chassis at the four corners on the bottom of the machine.\n\n[caption id=\"attachment_55834794\" align=\"aligncenter\" width=\"660\"] This black rubber bushing is so smashed you almost can't see it above the silver screw head at the bottom of the typewriter frame. The typewriter's foot has been removed from the vacant screw hole just to the left of the bushing screw to provide better visibility.[/caption]\n\nThis is a common repair issue for the Olympia SM3 machines and one which can dramatically impair that typewriter's functionality after several decades. I expected this would be a common enough problem, so I searched a few fora, YouTube, and some specialty\u00a0 Facebook Groups to see how others had done the replacement and find the specs for the original part. Sadly none were forthcoming. Has no one written this up before? Perhaps because the issue isn't a huge problem from a functional perspective, no one has bothered?\n\nBut when you're doing a thorough restoration on a machine you plan to put into daily use, you go the extra mile. To that end, I thought I'd write up a few notes for those who encounter this in the future, particularly as I couldn't find quick sources on it the way one can for the SM3.\u00a0\n\nMy crushed rubber husks (now more like a brittle, friable plastic) were approximately 16mmOD x 4mm ID x 2 mm, but I wanted to do better than guessing the appropriate replacement. Fortunately our friend Richard Polt has a downloadable .pdf copy of the Olympia Spare Parts Catalog and Price List for Standard Typewriters Model SG1 (Jan. 1, 1961 edition) from the Ames Supply Company on his website. Pulling it up very quickly provided a diagram of the appropriate part on page 12 and indicated it to be part number 34280-5x.6. Scrolling ahead to page 61, one discovers that the part is called a \"spacing washer (rubber)\" whose original specs are listed as 5\u230012\u2300x4mm which originally listed for 11\u00a2. On a German manufactured machine this is indicating a 5mm inner diameter, 12 mm outer diameter, and thickness of 4mm.\n\n\n\nA quick spin over to the local Ace Hardware store and I was able to find a variety of Hillman rubber bushings on offer as potential replacements.\n\n\n\nI selected Hillman part number 405784-E as the closest bushing with dimensions 1/4\" overall length; 3/16\" ID, 9/16\" major dia.; 3/8\" min. dia. and 1/8\" Hd. thickness. I picked up 4 of them for $0.95 each. Depending on availability, others might find luck ordering something of similar size and dimension from purveyors like McMaster-Carr or Grainger.\n\n[caption id=\"attachment_55834796\" align=\"aligncenter\" width=\"660\"] The old (left) and the new (right).[/caption]\n\nBack at home I inserted the smaller end into the hole of the frame and screwed the shoulder bolt and washer back in to hold the frame onto the typewriter chassis. It seemed an excellent fit and this part of the machine should be in good shape for the next few decades.\u00a0\n\nIf this is the only repair you're making to your machine, I suggest you replace each one, one-at-a-time in turn. This will prevent you from needing to take apart more of the machine or removing the entire body shell to get them on and will speed up the replacement process. If you're doing it as a larger restoration, then just install them when you re-attach the body shell. For me, loosely attaching the two rear ones followed by the two at the front and then tightening/adjusting them all seemed to be the easier way to go.\n\nIf you're restoring your own SG1, I hope these details make your work and research a bit quicker and easier.\u00a0",
"html": "Over the weekend I made a major push on beginning restoration of the <a href=\"https://boffosocko.com/2026/02/02/1956-olympia-sg1-standard-typewriter/\">Olympia SG1 standard typewriter</a> I picked up this past month.\u00a0\n\nOne of the small issues I encountered was finding four crushed rubber bushings between the exterior typewriter shell and the main chassis at the four corners on the bottom of the machine.\n\n[caption id=\"attachment_55834794\" align=\"aligncenter\" width=\"660\"]<img src=\"https://boffosocko.com/wp-content/uploads/2026/03/wp-17724316421148620735029722440606-1024x768.jpg\" alt=\"View of the back corner underneath an Olympia SG1 typewriter featuring a crushed rubber washer between the body shell and the solid steel chassis of the typewriter. It look like it's less than a millimeter thick.\" width=\"660\" height=\"495\" /> This black rubber bushing is so smashed you almost can't see it above the silver screw head at the bottom of the typewriter frame. The typewriter's foot has been removed from the vacant screw hole just to the left of the bushing screw to provide better visibility.[/caption]\n\nThis is a <a href=\"https://boffosocko.com/2024/07/14/aggregated-resources-and-playlist-for-a-crash-course-on-the-olympia-sm3-portable-typewriter/#Olympia%20SM3%20Rubber%20Bushings%20Replacement\">common repair issue for the Olympia SM3 machines</a> and one which can dramatically impair that typewriter's functionality after several decades. I expected this would be a common enough problem, so I searched a few fora, YouTube, and some specialty\u00a0 Facebook Groups to see how others had done the replacement and find the specs for the original part. Sadly none were forthcoming. Has no one written this up before? Perhaps because the issue isn't a huge problem from a functional perspective, no one has bothered?\n\nBut when you're doing a thorough restoration on a machine you plan to put into daily use, you go the extra mile. To that end, I thought I'd write up a few notes for those who encounter this in the future, particularly as I couldn't find quick sources on it the way one can for the SM3.\u00a0\n\nMy crushed rubber husks (now more like a brittle, friable plastic) were approximately 16mmOD x 4mm ID x 2 mm, but I wanted to do better than guessing the appropriate replacement. Fortunately our friend Richard Polt has a downloadable .pdf copy of the <a href=\"https://site.xavier.edu/polt/typewriters/OlympiaSG1parts.pdf\"><em>Olympia Spare Parts Catalog and Price List for Standard Typewriters Model SG1</em></a> (Jan. 1, 1961 edition) from the Ames Supply Company on his website. Pulling it up very quickly provided a diagram of the appropriate part on page 12 and indicated it to be part number 34280-5x.6. Scrolling ahead to page 61, one discovers that the part is called a \"spacing washer (rubber)\" whose original specs are listed as 5\u230012\u2300x4mm which originally listed for 11\u00a2. On a German manufactured machine this is indicating a 5mm inner diameter, 12 mm outer diameter, and thickness of 4mm.\n\n<img src=\"https://boffosocko.com/wp-content/uploads/2026/03/Olympia-SG1-diagram-highlighted.jpg\" alt=\"Mechanical diagram of the parts pertaining to the body shell of the Olympia SG1. The rubber washer part number is highlighted in yellow.\" width=\"966\" height=\"612\" />\n\nA quick spin over to the local Ace Hardware store and I was able to find a variety of Hillman rubber bushings on offer as potential replacements.\n\n<img src=\"https://boffosocko.com/wp-content/uploads/2026/03/wp-17724316778851643970633342041167-1024x768.jpg\" alt=\"Photo of the various specifications of about a dozen rubber bushings from a display in the hardware store.\" width=\"660\" height=\"495\" />\n\nI selected <a href=\"https://amzn.to/4l2YNG8\">Hillman part number 405784-E</a> as the closest bushing with dimensions 1/4\" overall length; 3/16\" ID, 9/16\" major dia.; 3/8\" min. dia. and 1/8\" Hd. thickness. I picked up 4 of them for $0.95 each. Depending on availability, others might find luck ordering something of similar size and dimension from purveyors like McMaster-Carr or Grainger.\n\n[caption id=\"attachment_55834796\" align=\"aligncenter\" width=\"660\"]<img src=\"https://boffosocko.com/wp-content/uploads/2026/03/wp-17724317095074657823087389083679-1024x768.jpg\" alt=\"Comparison of the old bushings on the left with the new rubber bushings on the right separated by the shoulder bolts and washers in the middle.\" width=\"660\" height=\"495\" /> The old (left) and the new (right).[/caption]\n\nBack at home I inserted the smaller end into the hole of the frame and screwed the shoulder bolt and washer back in to hold the frame onto the typewriter chassis. It seemed an excellent fit and this part of the machine should be in good shape for the next few decades.\u00a0\n\nIf this is the only repair you're making to your machine, I suggest you replace each one, one-at-a-time in turn. This will prevent you from needing to take apart more of the machine or removing the entire body shell to get them on and will speed up the replacement process. If you're doing it as a larger restoration, then just install them when you re-attach the body shell. For me, loosely attaching the two rear ones followed by the two at the front and then tightening/adjusting them all seemed to be the easier way to go.\n\nIf you're restoring your own SG1, I hope these details make your work and research a bit quicker and easier.\u00a0"
},
"author": {
"type": "card",
"name": null,
"url": null,
"photo": null
},
"post-type": "note",
"_id": "47507191",
"_source": "2785"
}
{
    "type": "entry",
    "published": "2026-03-02T06:55:23.037837+00:00",
    "url": "https://cleverdevil.io/2026/my-wife-is-out-of-town-and-i-miss-her-ve",
    "syndication": [
        "https://cleverdevil.club/@jonathan/116158268937543869",
        "https://bsky.app/profile/cleverdevil.io/post/3mg2od5gjao2h"
    ],
    "content": {
        "text": "My wife is out of town and I miss her very much, but have also been reminded how much I miss running the ceiling fan in my bedroom \ud83d\ude02",
        "html": "<p>My wife is out of town and I miss her very much, but have also been reminded how much I miss running the ceiling fan in my bedroom \ud83d\ude02</p>"
    },
    "author": {
        "type": "card",
        "name": "Jonathan LaCour",
        "url": "https://cleverdevil.io",
        "photo": "https://cleverdevil.io/profile/photo"
    },
    "post-type": "note",
    "_id": "47506678",
    "_source": "10"
}

 On my Om
With Neo, Apple Goes After Windows 11 – On my Om
It has been a long time since I used the words "cute" and "want" about a computer. Last time, I probably did when...
On my Om
With Neo, Apple Goes After Windows 11 – On my Om
It has been a long time since I used the words "cute" and "want" about a computer. Last time, I probably did when...


 Ben Werdmuller
Can we build the dog?
What resource-constrained teams need to ask before writing a line of code
Ben Werdmuller
Can we build the dog?
What resource-constrained teams need to ask before writing a line of code


 I flushed the internals out with lacquer thinner and blew everything out with the air compressor the following day. I replaced the rubber body bushings and replaced two missing washers on the feet. Then I put everything back together making the appropriate adjustments as I went.
 Beyond this, it's ready to be in the regular rotation, but will be my primary desk machine for the near future.


 This black rubber bushing is so smashed you almost can't see it above the silver screw head at the bottom of the typewriter frame. The typewriter's foot has been removed from the vacant screw hole just to the left of the bushing screw to provide better visibility.[/caption]
This is a common repair issue for the Olympia SM3 machines and one which can dramatically impair that typewriter's functionality after several decades. I expected this would be a common enough problem, so I searched a few fora, YouTube, and some specialty Facebook Groups to see how others had done the replacement and find the specs for the original part. Sadly none were forthcoming. Has no one written this up before? Perhaps because the issue isn't a huge problem from a functional perspective, no one has bothered?
But when you're doing a thorough restoration on a machine you plan to put into daily use, you go the extra mile. To that end, I thought I'd write up a few notes for those who encounter this in the future, particularly as I couldn't find quick sources on it the way one can for the SM3.
My crushed rubber husks (now more like a brittle, friable plastic) were approximately 16mmOD x 4mm ID x 2 mm, but I wanted to do better than guessing the appropriate replacement. Fortunately our friend Richard Polt has a downloadable .pdf copy of the Olympia Spare Parts Catalog and Price List for Standard Typewriters Model SG1 (Jan. 1, 1961 edition) from the Ames Supply Company on his website. Pulling it up very quickly provided a diagram of the appropriate part on page 12 and indicated it to be part number 34280-5x.6. Scrolling ahead to page 61, one discovers that the part is called a "spacing washer (rubber)" whose original specs are listed as 5⌀12⌀x4mm which originally listed for 11¢. On a German manufactured machine this is indicating a 5mm inner diameter, 12 mm outer diameter, and thickness of 4mm.
This black rubber bushing is so smashed you almost can't see it above the silver screw head at the bottom of the typewriter frame. The typewriter's foot has been removed from the vacant screw hole just to the left of the bushing screw to provide better visibility.[/caption]
This is a common repair issue for the Olympia SM3 machines and one which can dramatically impair that typewriter's functionality after several decades. I expected this would be a common enough problem, so I searched a few fora, YouTube, and some specialty Facebook Groups to see how others had done the replacement and find the specs for the original part. Sadly none were forthcoming. Has no one written this up before? Perhaps because the issue isn't a huge problem from a functional perspective, no one has bothered?
But when you're doing a thorough restoration on a machine you plan to put into daily use, you go the extra mile. To that end, I thought I'd write up a few notes for those who encounter this in the future, particularly as I couldn't find quick sources on it the way one can for the SM3.
My crushed rubber husks (now more like a brittle, friable plastic) were approximately 16mmOD x 4mm ID x 2 mm, but I wanted to do better than guessing the appropriate replacement. Fortunately our friend Richard Polt has a downloadable .pdf copy of the Olympia Spare Parts Catalog and Price List for Standard Typewriters Model SG1 (Jan. 1, 1961 edition) from the Ames Supply Company on his website. Pulling it up very quickly provided a diagram of the appropriate part on page 12 and indicated it to be part number 34280-5x.6. Scrolling ahead to page 61, one discovers that the part is called a "spacing washer (rubber)" whose original specs are listed as 5⌀12⌀x4mm which originally listed for 11¢. On a German manufactured machine this is indicating a 5mm inner diameter, 12 mm outer diameter, and thickness of 4mm.
 A quick spin over to the local Ace Hardware store and I was able to find a variety of Hillman rubber bushings on offer as potential replacements.
 I selected Hillman part number 405784-E as the closest bushing with dimensions 1/4" overall length; 3/16" ID, 9/16" major dia.; 3/8" min. dia. and 1/8" Hd. thickness. I picked up 4 of them for $0.95 each. Depending on availability, others might find luck ordering something of similar size and dimension from purveyors like McMaster-Carr or Grainger.
[caption id="attachment_55834796" align="aligncenter" width="660"]
I selected Hillman part number 405784-E as the closest bushing with dimensions 1/4" overall length; 3/16" ID, 9/16" major dia.; 3/8" min. dia. and 1/8" Hd. thickness. I picked up 4 of them for $0.95 each. Depending on availability, others might find luck ordering something of similar size and dimension from purveyors like McMaster-Carr or Grainger.
[caption id="attachment_55834796" align="aligncenter" width="660"]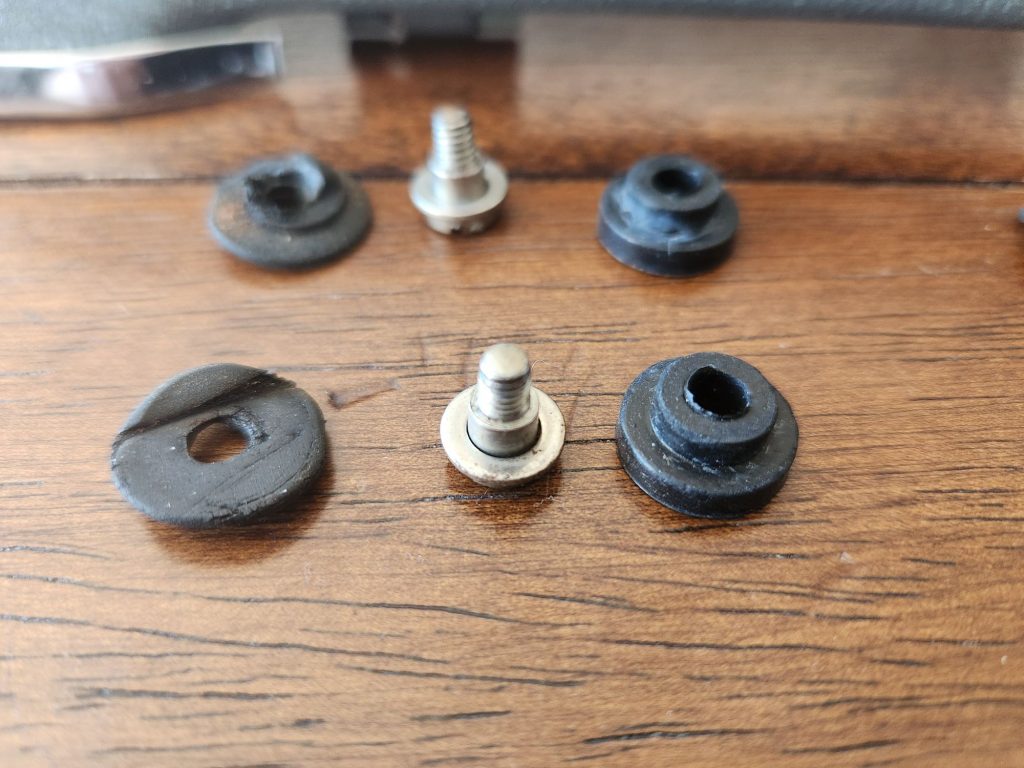 The old (left) and the new (right).[/caption]
Back at home I inserted the smaller end into the hole of the frame and screwed the shoulder bolt and washer back in to hold the frame onto the typewriter chassis. It seemed an excellent fit and this part of the machine should be in good shape for the next few decades.
If this is the only repair you're making to your machine, I suggest you replace each one, one-at-a-time in turn. This will prevent you from needing to take apart more of the machine or removing the entire body shell to get them on and will speed up the replacement process. If you're doing it as a larger restoration, then just install them when you re-attach the body shell. For me, loosely attaching the two rear ones followed by the two at the front and then tightening/adjusting them all seemed to be the easier way to go.
If you're restoring your own SG1, I hope these details make your work and research a bit quicker and easier.
The old (left) and the new (right).[/caption]
Back at home I inserted the smaller end into the hole of the frame and screwed the shoulder bolt and washer back in to hold the frame onto the typewriter chassis. It seemed an excellent fit and this part of the machine should be in good shape for the next few decades.
If this is the only repair you're making to your machine, I suggest you replace each one, one-at-a-time in turn. This will prevent you from needing to take apart more of the machine or removing the entire body shell to get them on and will speed up the replacement process. If you're doing it as a larger restoration, then just install them when you re-attach the body shell. For me, loosely attaching the two rear ones followed by the two at the front and then tightening/adjusting them all seemed to be the easier way to go.
If you're restoring your own SG1, I hope these details make your work and research a bit quicker and easier.